
I. Intro
Availability: This feature is in beta.
Who can perform these steps: Primary administrators or administrators with "Directory Sync" permission.
As an administrator, you can synchronize user data in Microsoft Entra ID to the corresponding organization in Lark.
You can utilize the feature to perform the following tasks:
- Create users: The specified Entra ID users will be provisioned to Lark automatically, and associated with existing Lark users with the same email address.
- Note: We recommend removing the deleted users from Lark before you start synching from Entra ID to avoid possible mismatches.
- Update user attributes: Updates to user profile attributes in Entra ID will be automatically synced to Lark.
- Deactivate users: Deactivated Entra ID users will be synced to Lark with the status of "Inactive".
Notice: The Entra ID user interface and instructions provided in the article are for reference only. The actual steps may vary depending on platforms or updates.
II. Steps
- Configure Lark & Entra ID Sync App
The Lark & Entra ID Sync App is a web application in the Lark Admin Console. It provides configurations for synchronizing data from Entra ID to Lark.
1.1 Enable the configuration to synchronize Entra ID users to Lark
- Open the Lark Admin Console and click Settings > Directory Sync > Add sync source.
- In the sync source panel, select EntraID.
- 250px|700px|reset
- On the Configure access security page, click Copy Token (or Refresh > Copy Token, if not the first time using it) and Copy URL to note them down for the following configuration in Entra ID. Click Next.
- 250px|700px|reset
- On the Set attributes page, configure the following sync rules for workforce type. Click Next.
- Field value of Employee Type in Entra ID: The employee type defined by the organization in Entra ID, such as "Regular", "Consultant", and so on.
- Name of Workforce Type: The workforce type defined by the organization in Lark, such as "regular employee", "consultant", and so on.
- If the employee type in Entra ID is configured as "Regular", it will be mapped to "regular employee" in Lark.
- Note: You can configure 15 sync rules at most.
- 250px|700px|reset
- On the General settings page, complete the following settings. Click Next.
- Member notification: Set whether to send a notification to new Lark members synced from Entra ID.
- Member deletion rule: Set how to respond to the System for Cross-domain Identity Management (SCIM) API requests to delete a user.
- Administrator notification: Set which administrators can receive notifications of sync failures. If the sync fails due to an expired token, the notification will be sent to the administrator with permission to configure Entra ID sync, regardless of this setting.
- Select attributes for identifying existing users: When SCIM creates a user, it will query whether the user exists through the username. This configuration provides an additional option for the Lark & Entra ID Sync App: when the app cannot query the existing user through the username, it will also use other attributes you've specified to determine whether the user exists.
- 250px|700px|reset
- On the Preview page, confirm the configuration. Click Save or Save and Activate.
- Save: Only save the configuration, but not enable this service.
- Save and Activate: Save the configuration and enable this service at the same time.
- Note: If the service is not activated, both connection and synchronization requests from Entra ID will be denied.
1.2 Create an app in Entra ID
- Log in to Entra ID as an administrator and click Microsoft Entra ID in the navigation bar.
- In the left navigation bar, select Manage > Enterprise applications, then click New application.
- 250px|700px|reset
- Click Create your own application. Enter the name of the sync App, then click Create.
- 250px|700px|reset
- On the app overview page, click Get started in the Provision User Accounts tile. On the newly opened page, click Get started again.
- 250px|700px|reset
- Select Automatic for Provisioning Mode, then enter the Admin Credentials, which is the Base URL with an extra suffix and token obtained from the Lark configuration. The suffix is a Microsoft fix.
- Suffix: ?aadOptscim062020
- Example: https://www.xyz.com/admin/sicm/v2?aadOptscim062020.
- See "Enable the configuration to synchronize Entra ID users to Lark" for how to get the Base URL and token.
- Click Test Connection to verify the credentials. Then click Save.
- 250px|700px|reset
- On the Provisioning page, go to Mappings, and click Provision Microsoft Entra ID Groups. Click Delete to the right of the mapping relationship from externalId to objectId, then click Save.
- 250px|700px|reset
- Go back to Mappings and click Provision Microsoft Entra ID Users. Configure the following settings and click Save:
- Remove unnecessary attribute mappings and only leave the attribute mappings listed in the table below.
-
- Click Add New Mapping and enter the following, then click Ok.
- Select Direct for Mapping Type.
- Select employeeType for Source attribute.
- Select userType for Target attribute.
- 250px|700px|reset
- Go back to the Provisioning page, go to Settings and confirm Scope is set as Sync only assigned users and groups. You can also select Prevent accidental deletion and set a deletion threshold for data protection, then click Save.
- On the app overview page, click Assign users and groups in the first tile.
- 250px|700px|reset
- Click Add user/group and go to the Add Assignment page. Click None Selected under Users and groups, select the users or user groups needed for synchronization in the list on the right, then click Select. After completion, click Assign.
- 250px|700px|reset
250px|700px|reset
- Go back to the Provisioning page, and click Start provisioning to initiate the synchronization.
- 250px|700px|reset
1.3 Verify the results
After completing the above steps, Entra ID users will be automatically synced to your Lark organization. You can also see the sync results on the app overview page in Microsoft Azure.
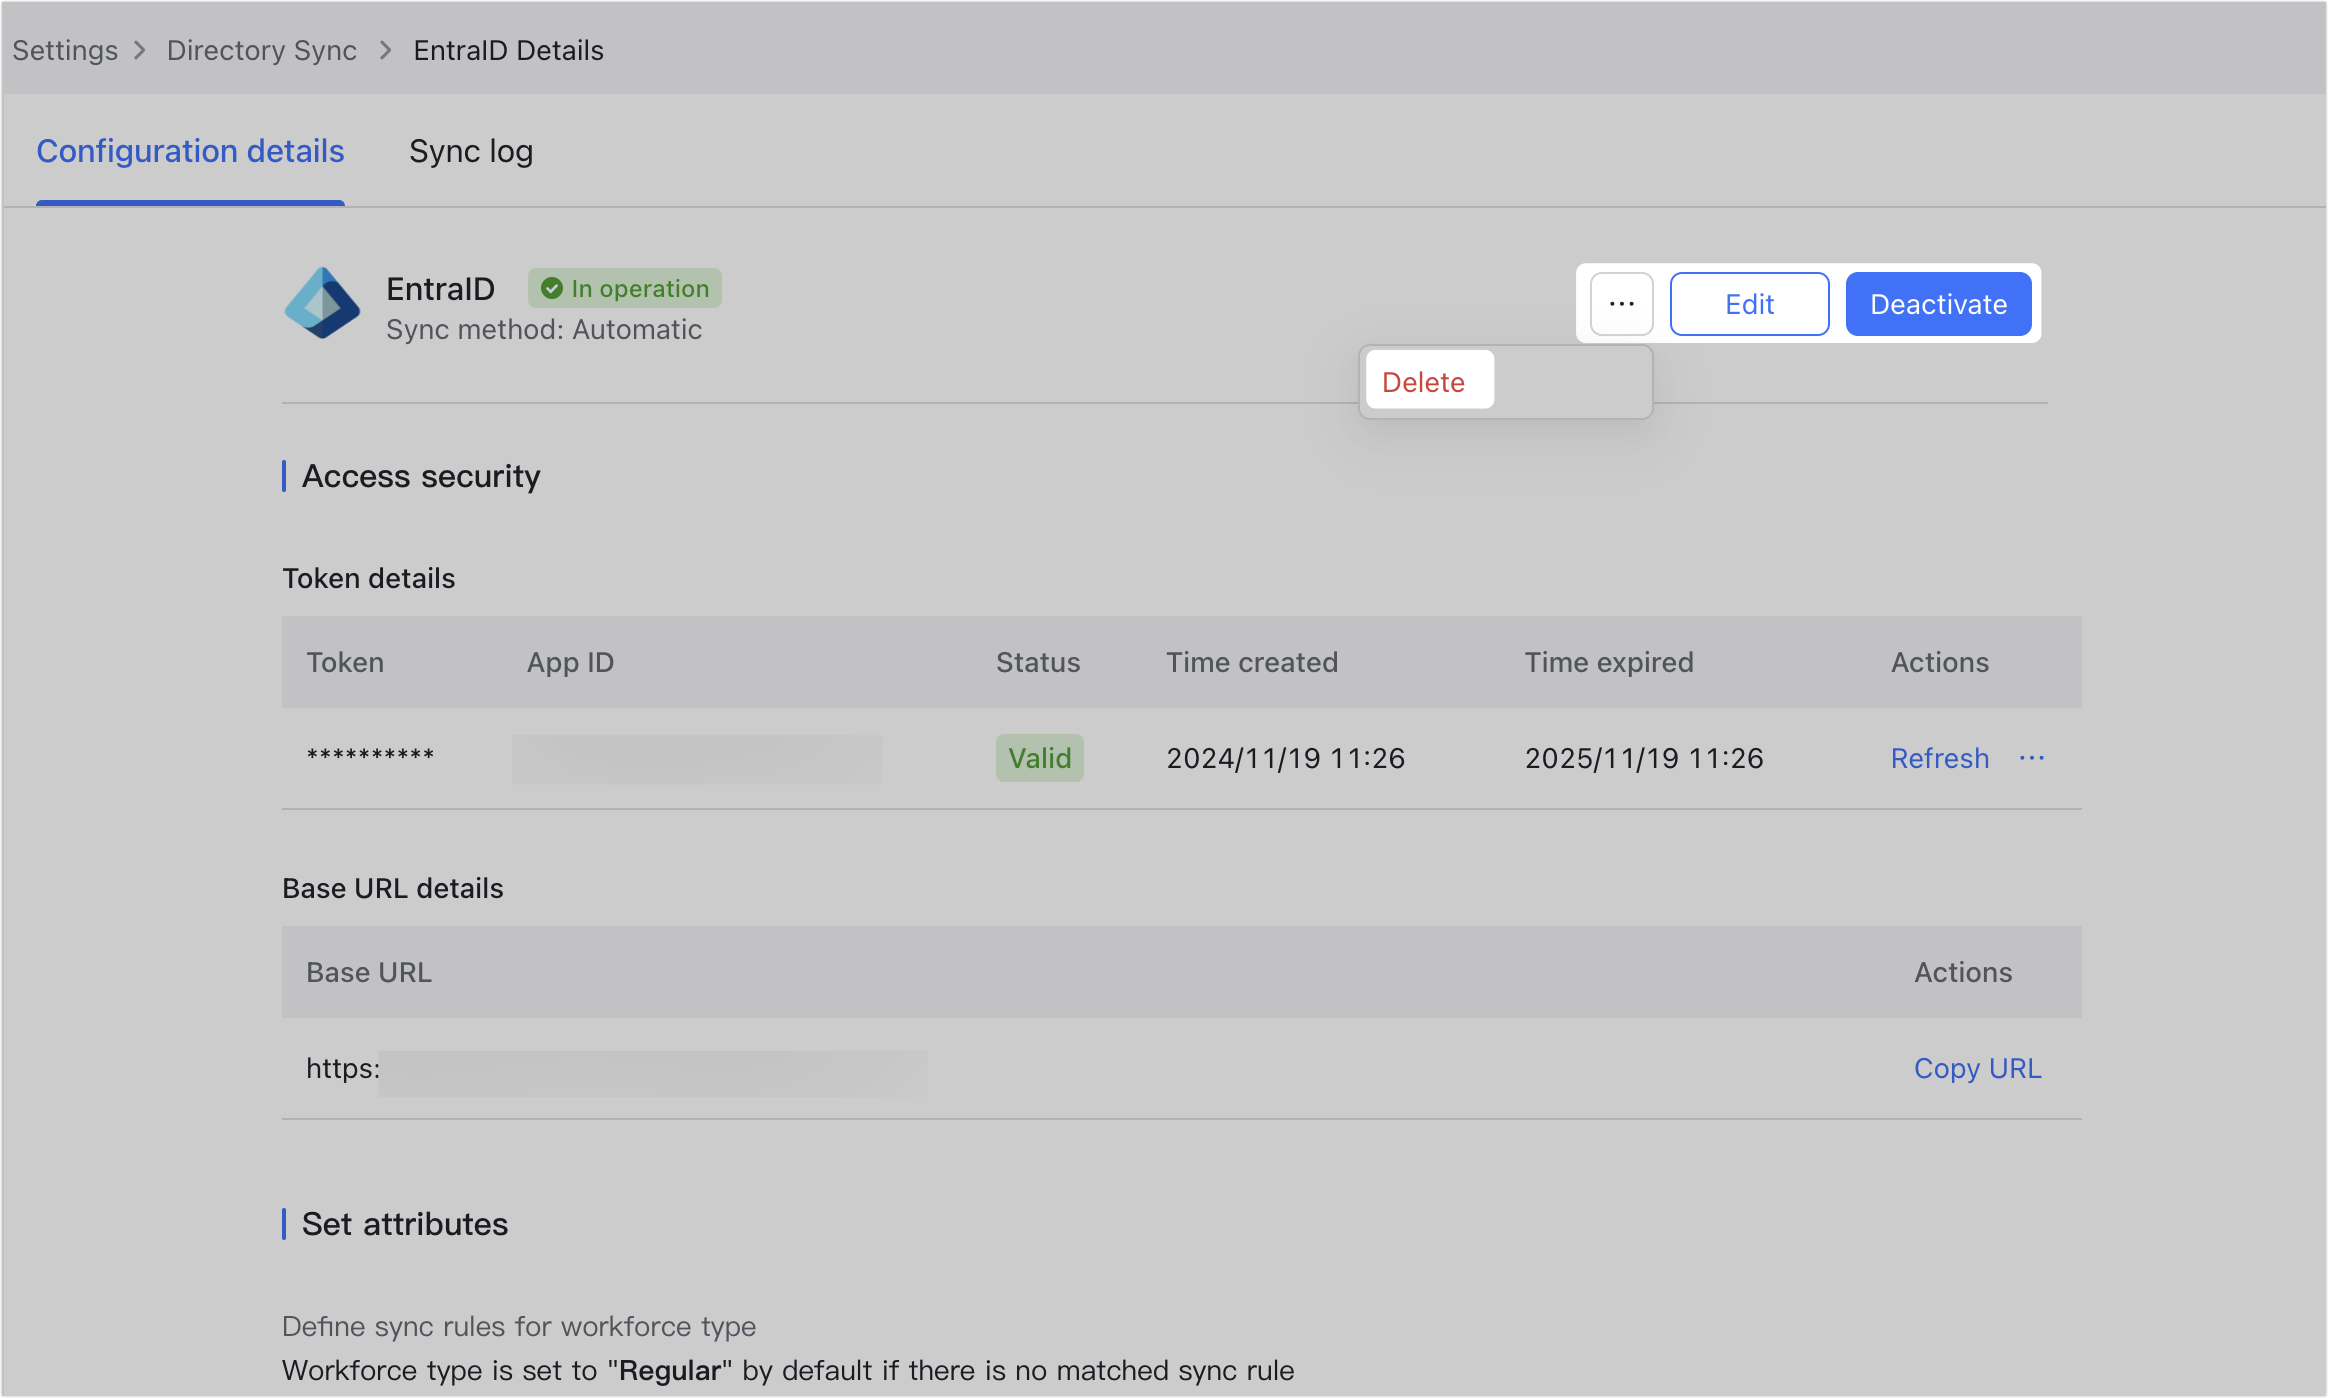
- Manage the Lark & Entra ID Sync App
You can click the Lark & Entra ID Sync App card in the Lark Admin Console to view the detailed settings, and disable, enable, edit, or delete the app.
- Deactivate: Click Deactivate in the sync configuration details, or directly click Deactivate on the app card to disable the app. Once stopped, it will not respond to any sync requests from Entra ID.
- Activate: If the sync app is deactivated, click Activate in the sync configuration details, or directly click Activate on the app card to enable and restore service.
- Edit: Click Edit, and the changes will take effect at the next sync.
- Delete: If you no longer need this app, click the ··· icon > Delete to delete the app.
- Note: The app cannot be recovered once deleted, and all configurations will be lost. Users who have been synced will not be affected.
250px|700px|reset
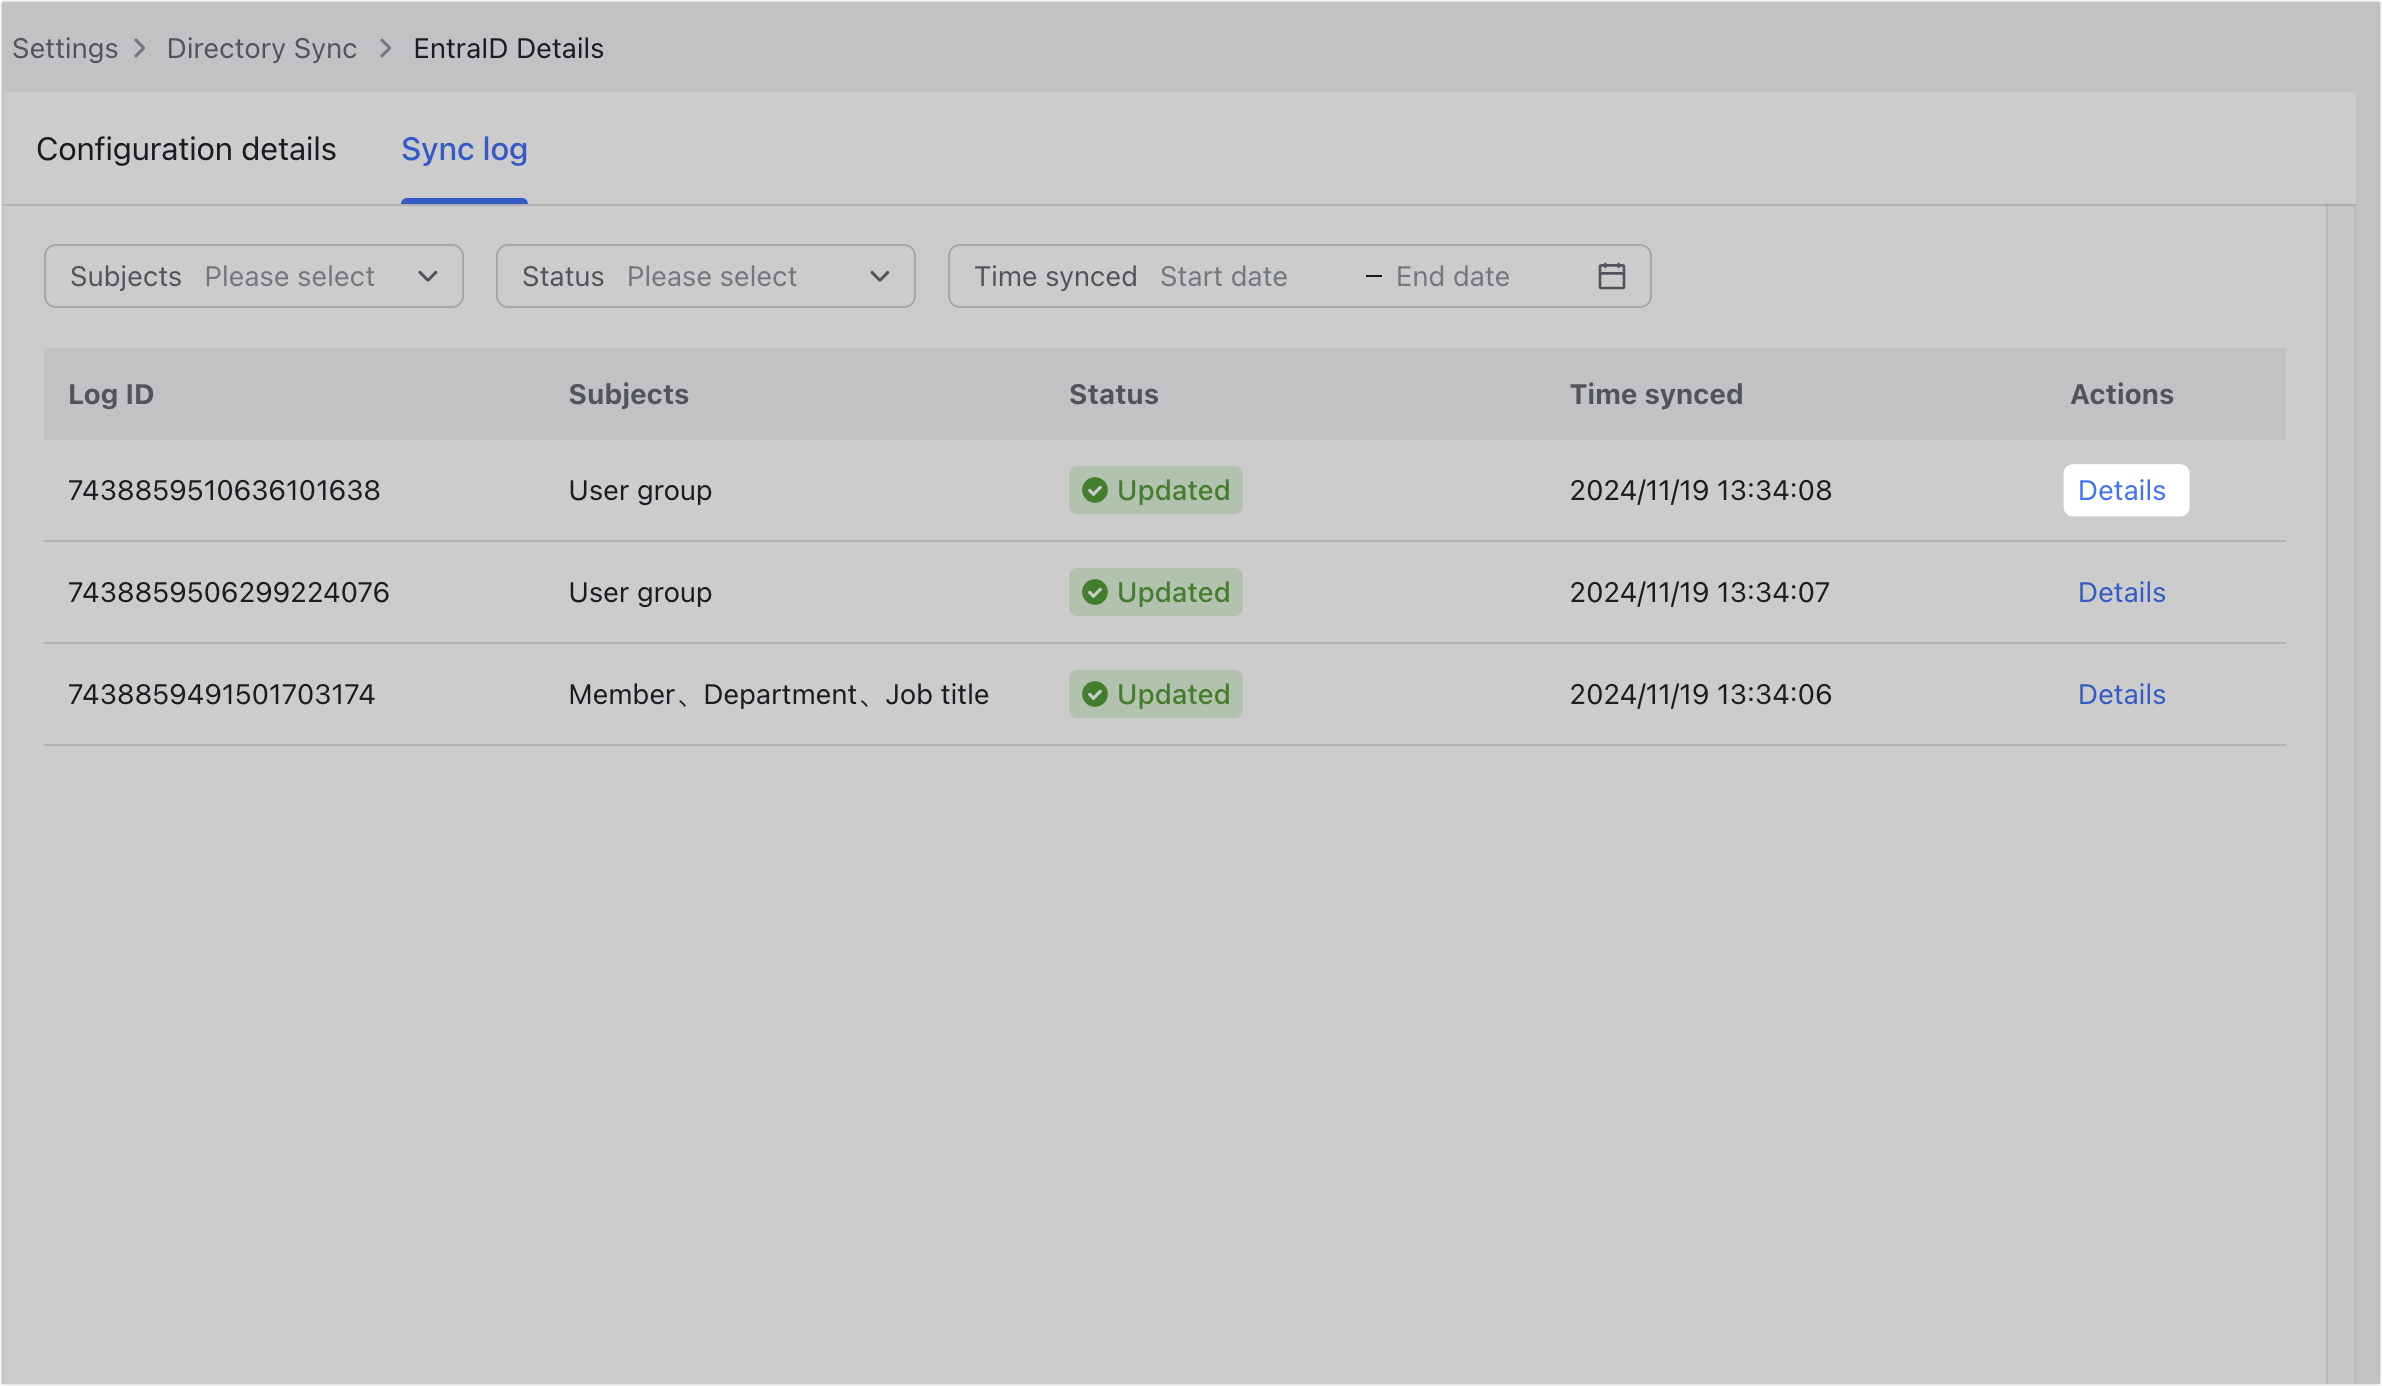
- Manage sync logs
View sync logs
By clicking Sync log on the Lark & Entra ID Sync App card, you can view the sync logs of user creation, modification, and deletion, as well as the associated attributes (such as job title and department). Click Details at the right of the log entry to learn more.

250px|700px|reset
250px|700px|reset
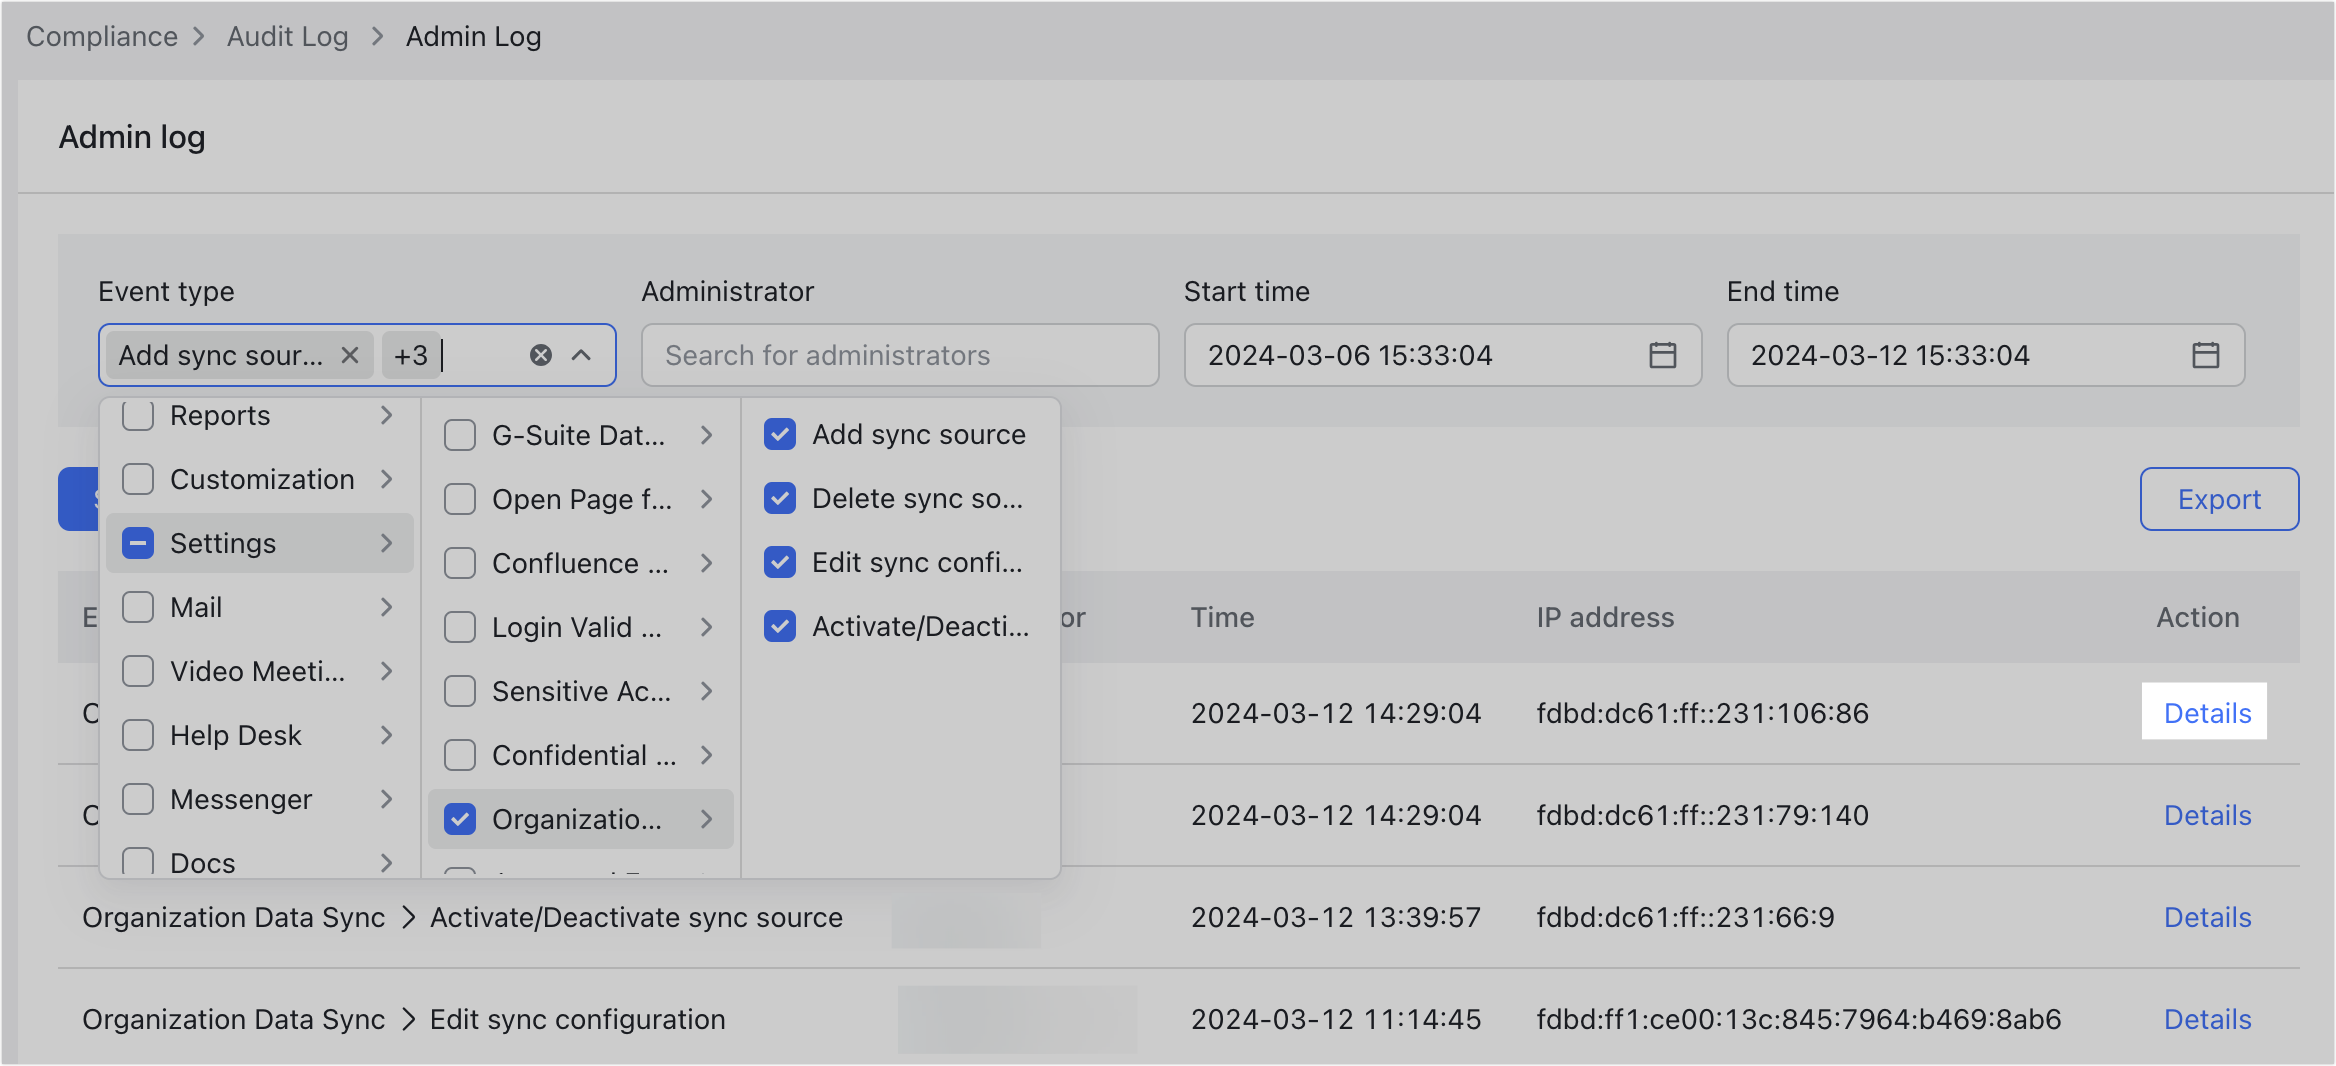
View admin logs
Who can perform these steps: Primary administrators or administrators with "Admin log" permission.
As an administrator, you can view the creation, configuration, and modification details of the Lark & Entra ID App in the admin logs.
- Open the Lark Admin Console and click Compliance > Audit Log > Admin log.
- Set the query filters:
- Event type: select Settings > Organization Data Sync, and choose the following as needed:
- Add sync source
- Delete sync source
- Edit sync configurations
- Activate/Deactivate or Stop Sync Settings
- Administrator
- Start time
- End time
- Click Search to get the log.
- Click Details at the end of the log entry to view the details.
250px|700px|reset
III. FAQs