
Available with these plans:
Starter
Basic
Pro
Enterprise
10 trusted parties
10 trusted parties
To upgrade your Lark Plan or for more information, contact Support or your Customer Success Manager. The Lark Basic plan supports only specific countries and regions.
I. Intro
Who can perform these steps: Primary administrators or administrators with "External Collaborations" permission.
Trusted party refers to the one-to-one relationships with other organizations of trust (an organization can have multiple trusted parties). A trusted-party relationship allows safe and convenient collaboration between two organizations, as members communicate without needing to first add each other as contacts.
Administrators can decide which of the members and departments are shared, as well as the visibility of members' profile fields. Share the article with the primary administrator of the other organization that you'd like to establish a trusted party relationship with to facilitate the process.
250px|700px|reset
II. Steps
This article will explain the process of establishing a trusted-party relationship using the example of Organization A and Organization B.
Organization A shares its trusted-party QR code invitation with Organization B, which will scan the code and submit a request to connect with Organization A.
Establish a trusted-party relationship
Notice:
- Either of the organizations must be on the Lark Pro or Enterprise plan, and haven't run out of the quota of trusted parties. This organization must scan the QR code of the other organization to build a trusted party.
- If both organizations are on either the Starter or Basic plan, they can't build a trusted party with each other.
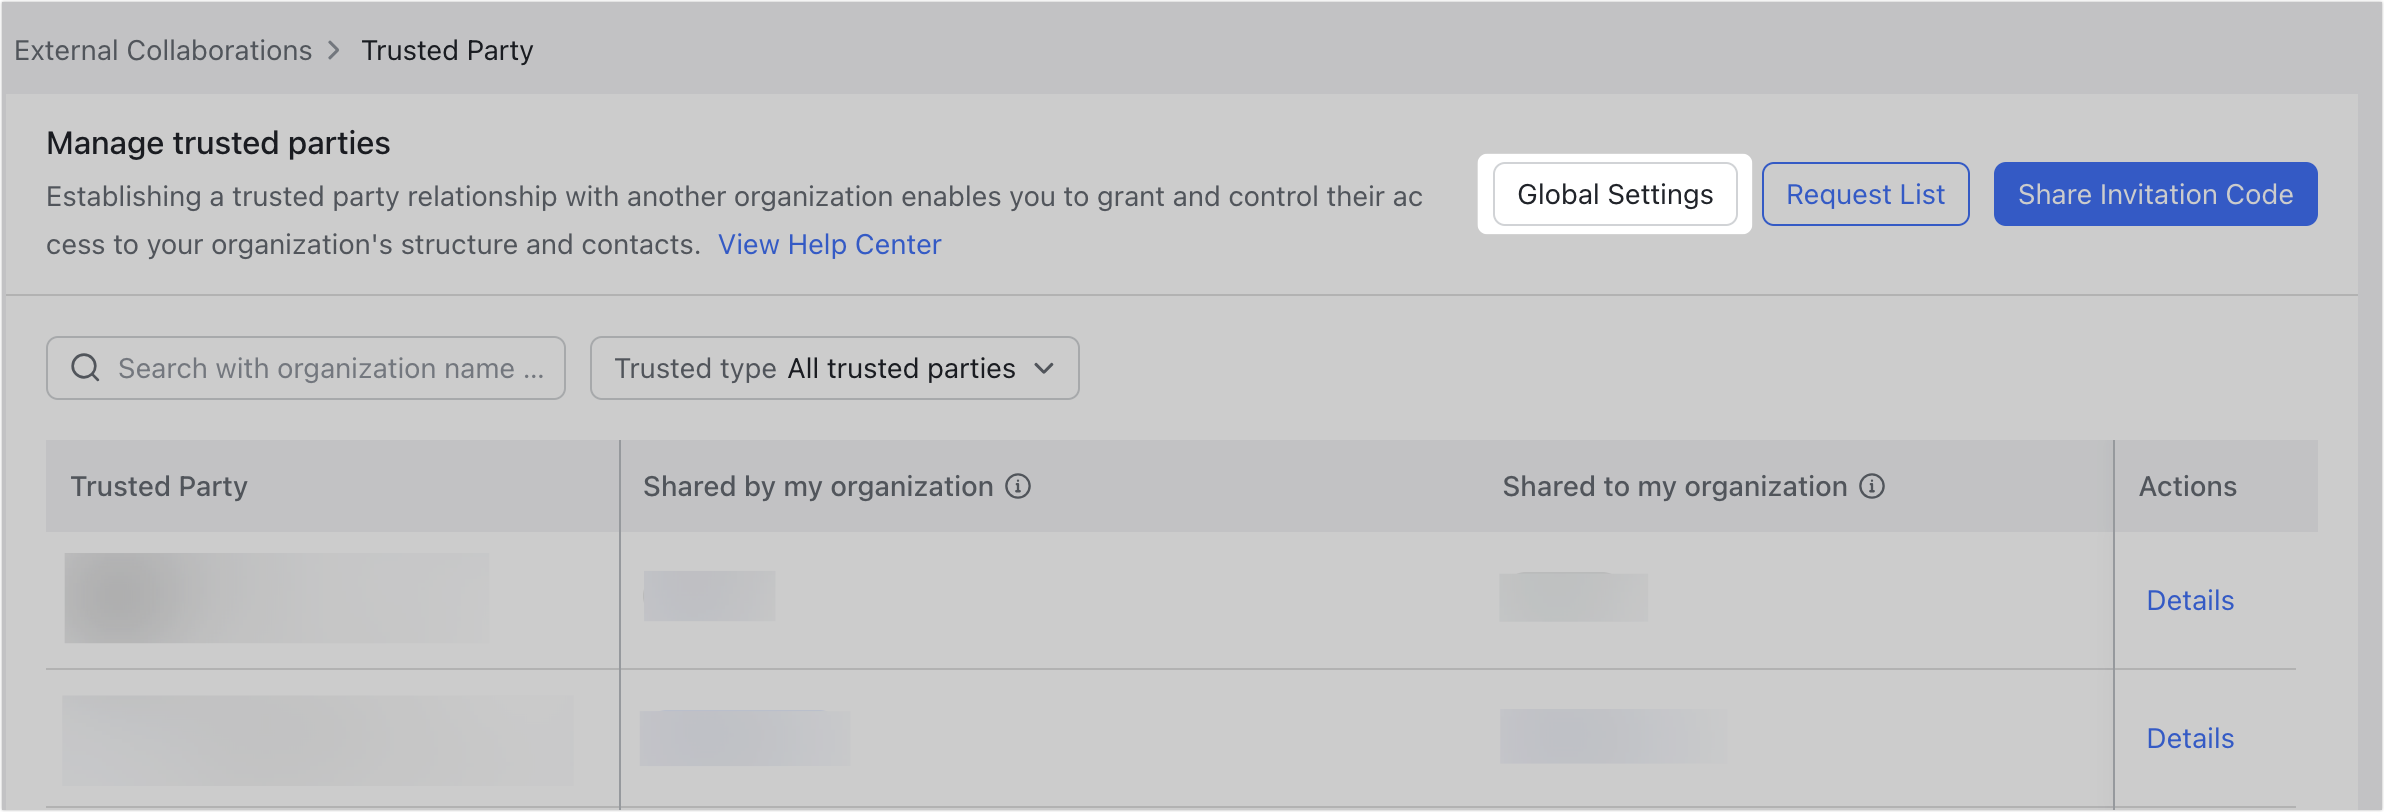
- As a primary administrator of Organization A, go to the Lark Admin Console and click External Collaborations > Trusted Parties.
- Click Share Invitation Code in the upper-right corner to generate a QR code.
- 250px|700px|reset
- Click Save to download the QR code. Share it with a primary administrator at Organization B. You can click Reset to make all previously generated QR codes invalid and generate a new one.
250px|700px|reset
- Ask the primary administrator of Organization B to scan the QR code with the Feishu Lark app and submit the request following the steps below:
- Tap Share departments or members and select the departments and members to be shared. Or skip both steps to submit the request directly and set the sharing scope in the Lark Admin Console later.
- Set the visibility level of shared members and departments:
- Members from trust party can view my organizational structure: Members of Organization A can search for and view shared departments and members of Organization B in Contacts.
- Members from trust party can only search members I shared: Members of Organization A can only search for shared departments and members of Organization B, but not see them in Contacts.
- Tap Submit Request.
- Do either of the following to approve the request:
- Click Review on the notification card to open the Request List in the Lark Admin Console.
- 250px|700px|reset
- Open the Lark Admin Console and click External Collaboration > Trusted Party > Request List.
- 250px|700px|reset
- Click Approve next to the request, then click Accept to confirm your decision.
- 250px|700px|reset
Note: Every day at 10:00 AM, the system will automatically check whether there are any unprocessed trusted-party requests. If there are, the Admin Assistant will send a notification to the primary administrators.
Set the sharing scope
Once the trusted-party relationship is built, the administrators of both organizations can specify which members and departments to share with each other.
- Open the Lark Admin Console and click External Collaborations > Trusted Parties > Details.
- Note: The priority of custom settings is higher than default settings.
- 250px|700px|reset
- In the Trusted party details pane, click the Edit members shared by this organization icon next to Sharing scope of my organization to set members that you want to share with Organization B.
- You can select all members or departments and members.
- 250px|700px|reset
- To set the permission of shared members from the other organization, click Edit on the Permissions tab under the Permission granted from us to the other organization section.
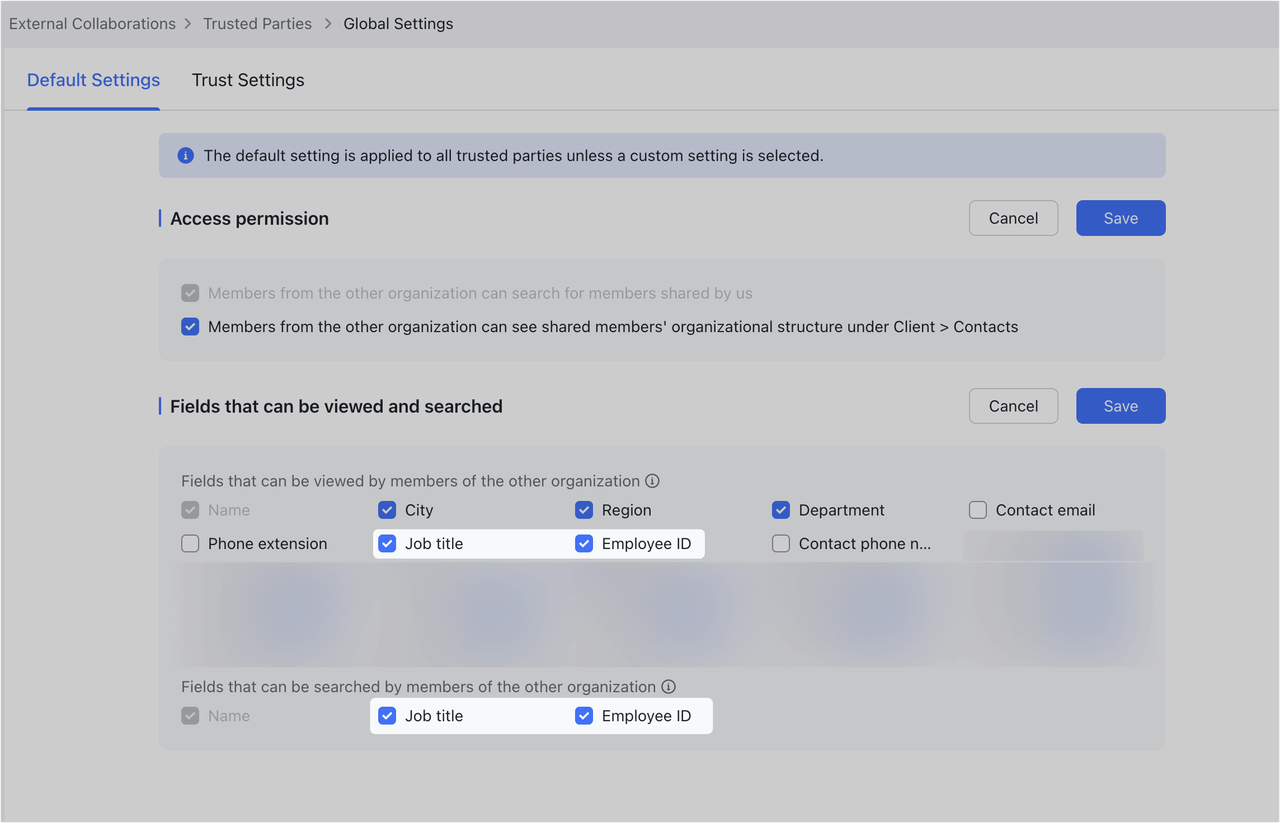
- Access permission: By default, the trusted organization can find the members of your organization by searching, and see the organization structure of those members in Contacts. You can hide the organization structure by clicking Edit > Custom and deselect the second check box.
- Fields that can be viewed and searched: Click Edit > Custom and set the following as needed.
- Visibility scope of member profile: Select which fields of your organization's members' profiles will be visible to the members of the other organization.
- Field filters: Set which profile fields will be searchable by members of the other organization.
- You can also view the scope of permissions granted by the other organization under the Permission granted from the other organization to us section.
- 250px|700px|reset
- Go to the Collaboration Rules tab, click Add Rule > the Edit icon to select or search members within the shared scope of both parties, and click Save.
- The rule determines which members of your organization can view and search for the shared members of the other organization.
- Note: If no rules are set, members of your organization won't be able to view or search for any shared members of the other organization.
- 250px|700px|reset
- If your organization has multiple rules, you can also search for collaboration rules by member, department, or user group in the search bar to find your target quickly.
- 250px|700px|reset
Use case of sharing scope: One-way visibility and partial access
You can set a one-way visibility rule or a partial access rule to configure the visibility of your members.
The following description again uses the example of Organization A (your organization) and Organization B (the other organization).
One-way visibility
As the administrator of Organization A, you can allow your members to view members of Organization B, but prevent members of Organization B from viewing your members. In this scenario:
250px|700px|reset
- Private chats between the two organizations' members can only be started by your members; the member of Organization B can't initiate a conversation.
- Once a private chat already exists before the visibility changes, members from both organizations can still send messages.
- If the organizations are no longer trusted parties, members of both organizations can continue to send messages in existing private chats, if they have added each other as contacts.
- If the organizations are no longer trusted parties, and the members have not added each other as contacts, they may be able to find each other using phone numbers, although this will depend on the privacy settings on each side.
- If a member blocks another member, the blocked member will not be able to send a private message to the other.
Partial access
You can allow only some of your members to view members of Organization B. In this scenario, the chosen members (a-1) can start chats with Organization B members without adding them as contacts. Other members (a-2) will need to add them as contacts before sending a message.
250px|700px|reset
Global settings for trusted parties
In External Collaborations > Trusted Parties > Global Settings, you can end trusted-party relationships and change visibility.
250px|700px|reset
You can set the following options in the Default Settings tab:
- Click Edit next to Access permission > Custom to set whether to allow the shared members of the other organization to check your organizational structure in their Contacts.
- Click Edit next to Fields that can be viewed and searched > Custom to set the visible fields and searchable fields of member profiles. By default, only Name is visible and searchable.
- Fields that can be viewed by members of the other organization: You can select both default fields, such as city, department, job title, and email or custom fields.
- Fields that can be searched by members of the other organization: Set which profile fields will be searchable by members of the other organization.
- Note: By default, only the Name field is searchable by members of the other organization.
- Note: Only if you select the field in both visible and searchable fields, the shared members of the other organization can search for your shared members through that field.
- 250px|700px|reset
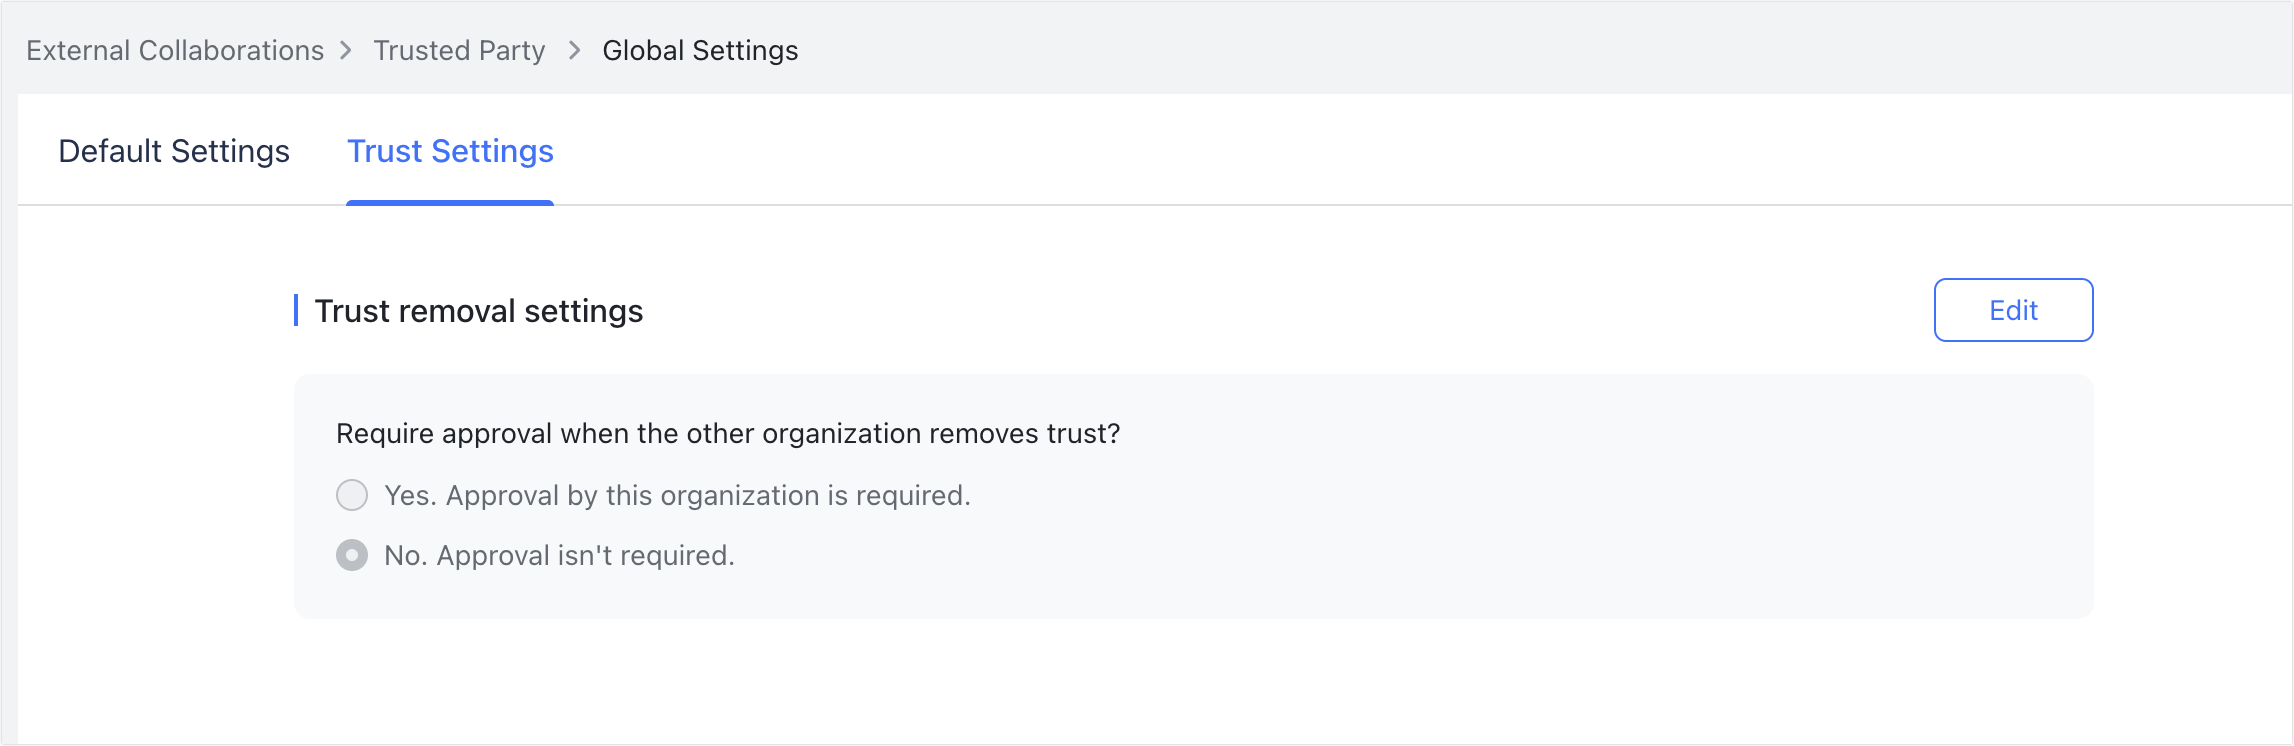
 You can set whether it requires approval to remove the trust relationship in the Trust Settings. If required, the other organization needs to wait for the approval of the administrator of your organization before it can end the trust relationship.
250px|700px|reset
Remove a trusted party
- Open the Lark Admin Console and click External Collaborations > Trusted Parties.
- Find the trusted party you wish to remove. Click Details > the ··· More icon in the upper-right corner > Remove Trust.
- 250px|700px|reset
- In the pop-up window, click Remove.
- The trusted-party relationship will be severed immediately if the other organization doesn't require approval for the removal of trust.
- If they do require approval, then the relationship will only end after one of the trusted party's primary administrators has approved your action.
Administrators on both sides will receive a notification about the removal from Admin Assistant.
Once removed, members of both organizations:
- Won't be able to find one another if there's no existing private chat.
- Will have to add the other as external contacts to continue with the existing chat.
III. FAQs