
I. Intro
Availability: Some of the features described in this article are in beta.
Who can perform these steps: Primary administrators or administrators with Meeting Rooms permissions.
As an administrator, you can flexibly create different meeting room layers, add meeting rooms, and choose meeting room features in the Lark Admin Console based on their business needs. If a meeting room is no longer required, administrators also have the option to delete it.
II. Steps
- Set meeting room layers
Before meeting rooms may be added, you must first create a meeting room layer. You or other administrators can also modify or delete the layer later if needed.
The meeting rooms will be arranged in a series of layers and sub-layers. The first layer will automatically be defined as the organization's name. Then that "level 1" layer contains one or more sub-layers, which can in turn have sub-layers of their own. It's recommended to make each sub-layer more specific than the one which precedes it, like by location or by team hierarchy. For example:
- By location: ABC company > Vancouver > Building 6 > Floor 5 > Room 8
- By team hierarchy: ABC company > Product Z > Engineering > R&D > Room 8
Individual meeting rooms can be added to sub-layers at "level 5" or beyond. You can either add meeting rooms one-by-one, or batch import several at once.
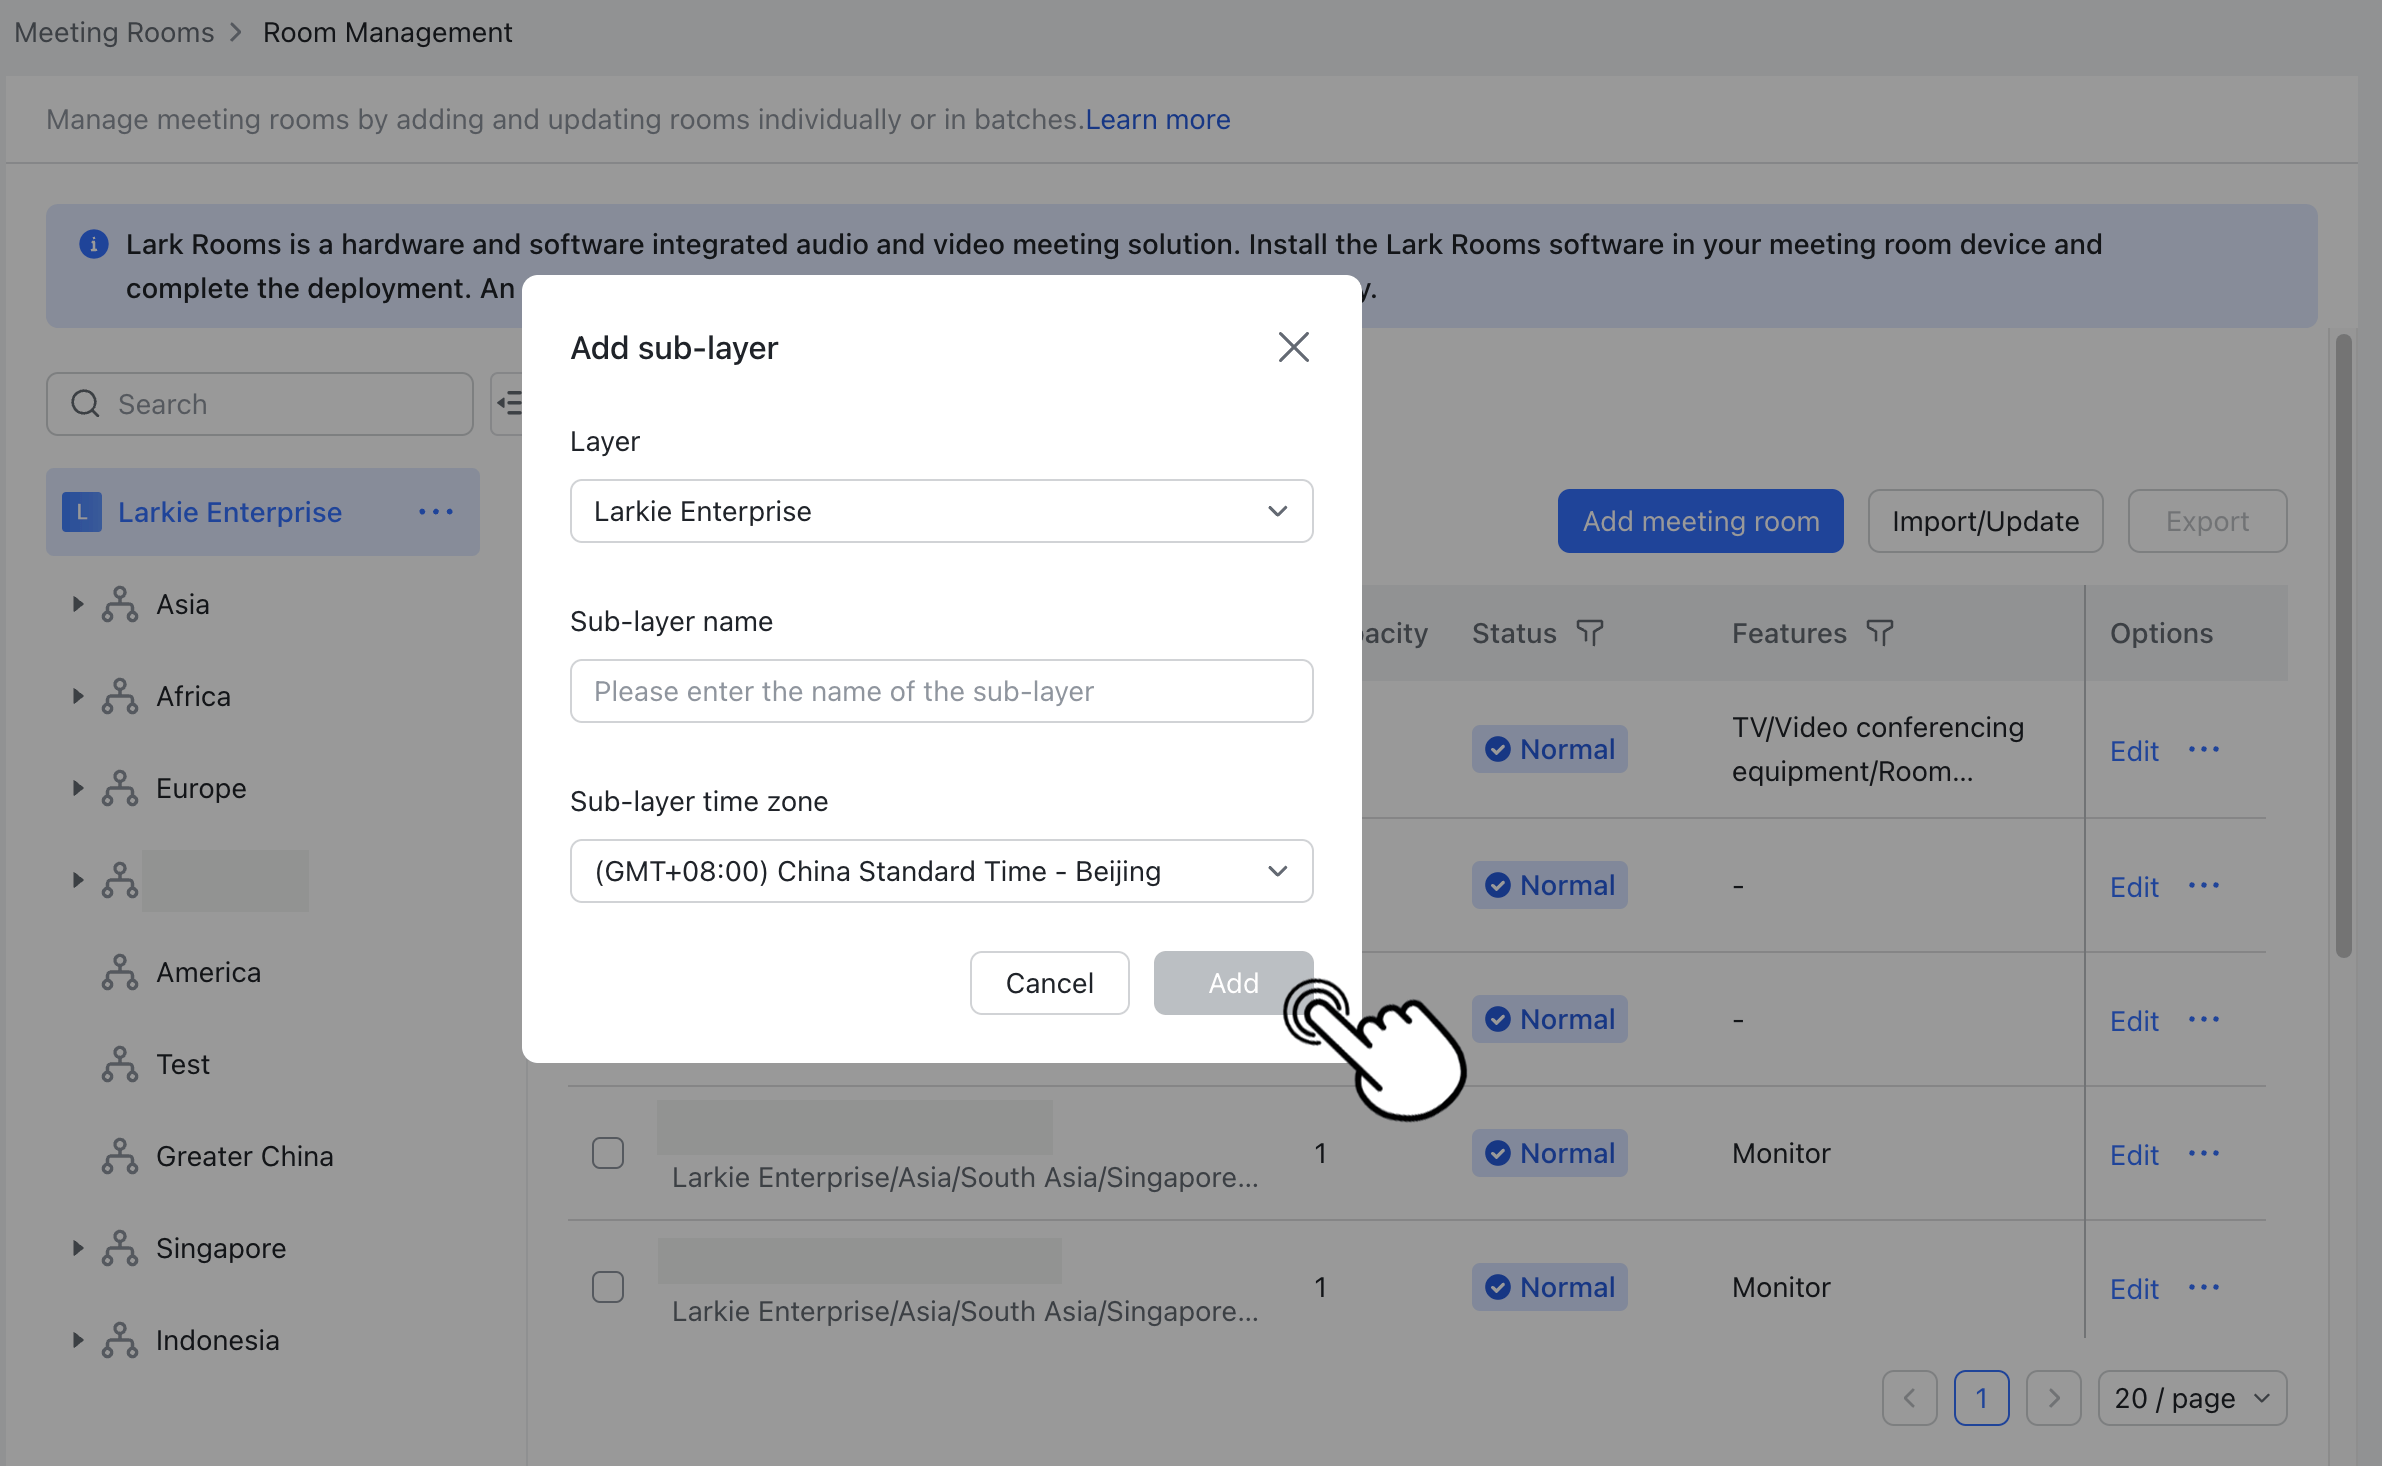
1.1 Add a sub-layer
- Enter the Lark Admin Console > Meeting Rooms > Room Management page.
- Click the icon at the right of the desired layer and select Add sub-layer.
- 250px|700px|reset
- In the pop-up window, name the new layer.
- You can also reselect the parent layer from the Layer dropdown list.
- Note: Sub-layers under the same layer cannot have duplicated names.
- Select the Sub-layer time zone and click Add to create the sub-layer.
You can create multiple sub-layers and up to 10 layers depending on the business needs of your organization.
250px|700px|reset
1.2 Edit a sub-layer
You must have the administrator permission of the parent layer to edit its sub-layers. The layers and meeting rooms that you don't have the permission for are grayed out in the layer list.
- Hover over the sub-layer name, click the icon, and choose Edit layer.
- 250px|700px|reset
- In the pop-up window, modify the layer name or time zone.
- Click Save to apply your changes.
- 250px|700px|reset
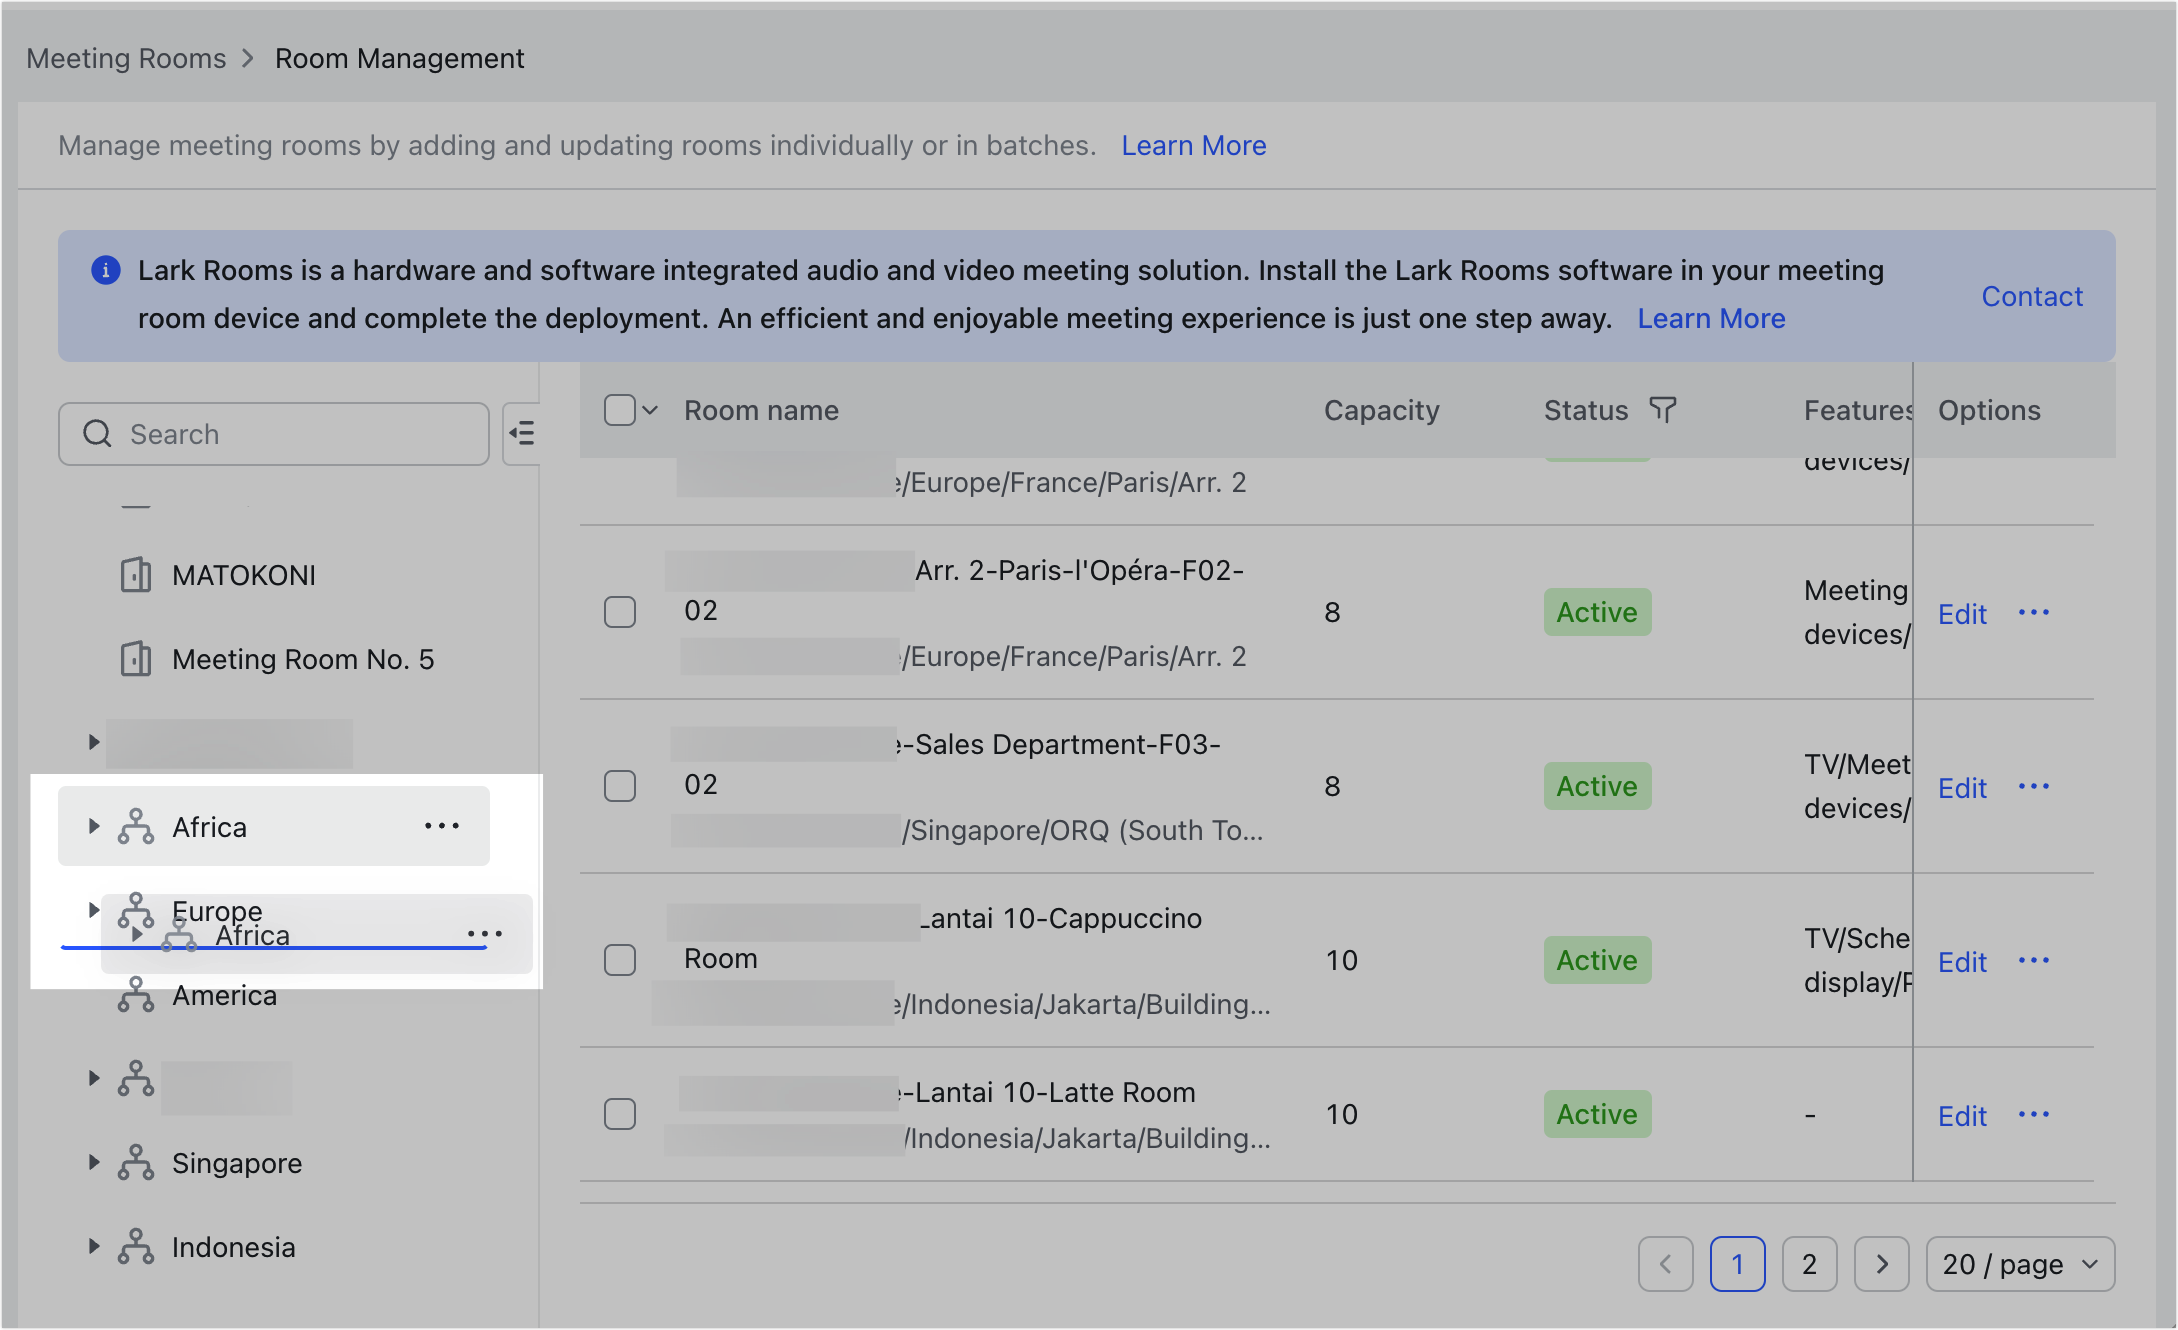
You can also drag and drop layers or meeting rooms under a layer that you have permission for to rearrange their order. When you adjust the order of a layer, all of its corresponding sub-layers will be moved along.
Note: Sub-layers and meeting rooms cannot be dragged from one parent layer to another.
250px|700px|reset
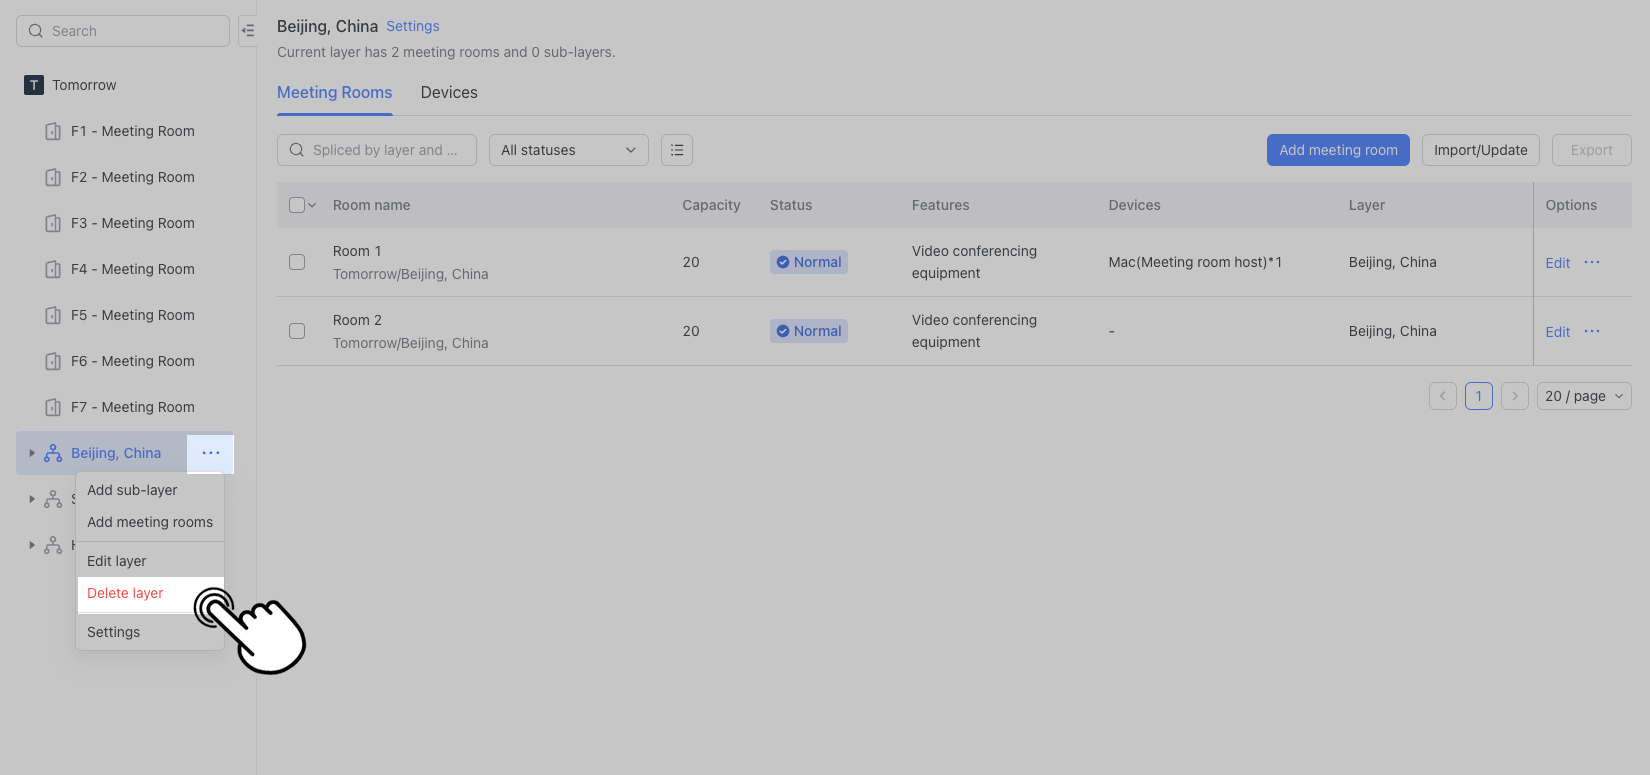
1.3 Delete a sub-layer
- Click the icon to the right of the corresponding layer.
- Select Delete layer.
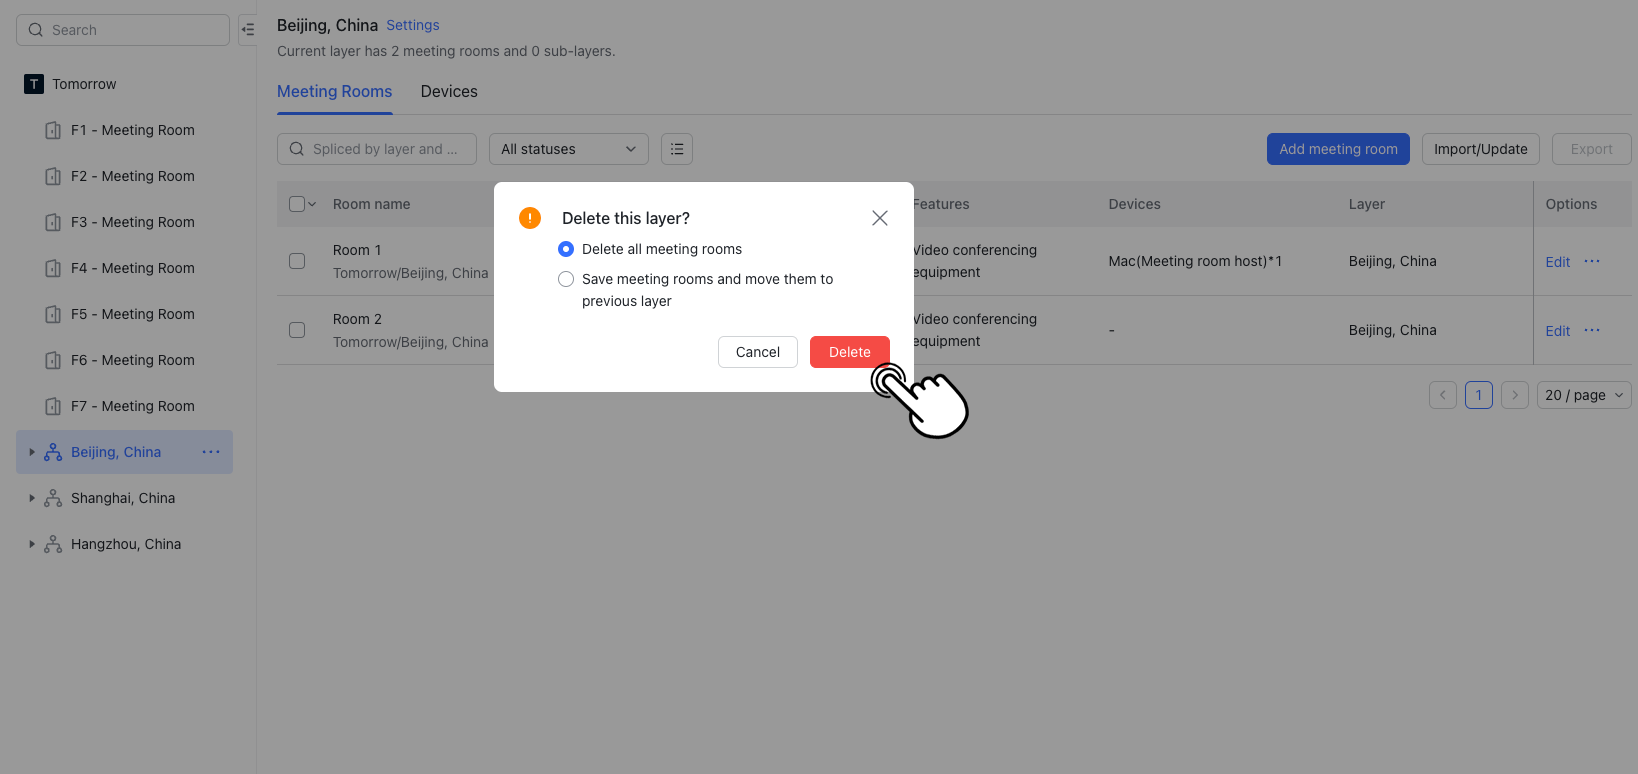
- In the pop-up window choose whether you'd like to Delete all meeting rooms or Save meeting rooms and move them to previous layer.
250px|700px|reset
250px|700px|reset
- Delete all meeting rooms: This will delete the layer and all meeting rooms associated with it. In the pop-up confirmation window, you can choose to Send notifications to users who reserved the meeting room and Add contact.
- 250px|700px|reset
- Save meeting rooms and move them to previous layer: This will delete the selected layer and automatically move all associated meeting rooms to the next layer up. If the parent layer contains a meeting room with the same name as one in the deleted layer, an error message will appear and the deletion will not take place.
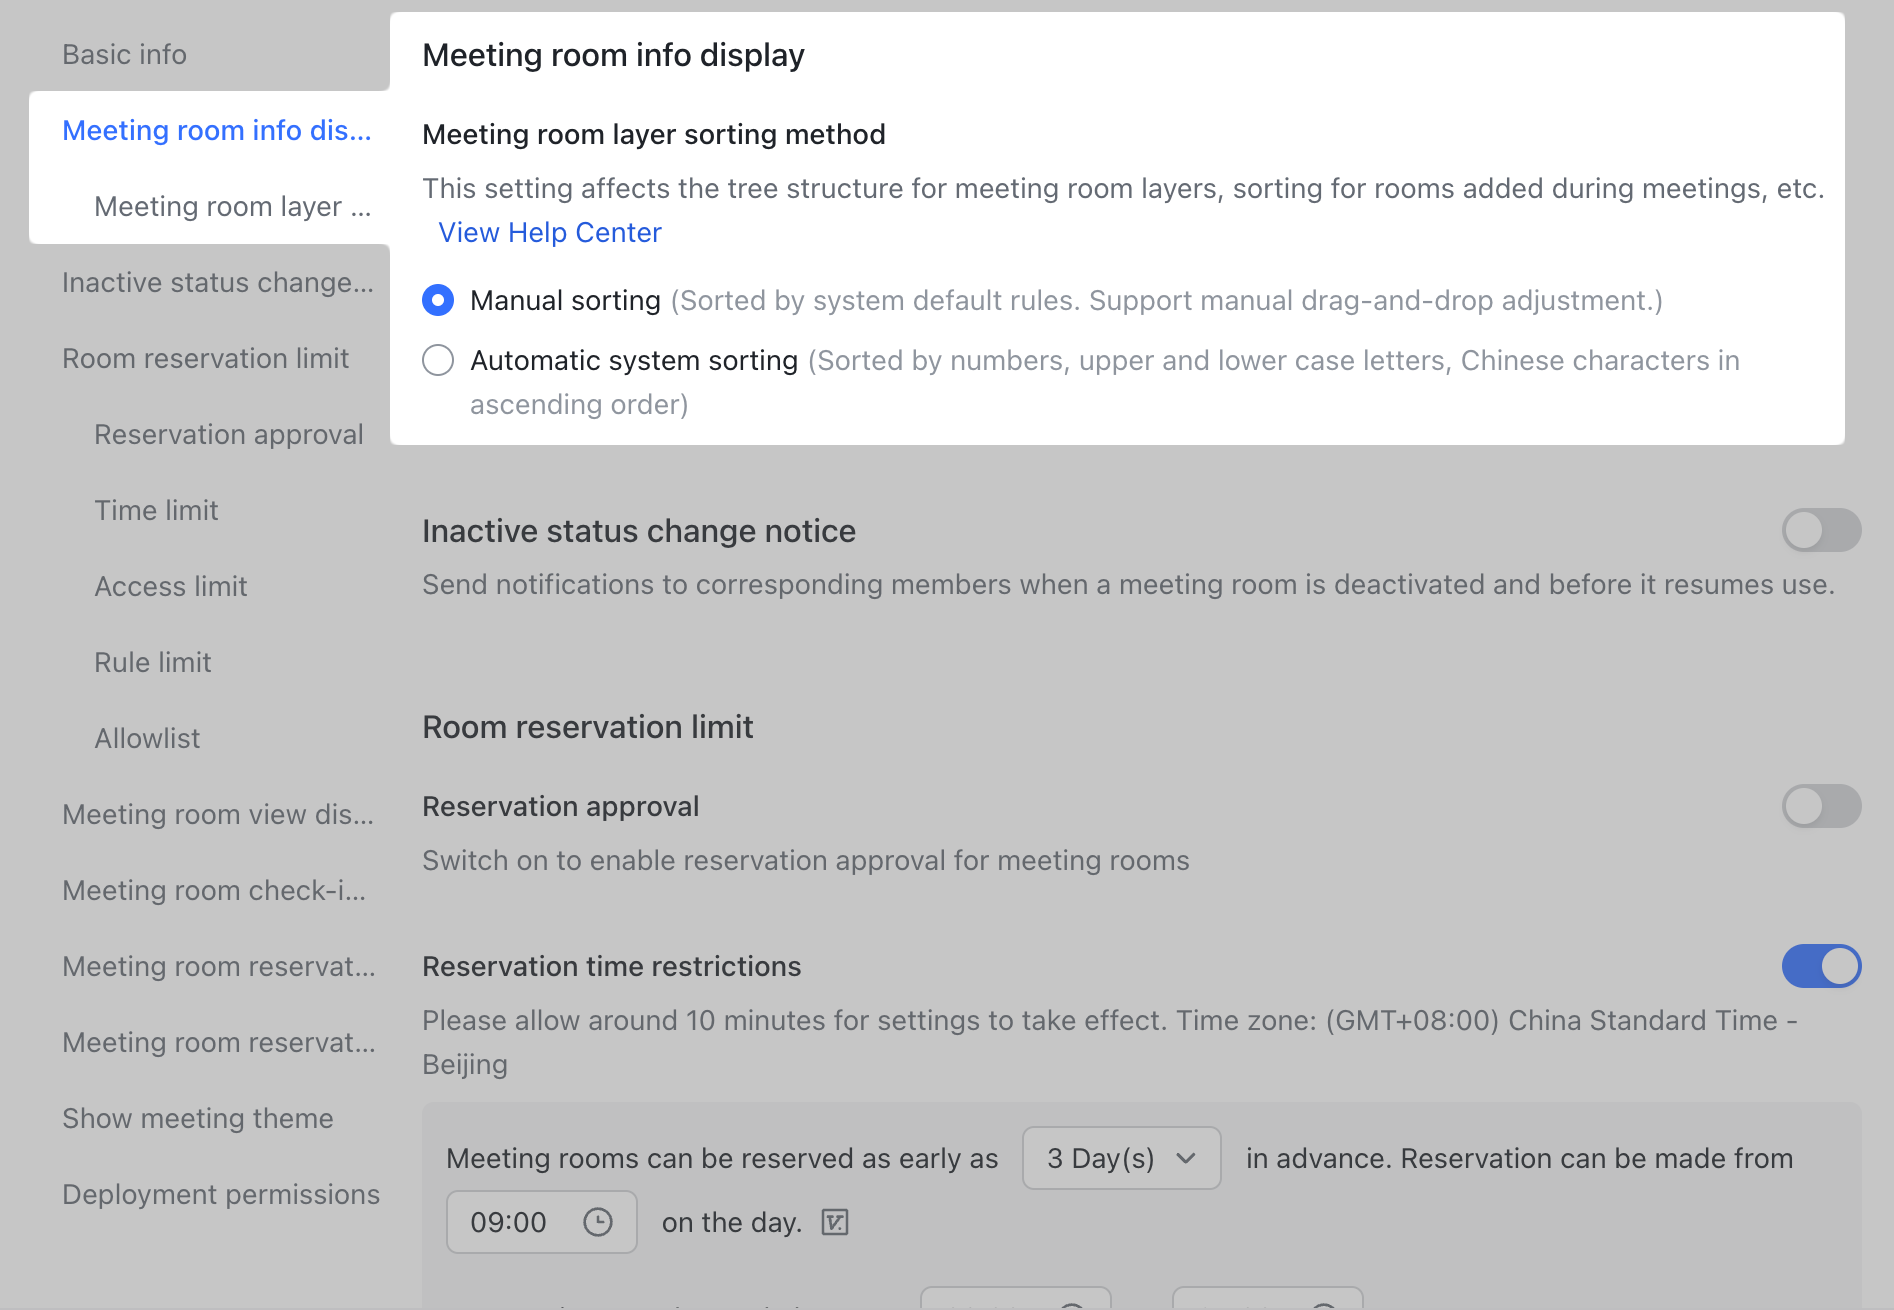
1.4 Set layer's sorting method
You can switch the sorting method of meeting room layers to make the arrangement more clear and in order.
- Select the first layer, which is the organization name, click the icon > Settings.
- Click Basic info > Meeting room info display > Meeting room layer sorting method, then select either Manual sorting or Automatic system sorting.
- Manual sorting: The meeting room layers will be sorted based on their time of creation, and administrators can manually drag and adjust their position.
- Automatic system sorting: The meeting room layers will be sorted in an ascending and case-sensitive order.
- Notice:
- Automatic system sorting will disallow adjusting the order of the layers manually.
- Switching between sorting methods takes some time. During this period, administrators will not be able to add, edit, or delete meeting rooms. It is recommended to wait for 5 minutes before proceeding with these operations.
250px|700px|reset
- Set up meeting rooms
2.1 Add meeting rooms
Once a meeting room layer has been created, administrators can add meeting room or batch import existing meeting rooms from the fifth sub-layer.
Create an individual meeting room
If you don't need to add a lot of meeting rooms, you can create them individually.
Notice:
- You can only add meeting rooms at the fifth level or onward.
- Adding meeting rooms at any level is in beta and only available to some users.
- Click the icon to the right of the room list and select Add meeting rooms, or simply click Add meeting room near the top of the meeting room information page.
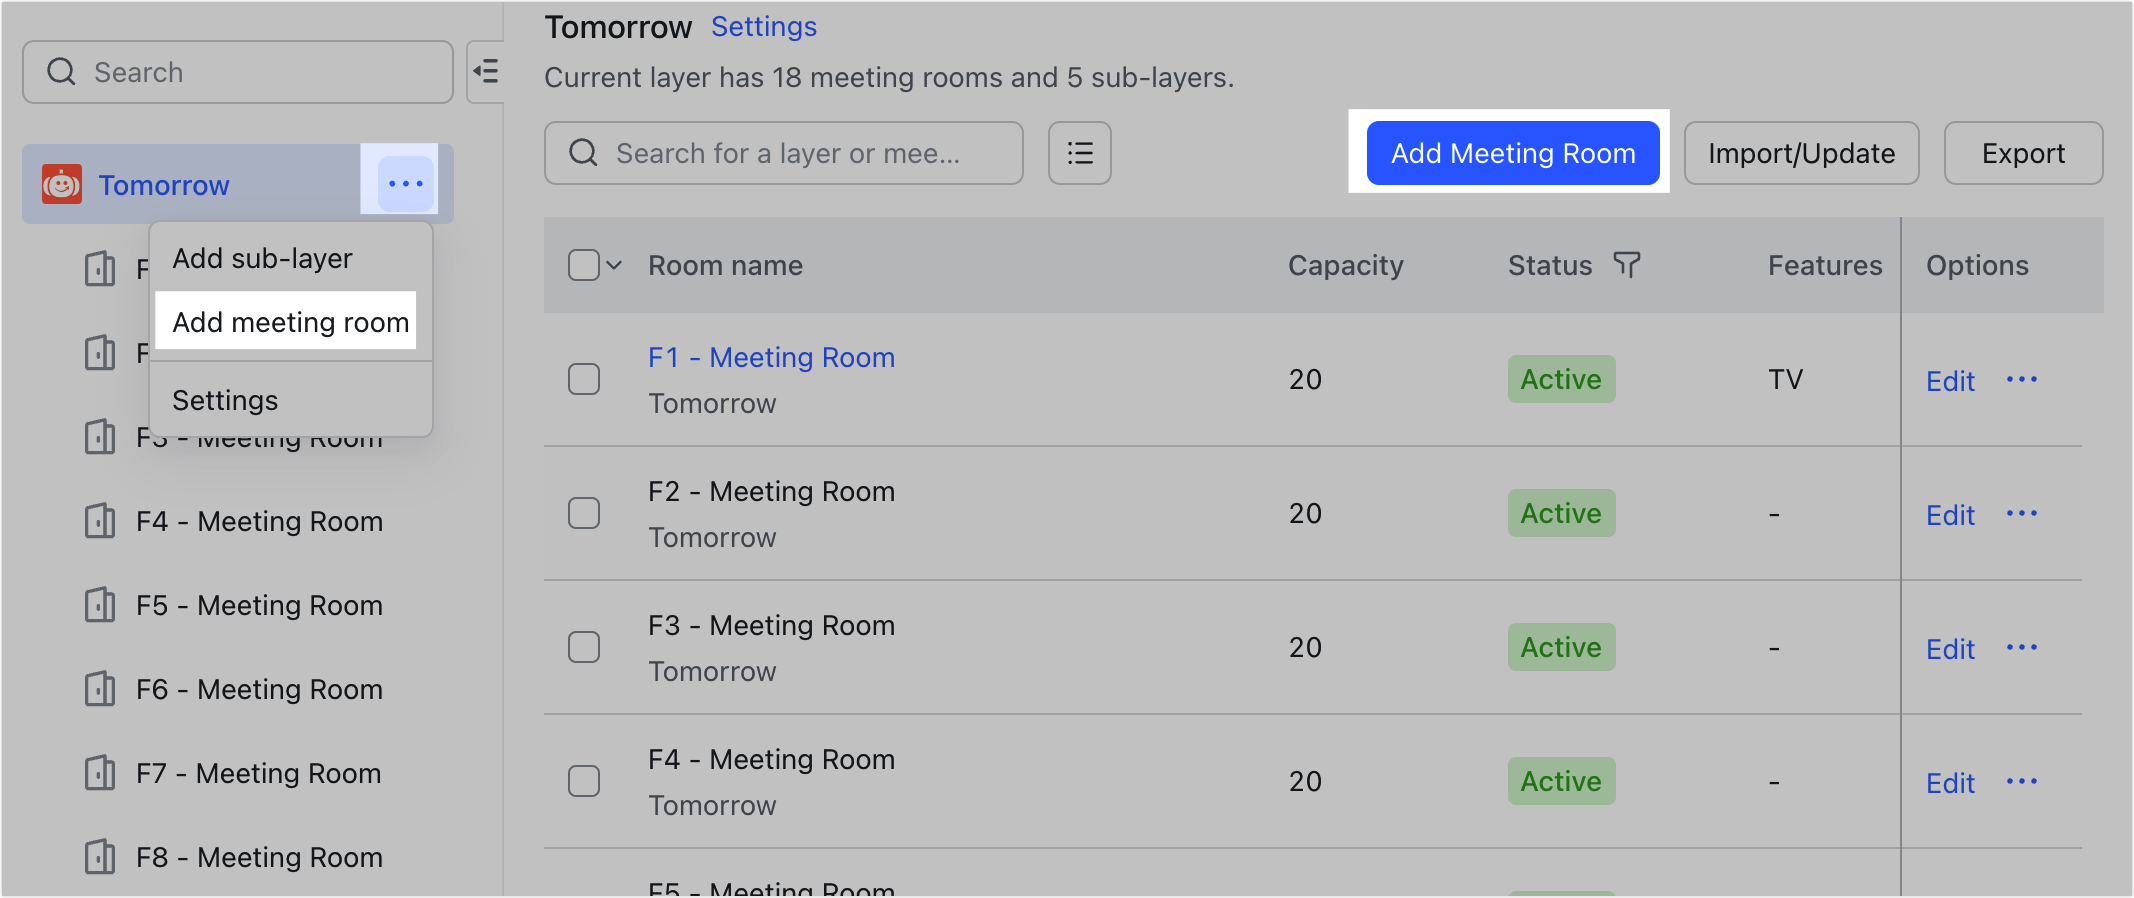
250px|700px|reset
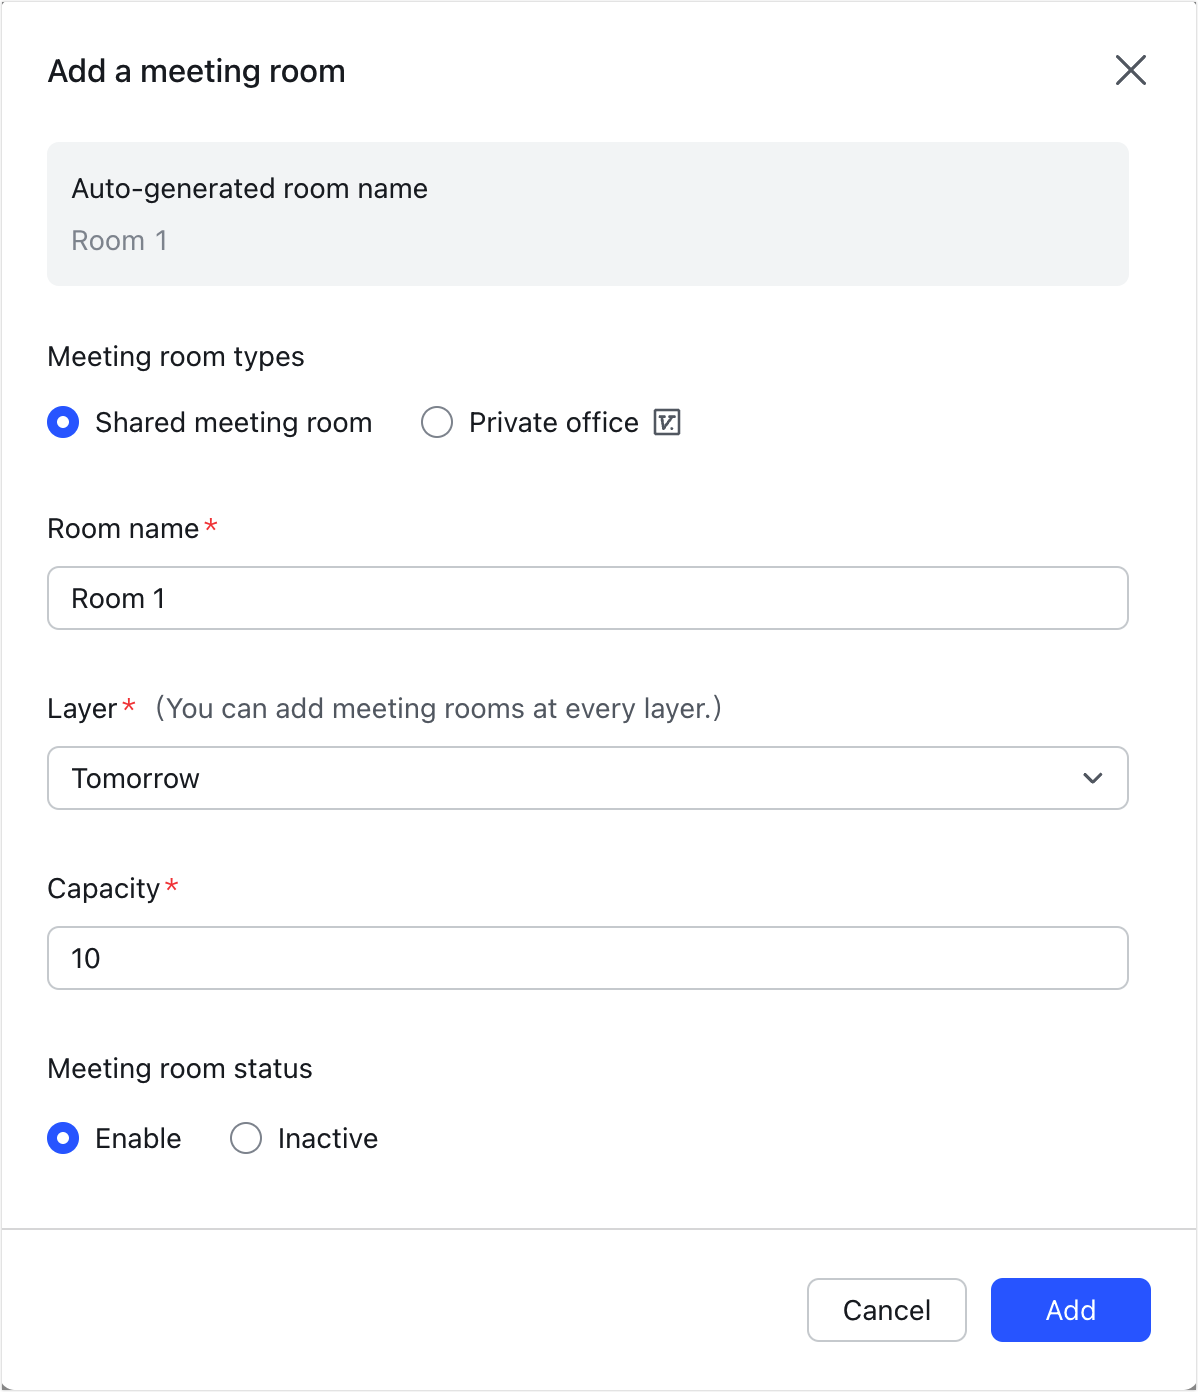
- In the pop-up window, enter the room name, capacity, the layer it belongs to, its status, and features.
- Click Add in the lower-right corner to create the meeting room.
250px|700px|reset
Batch import meeting rooms
If you need to add a lot of meeting rooms, you can batch import them into the system.
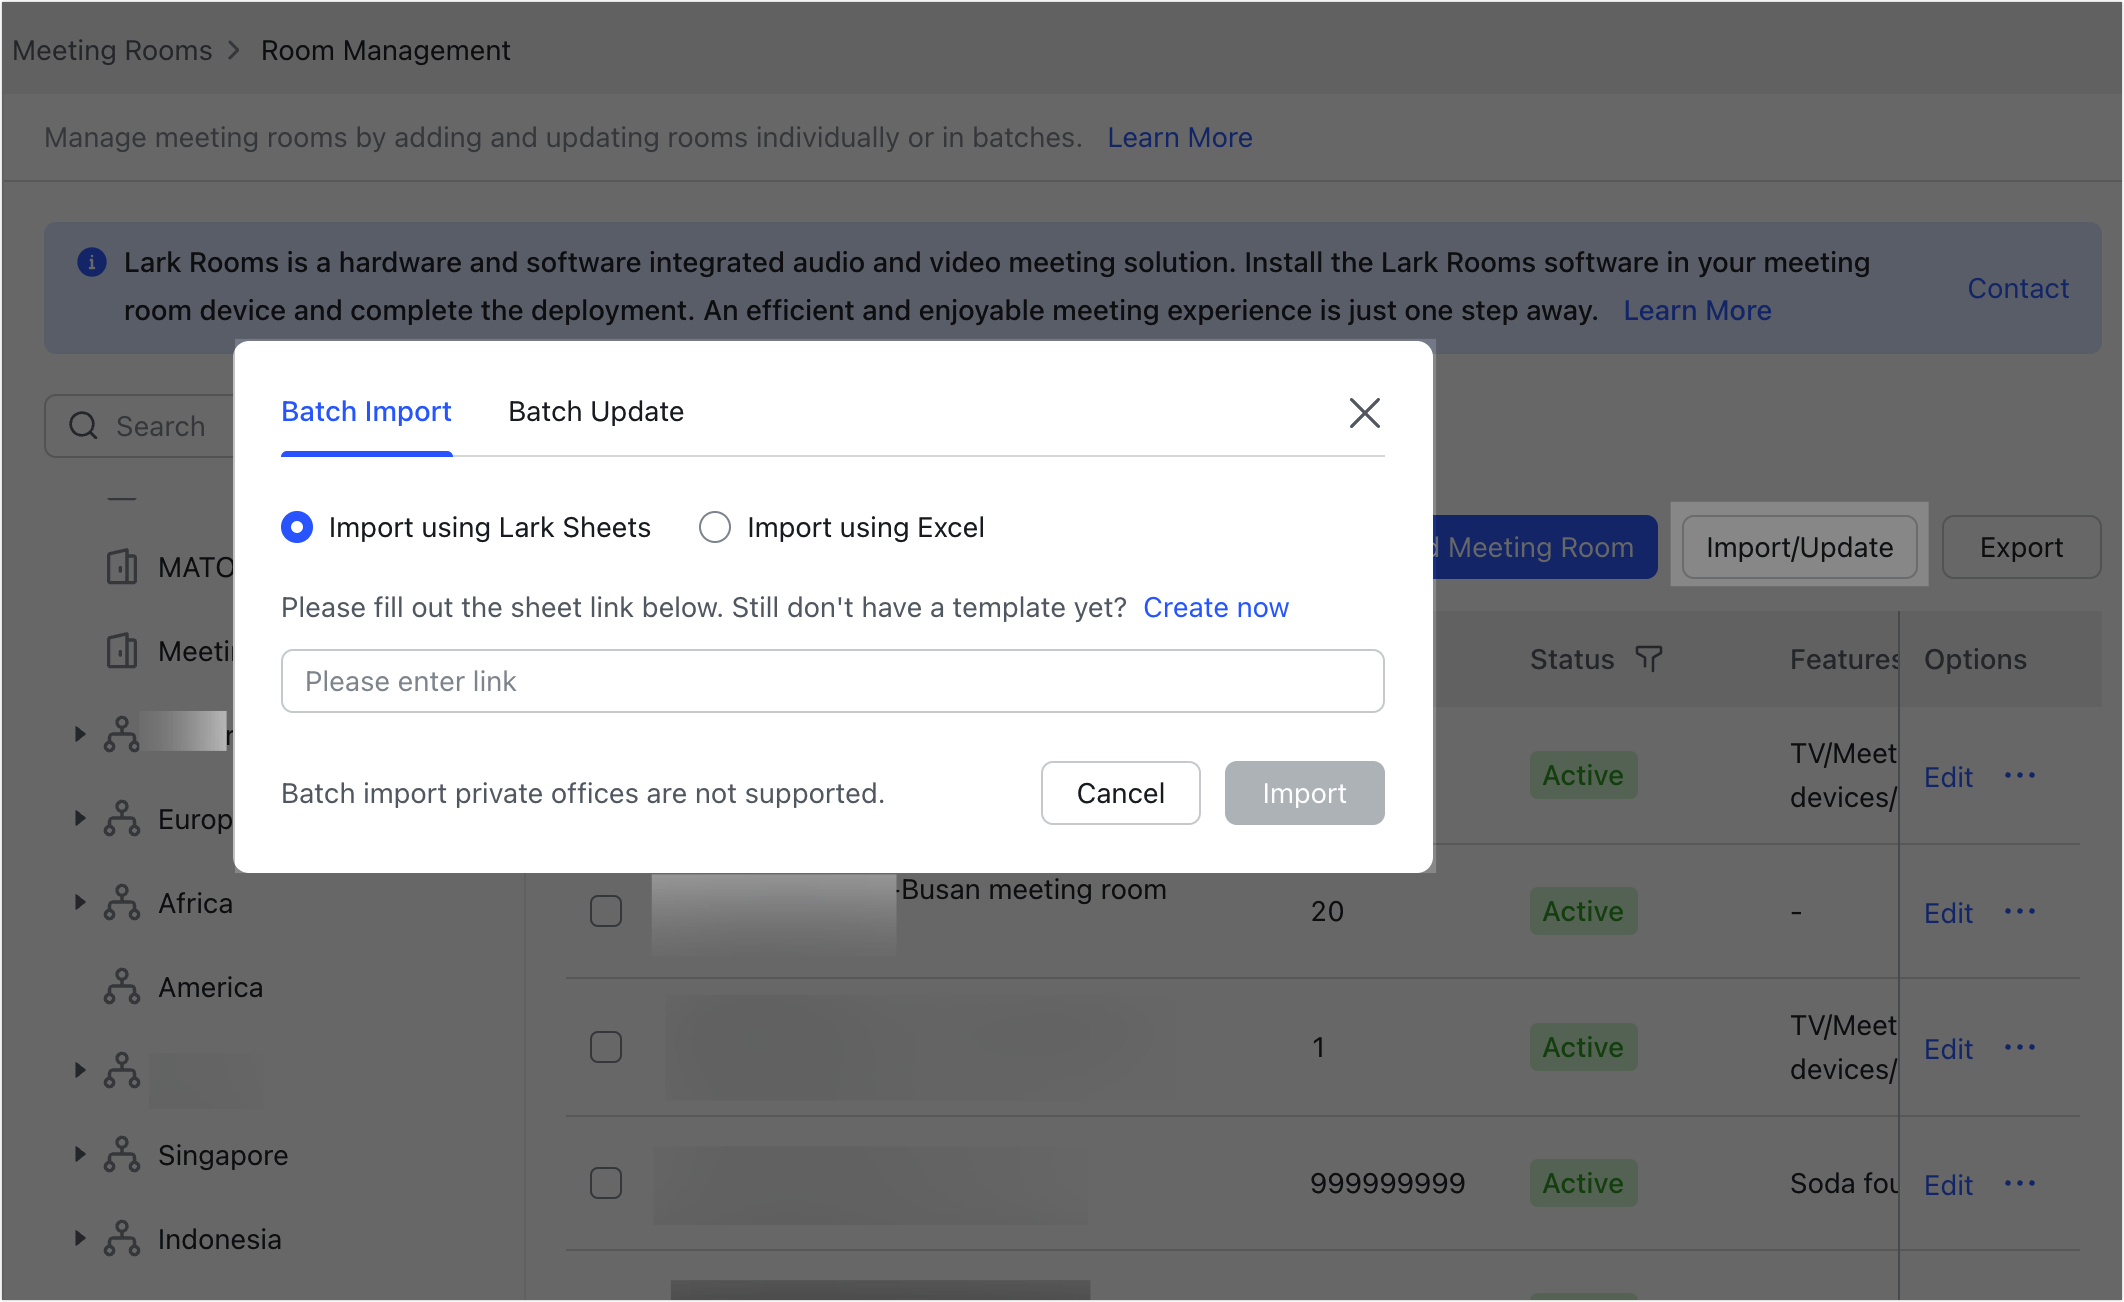
- Click Import/Update near the top of the Room Management page.
- In the popup window, under Batch Import, select either Import using Lark Sheets > Create now or Import using Excel > Download now.
- In the template, enter each meeting room's name, capacity, the layer it belongs to, its status, and features. Once done, upload the template file to batch import meeting rooms.
250px|700px|reset
Note: Meeting rooms under the same layer cannot have duplicate names.
2.2 Edit a meeting room
There are 3 ways an administrator can modify a meeting room's name, associated layer, capacity, status, features, and notes.
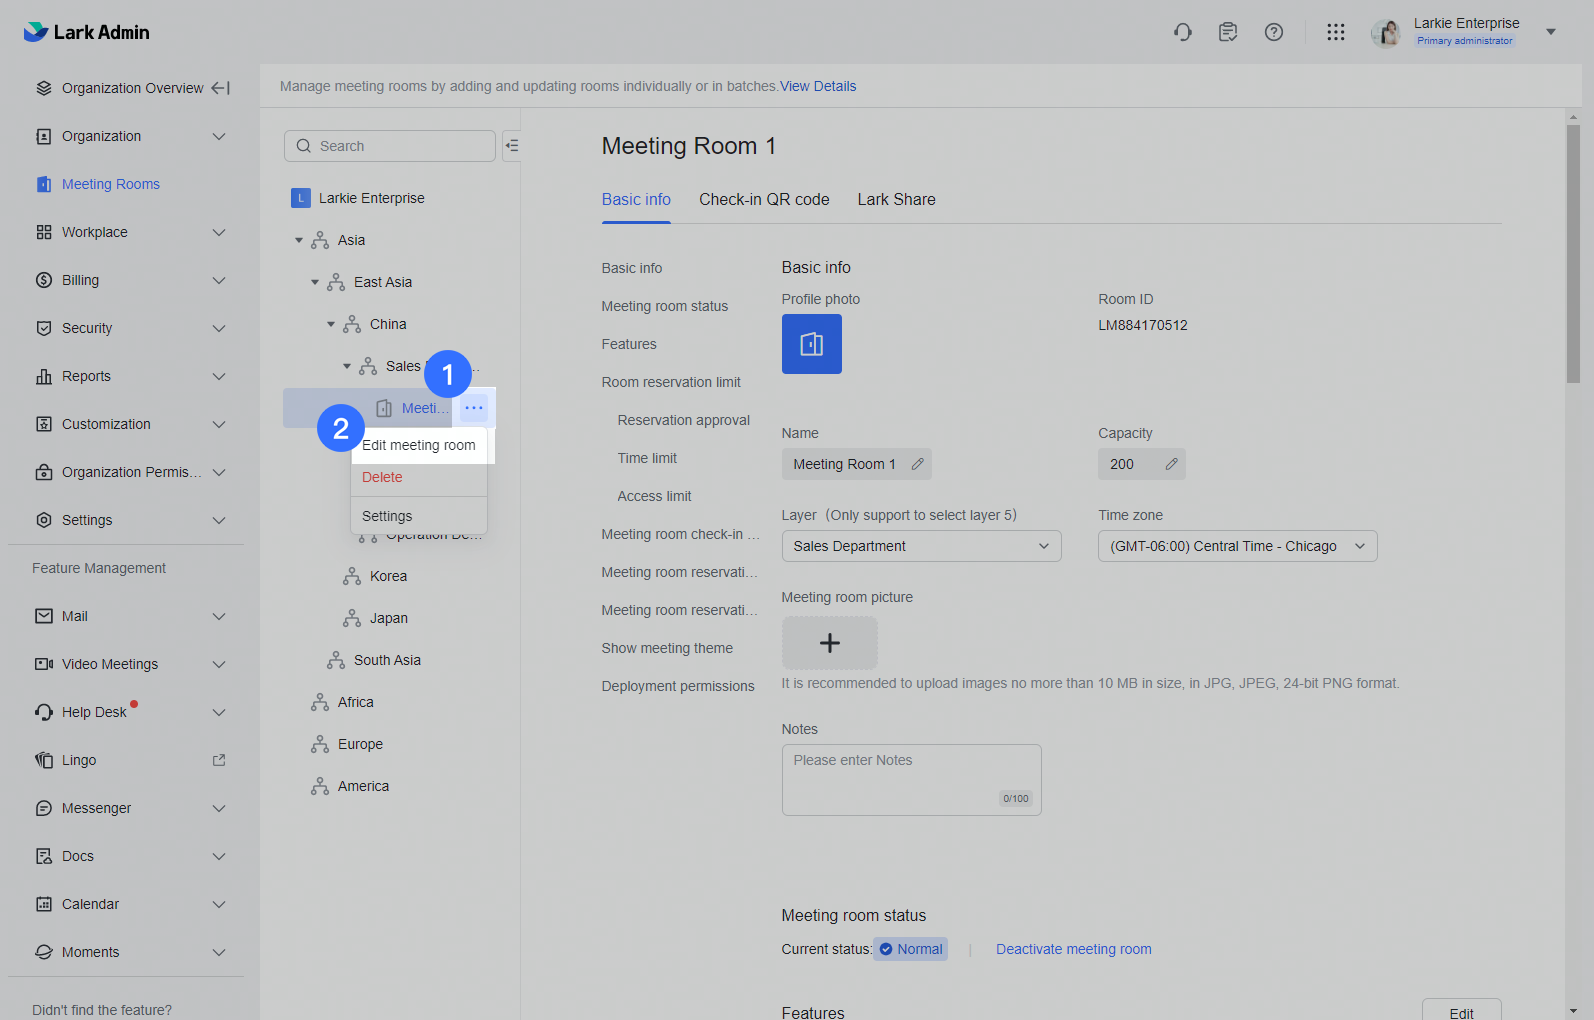
Method 1: Click the
icon to the right of the meeting room in the layer management menu and select Edit meeting room.
250px|700px|reset
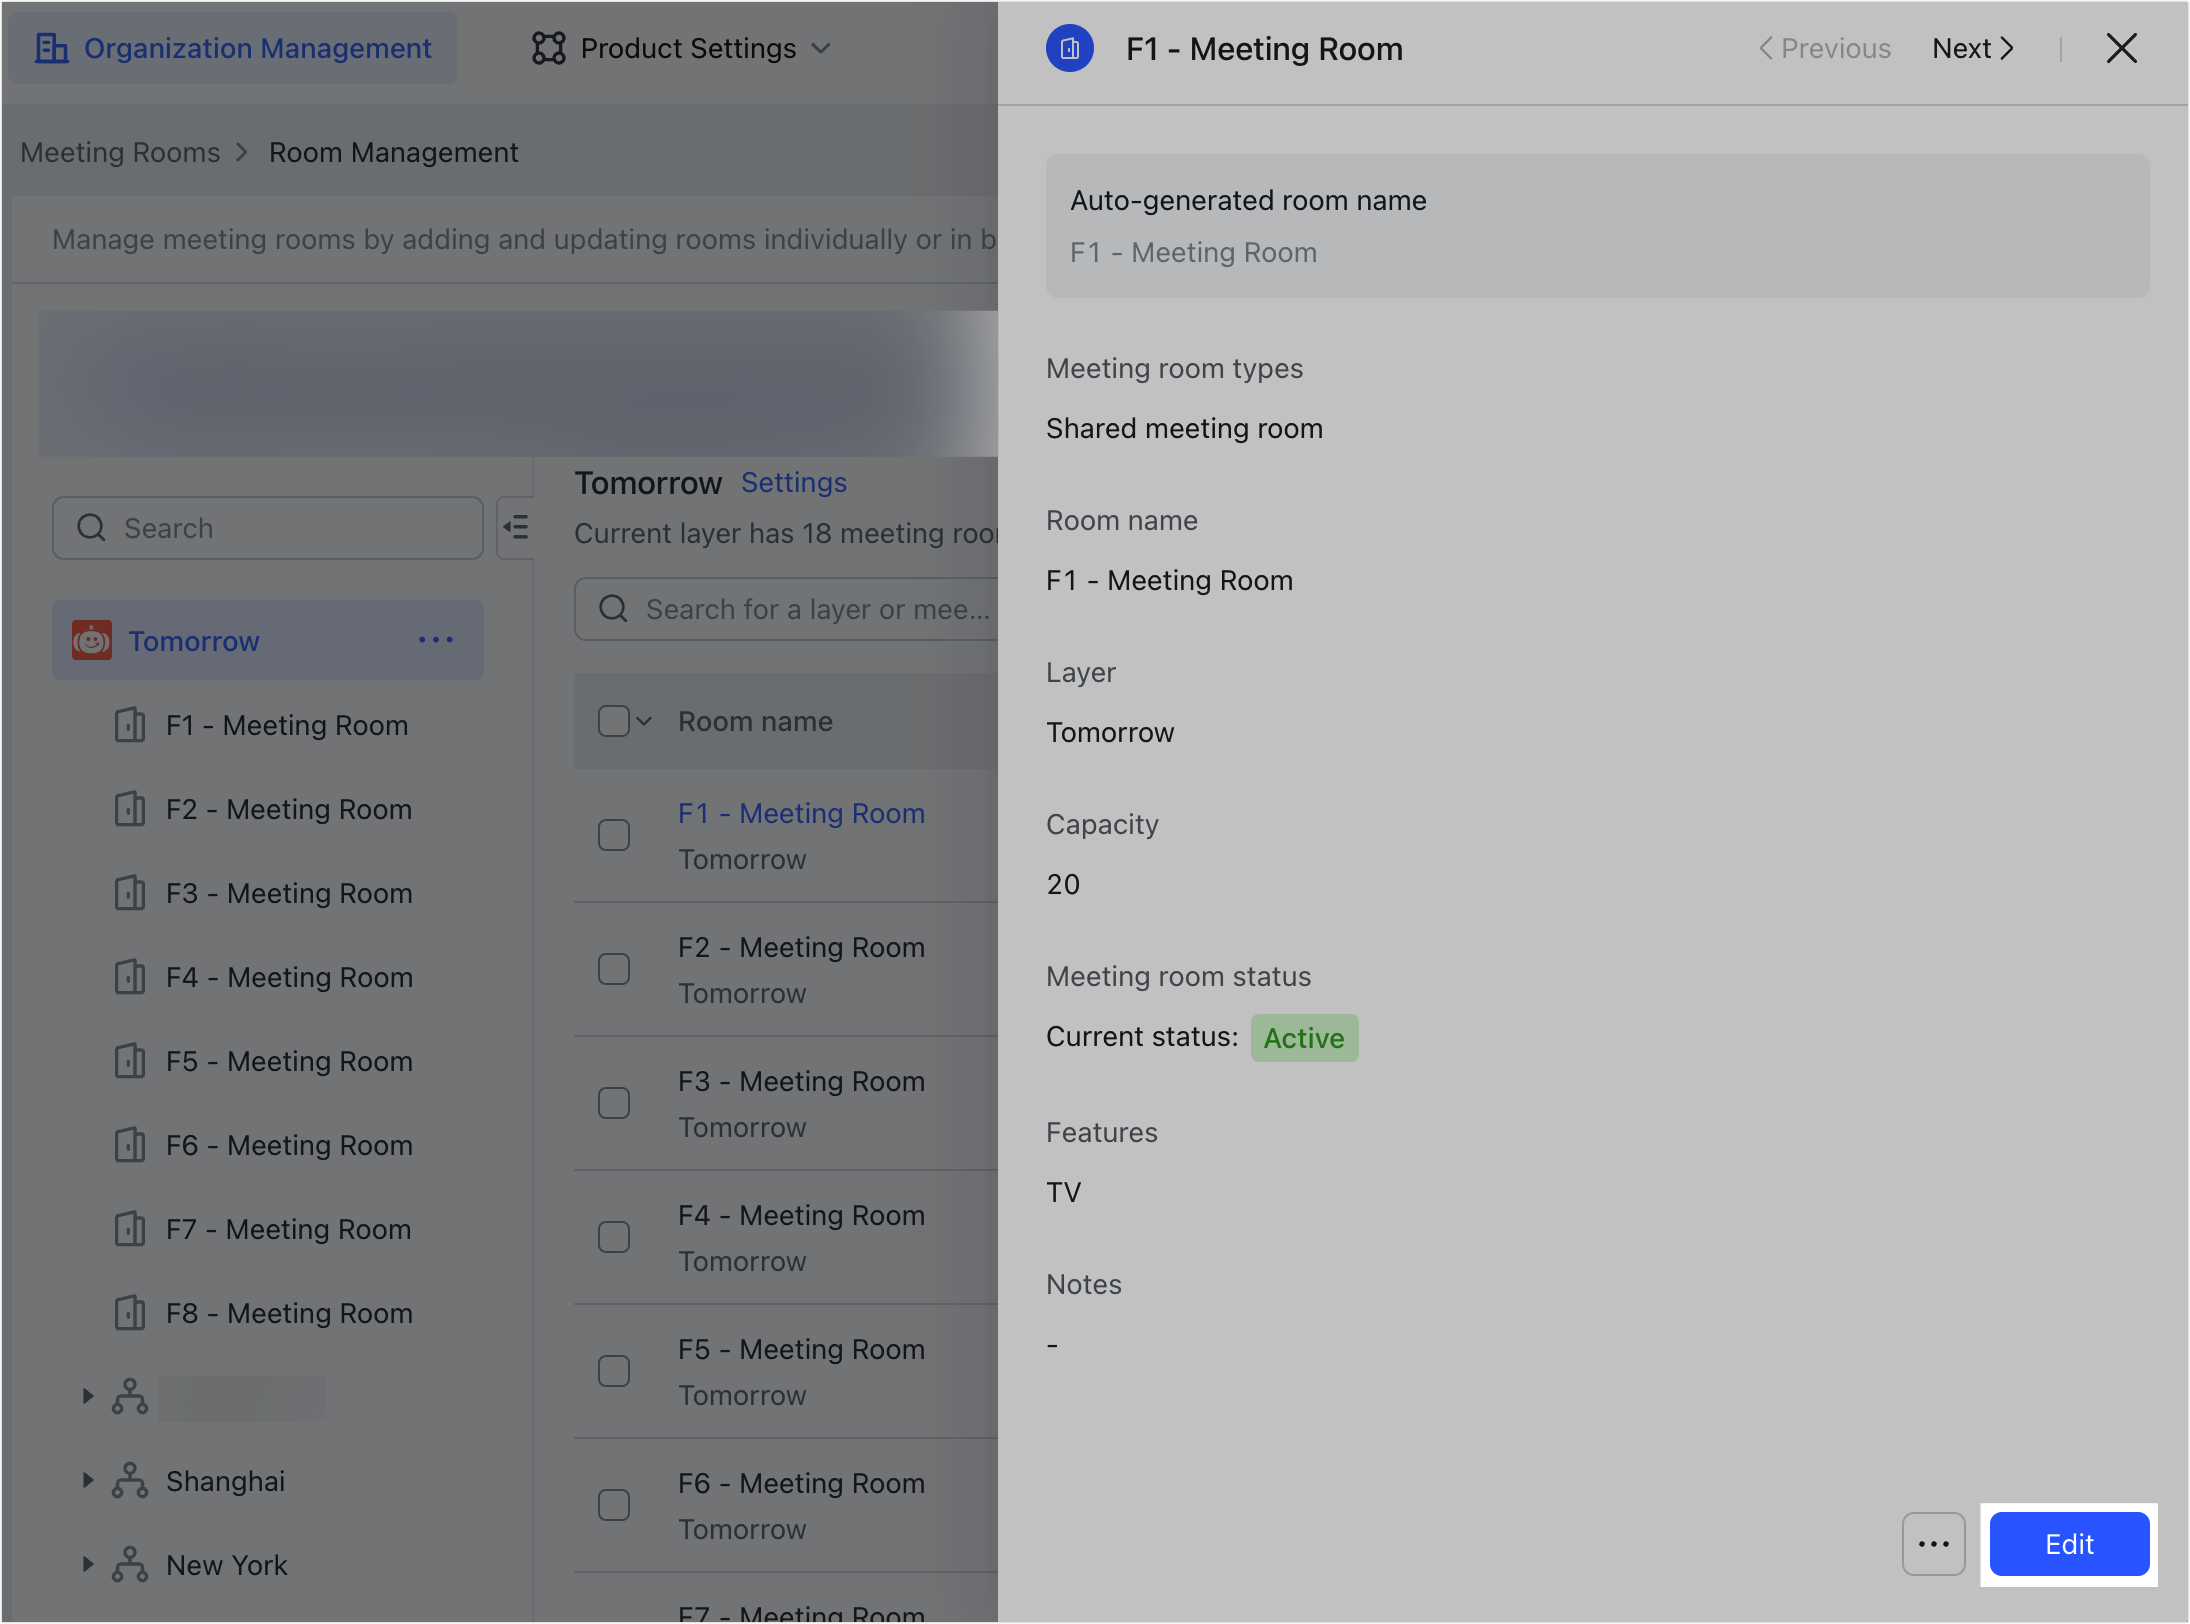
Method 2: Find the meeting room on the meeting room information page, and click Edit.

250px|700px|reset
Method 3: Click the meeting room name on the meeting room information page and select Edit in the menu bar that appears on the right.
250px|700px|reset
2.3 Delete a meeting room
If meeting rooms are no longer needed or in use, administrators can delete them individually or in batches.
Method 1: Delete individual meeting rooms
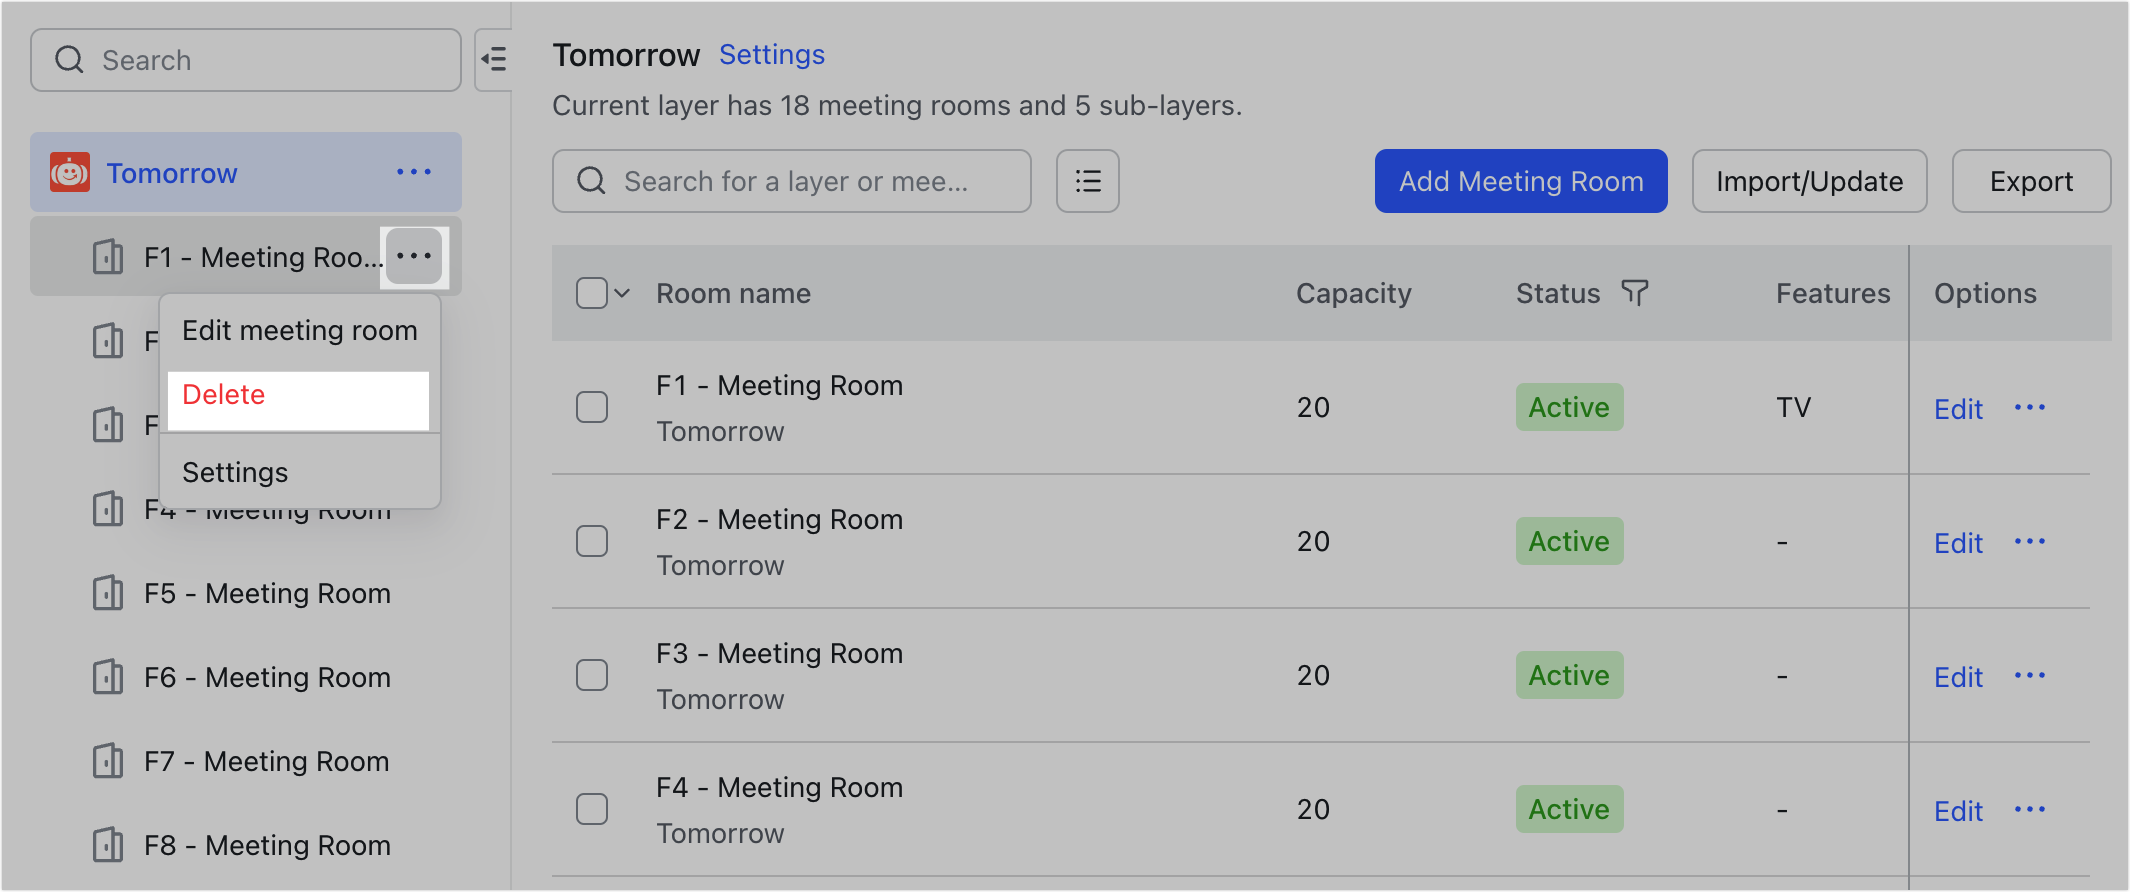
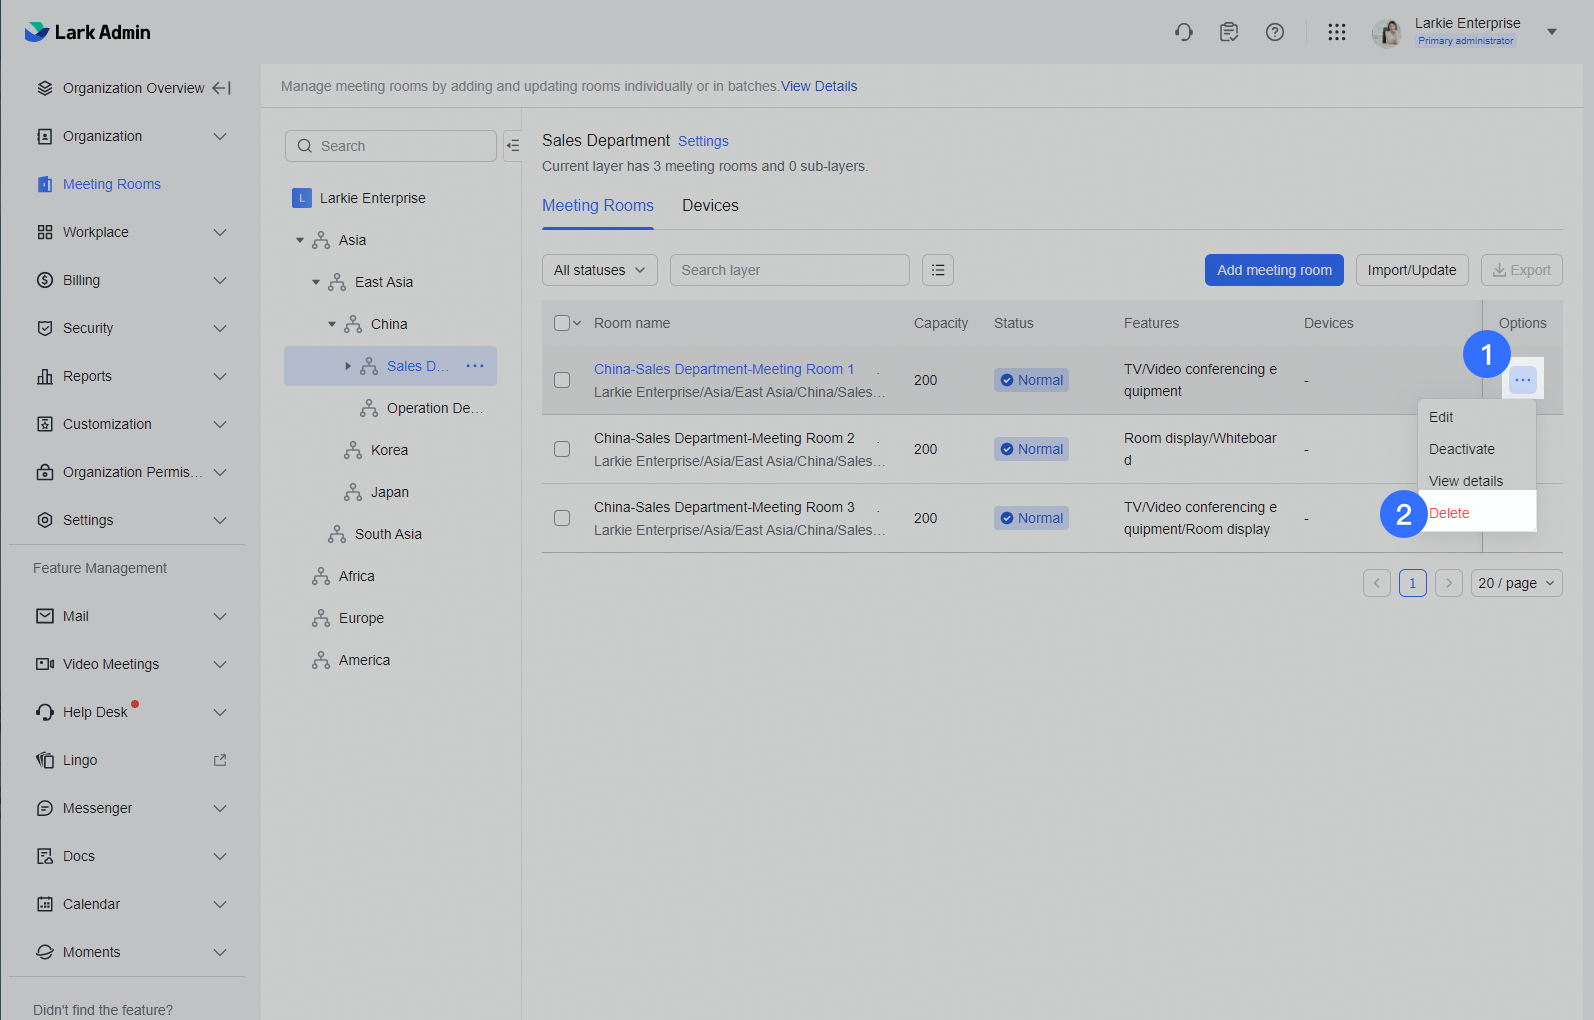
If you don't need to delete many meeting rooms, you can click the
icon to the right of the individual meeting room in the room list and select Delete. Alternatively, you can find the meeting room on the meeting room information page, click the
icon under Options on the far right and select Delete.
250px|700px|reset
250px|700px|reset
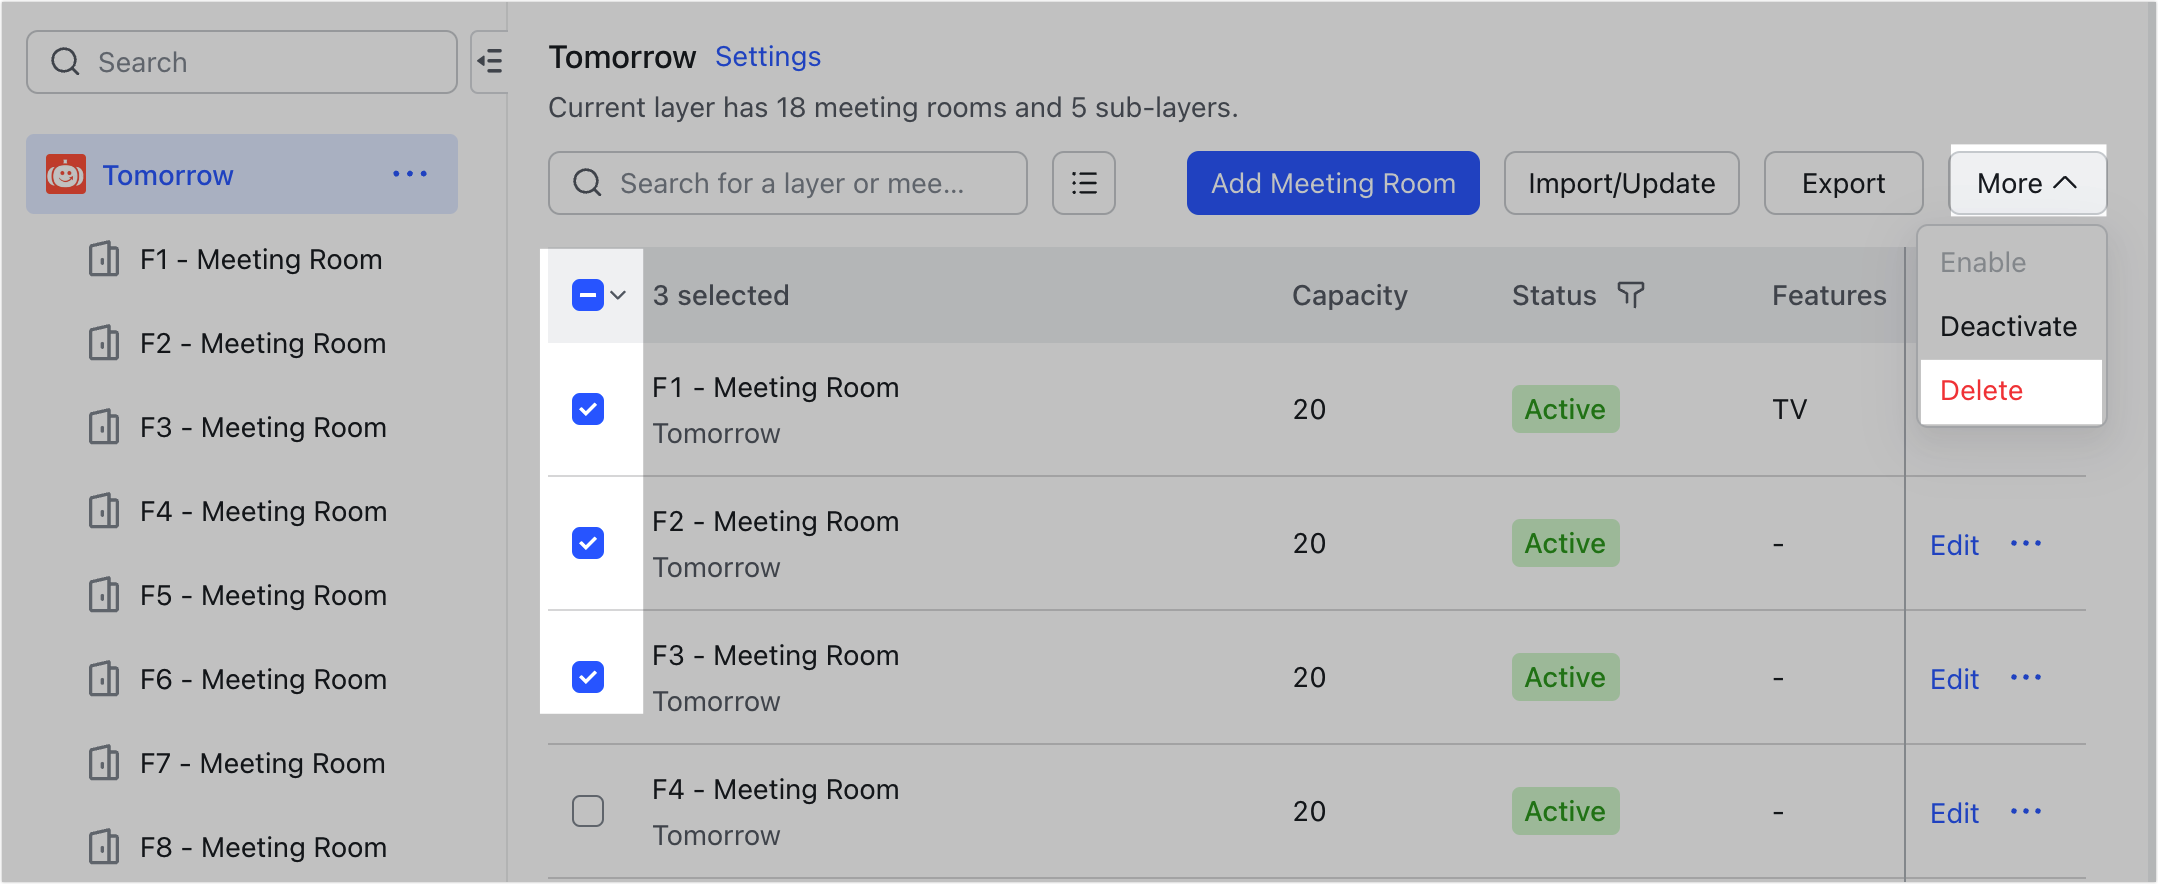
Method 2: Batch delete meeting rooms
If you need to delete multiple meeting rooms at once, click the checkboxes next to the desired meeting rooms on the meeting room information page and click Delete in the upper-right corner. In the pop-up window that appears, you can choose whether to send a notification to users and contacts who have reserved those meeting rooms. Click Delete again in the lower-right corner to delete all selected meeting rooms.
250px|700px|reset
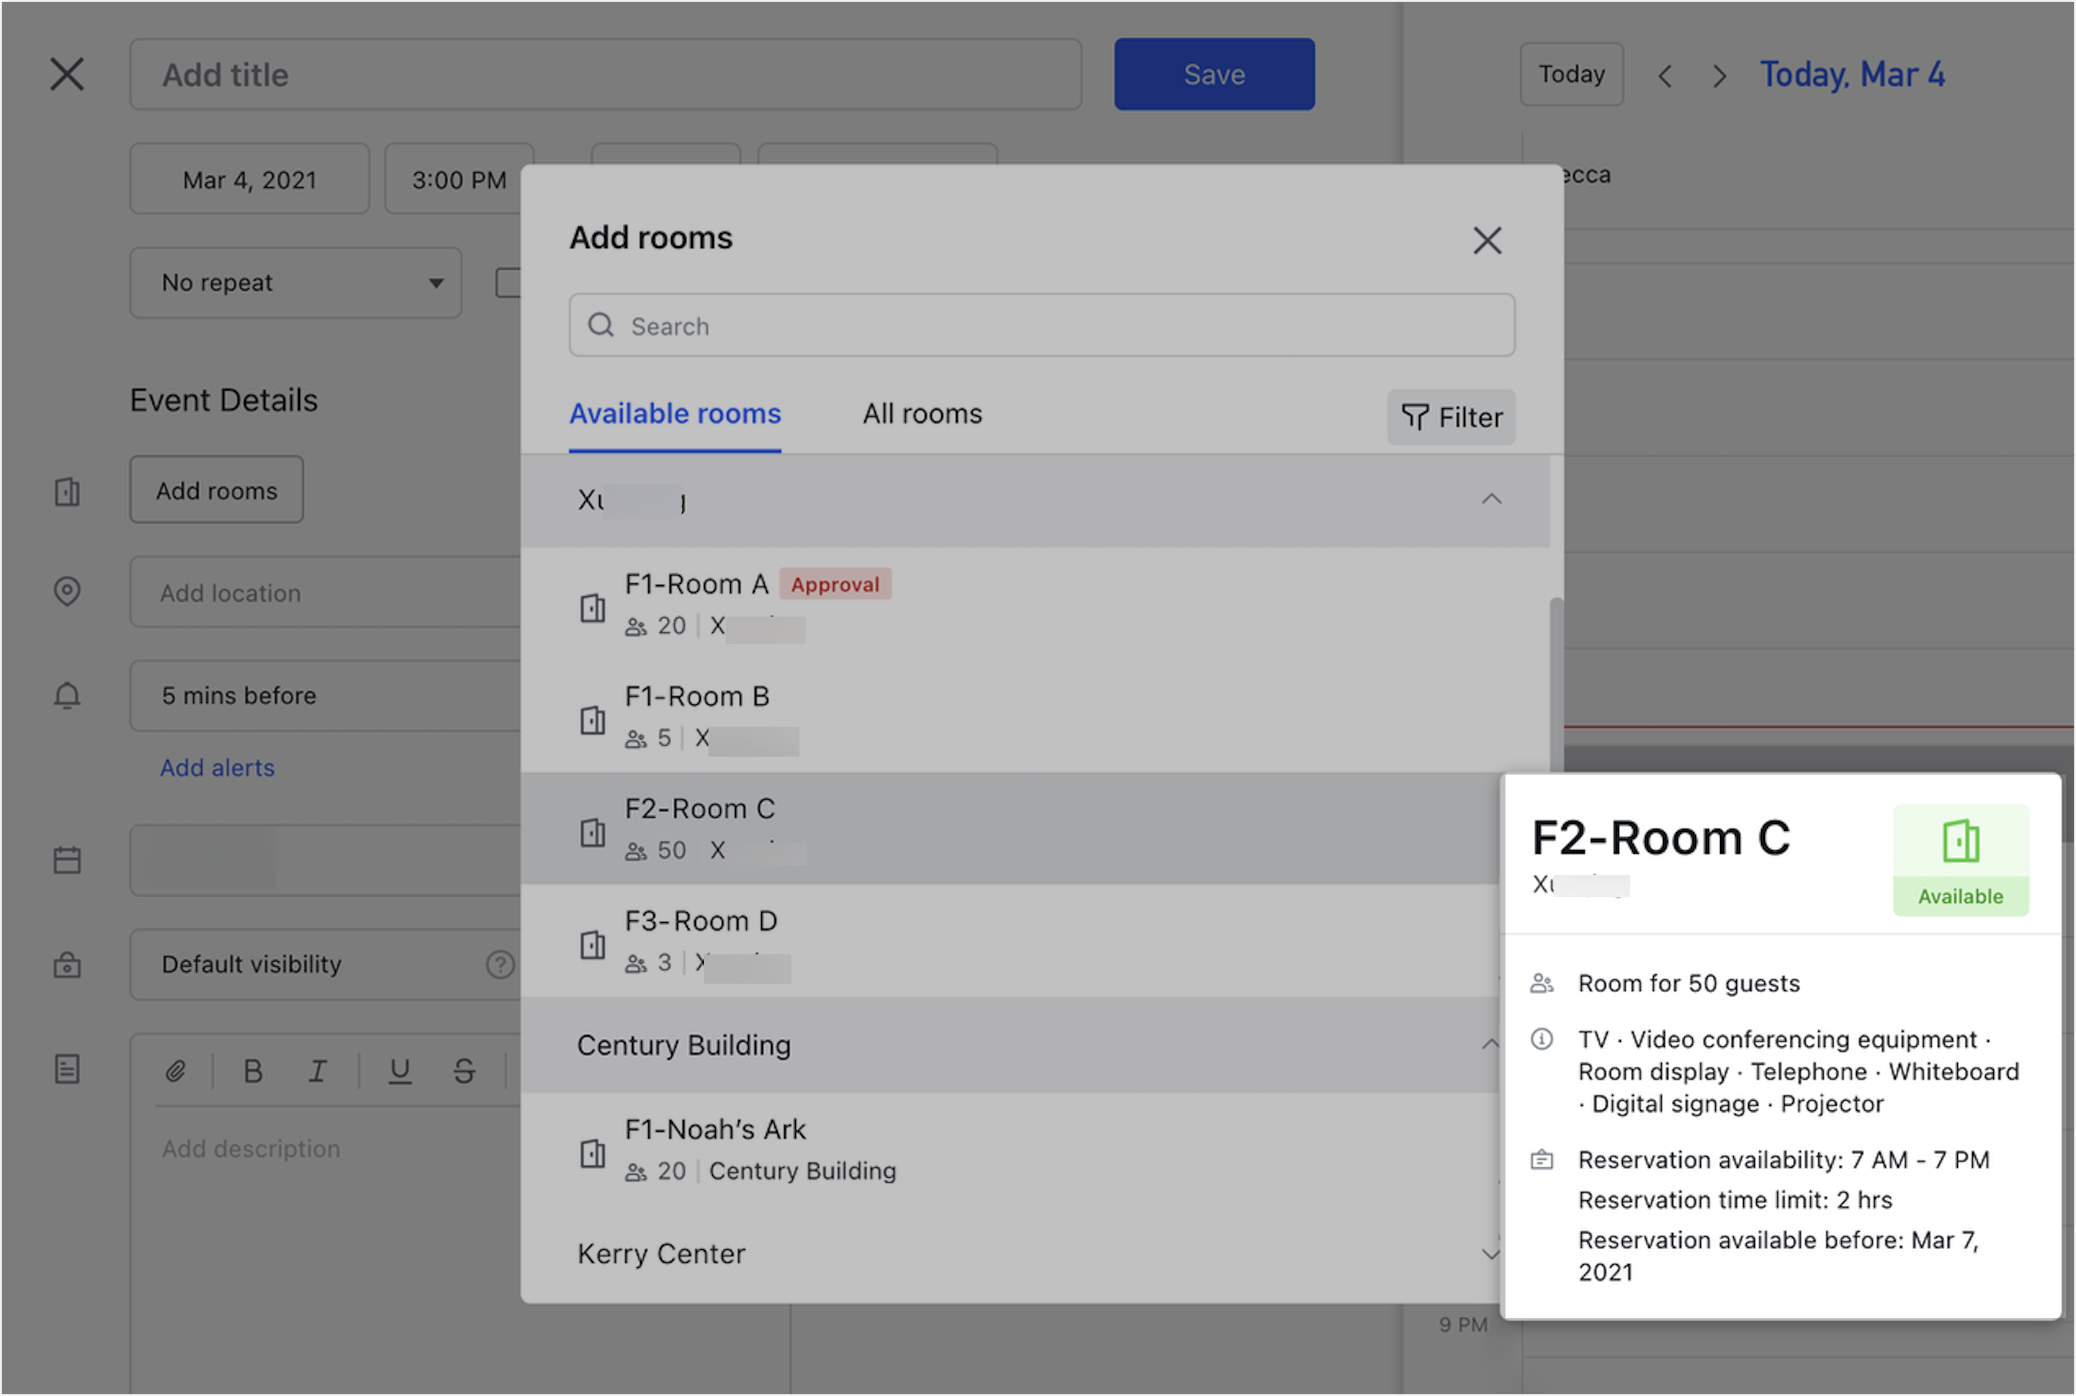
- How it works on the members' side
Once you have finished setting up your meeting rooms, members will be able to see the capacity, features, and reservation availability of any meeting room with Normal status when creating events and adding Meeting Rooms, and will be able to reserve any that meets their needs. Members are not able to reserve any meeting rooms whose status is set to Deactivated.
250px|700px|reset
III. FAQs