I. Intro
Availability: This feature is in beta.
Who can perform these steps: Primary administrators and administrators with Exchange calendar sync permissions.
Administrators can configure the sync between Lark and Microsoft Exchange Calendar for all members in the Lark Admin console. After the calendar data is synced, members can view and edit Exchange events in Lark. Updated new event information will also be synced to their Exchange calendars in real time.
Note: Aside from Exchange Calendar, this function also supports Exchange On-Premises, Exchange Online, Outlook, Hotmail, Live, and MSN Calendar syncing.
Synchronization result:
II. Steps
Important:
- For organizations that have previously configured two-way sync between Exchange Calendar and Lark Calendar, administrators must complete the "Update Authorization" for the Exchange administrator account in the Lark Admin Console by February 2025 (For detailed instructions, refer to Step 1 below). If this action is not completed on time, calendar sync will fail.
- Organizations that have not yet configured two-way sync between Exchange Calendar and Lark Calendar can skip to "2. Configure your Exchange admin account in the Lark Admin Console" to start the configuration.
- Complete the update authorization for the Exchange administrator account
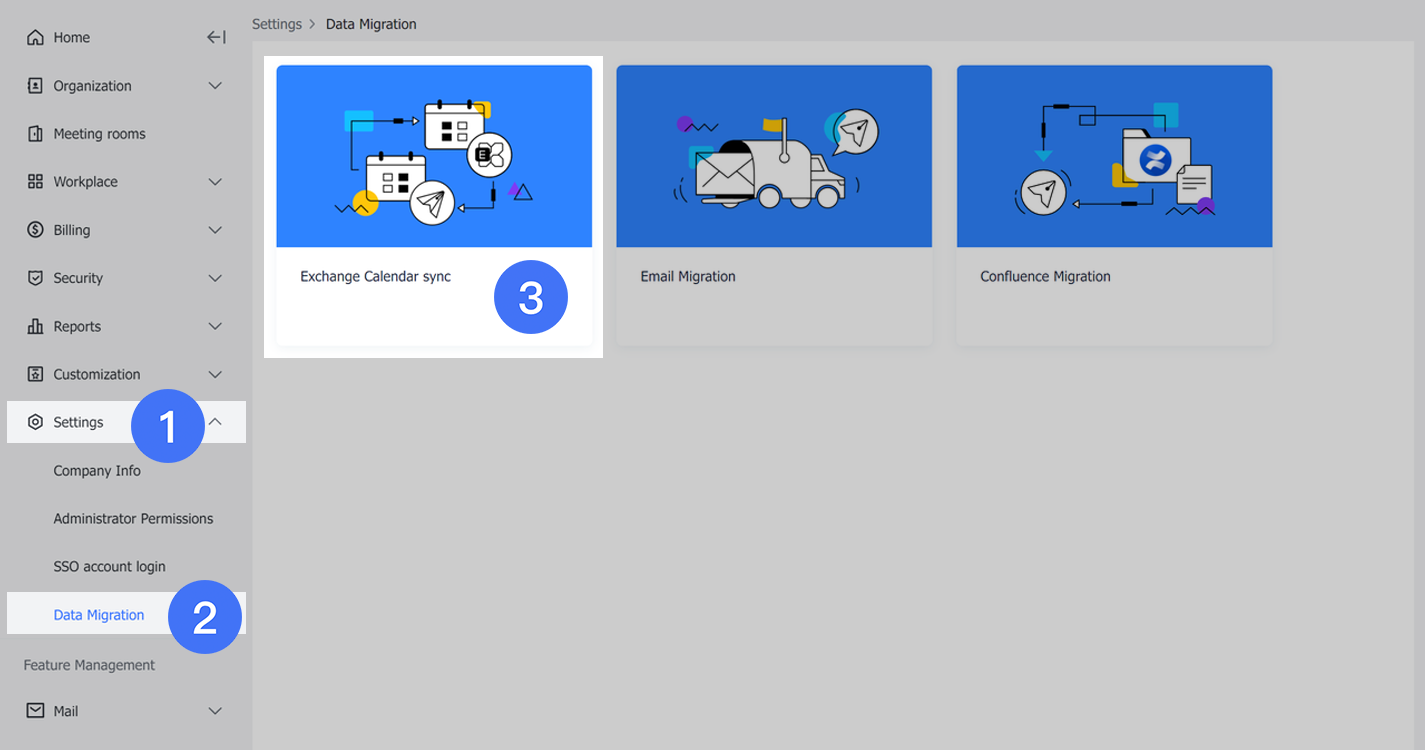
- Open the Lark Admin Console and click Settings > Data Migration > Exchange Calendar sync in the left navigation bar.
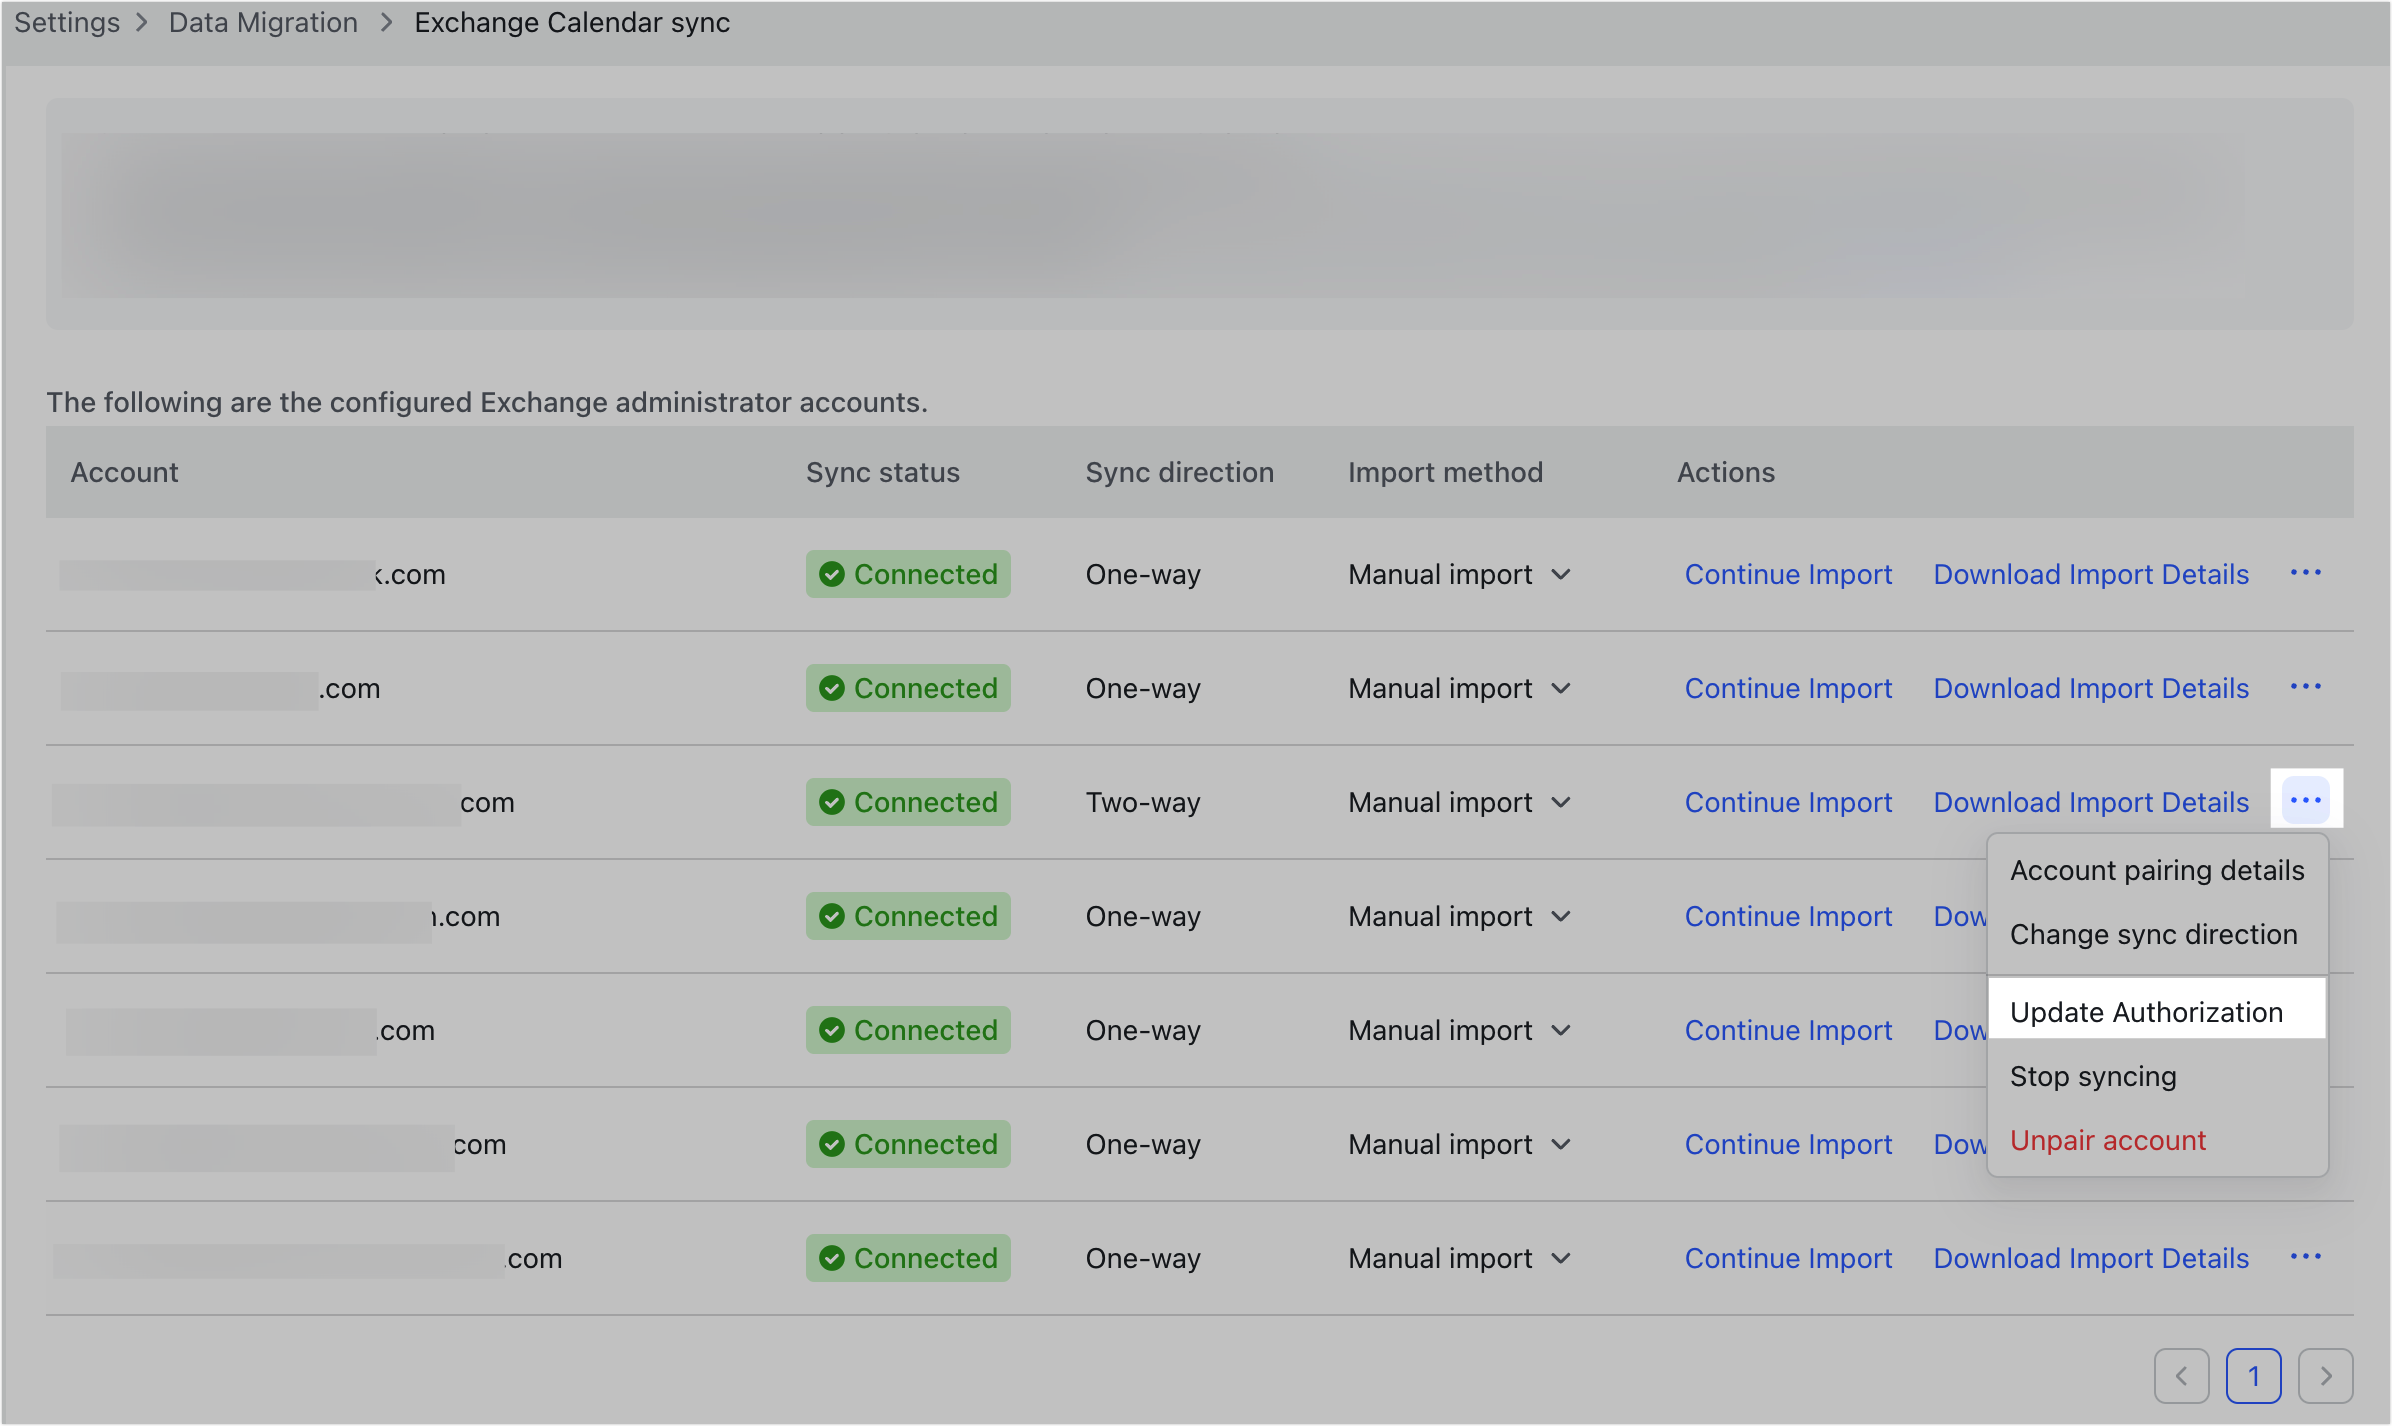
- Select the Exchange administrator account to be updated in the account list, and click the ··· icon on the right > Update Authorization.
250px|700px|reset
- A Microsoft account login page opens. Follow the prompts to log in to the Exchange administrator account.
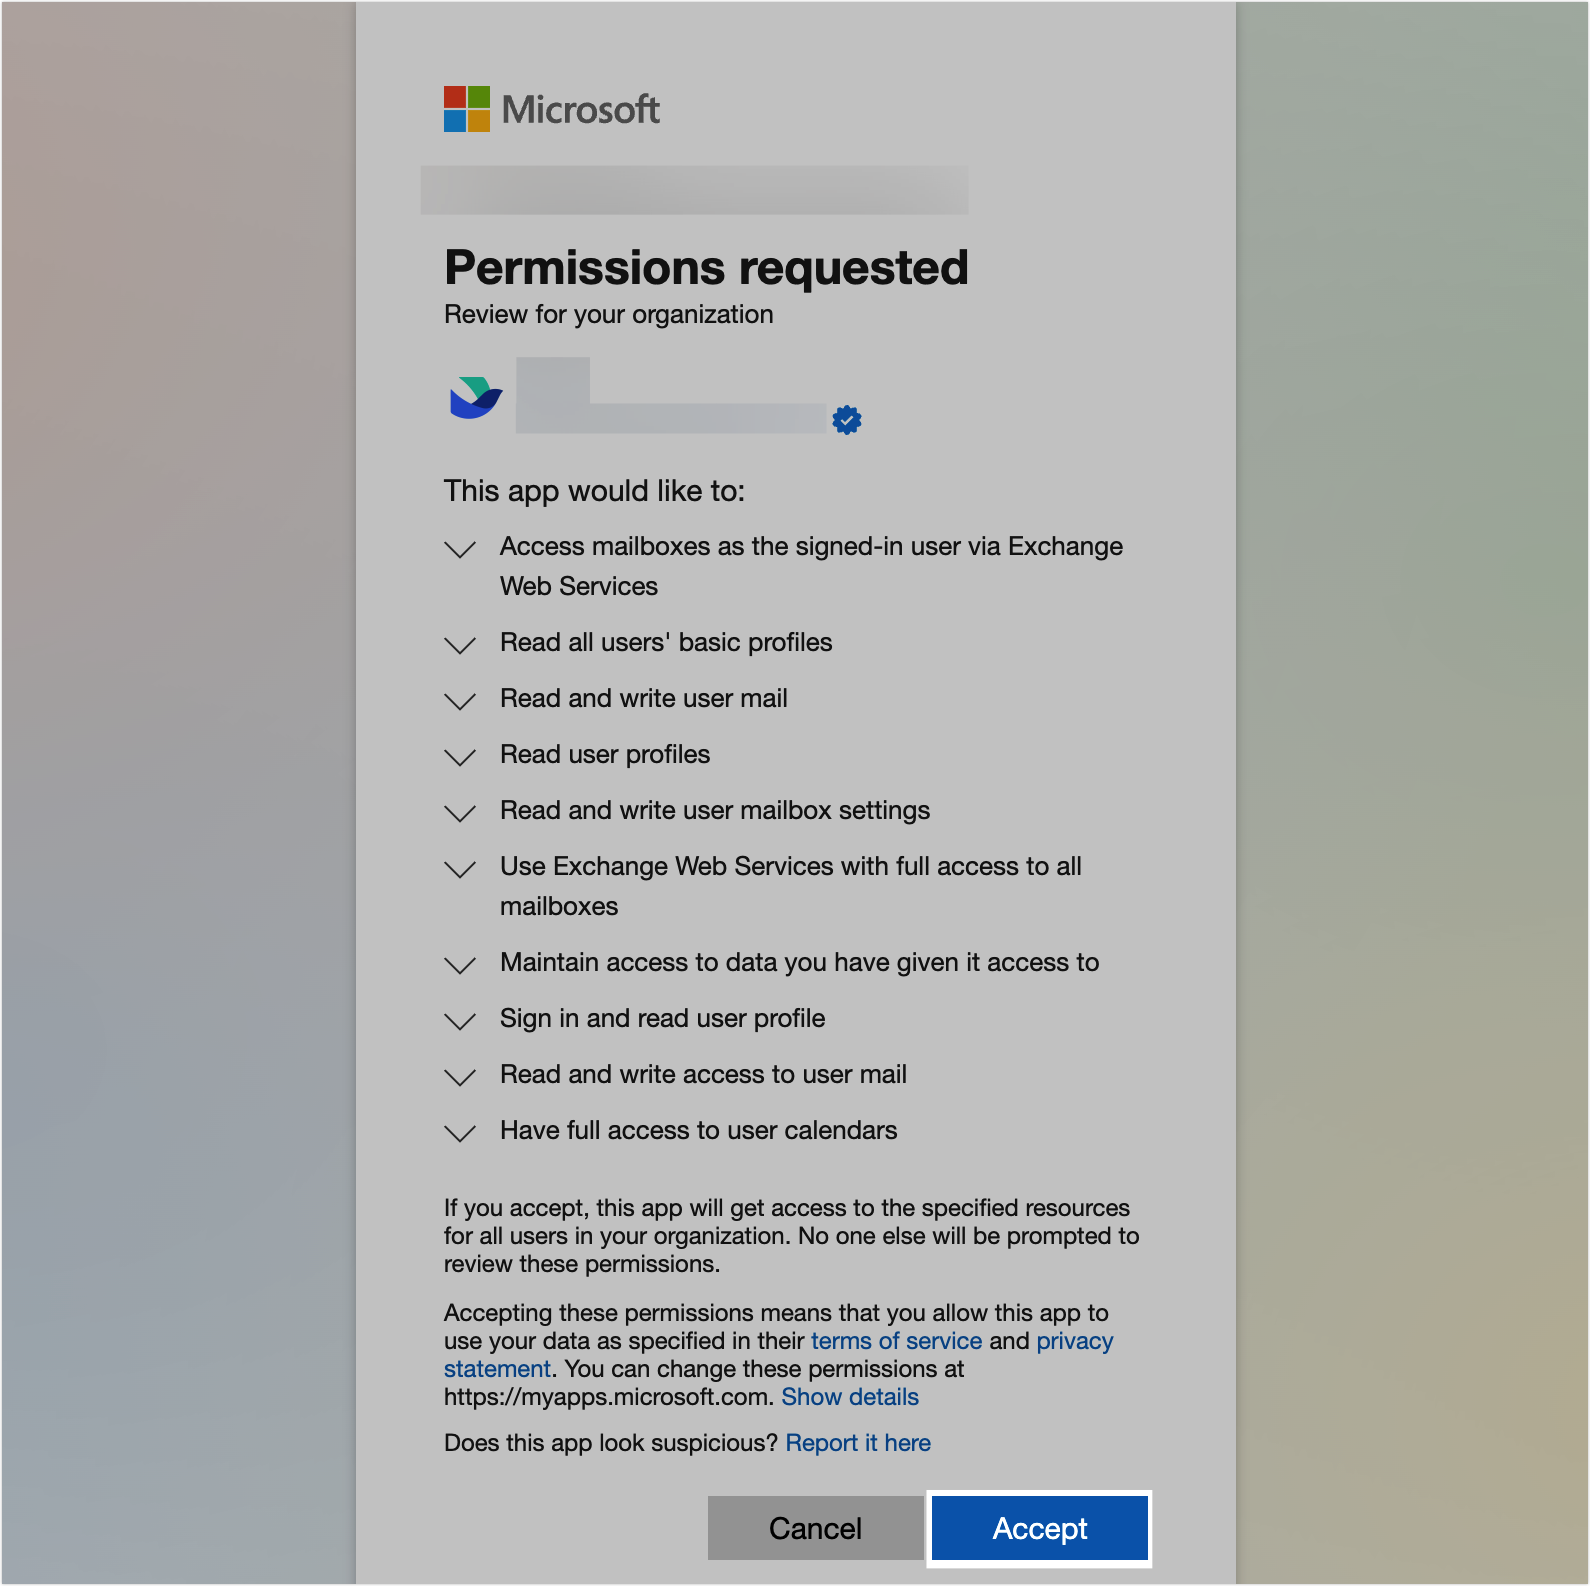
- After logging in, click Accept on the authorization page to complete the update. Then the two-way calendar sync will continue to proceed normally.
250px|700px|reset
- Configure your Exchange admin account in the Lark Admin Console
Important: To avoid Lark emails marked as spam and consequently sync failures of events, the Exchange admins must add the Lark email domain to the allowlist in the Microsoft 365 admin center. For more information, see Admin | Configure email domain whitelist in the Exchange admin console.
Configure the impersonation permission in the Exchange admin center and wait for 30 minutes to proceed with the steps listed below.
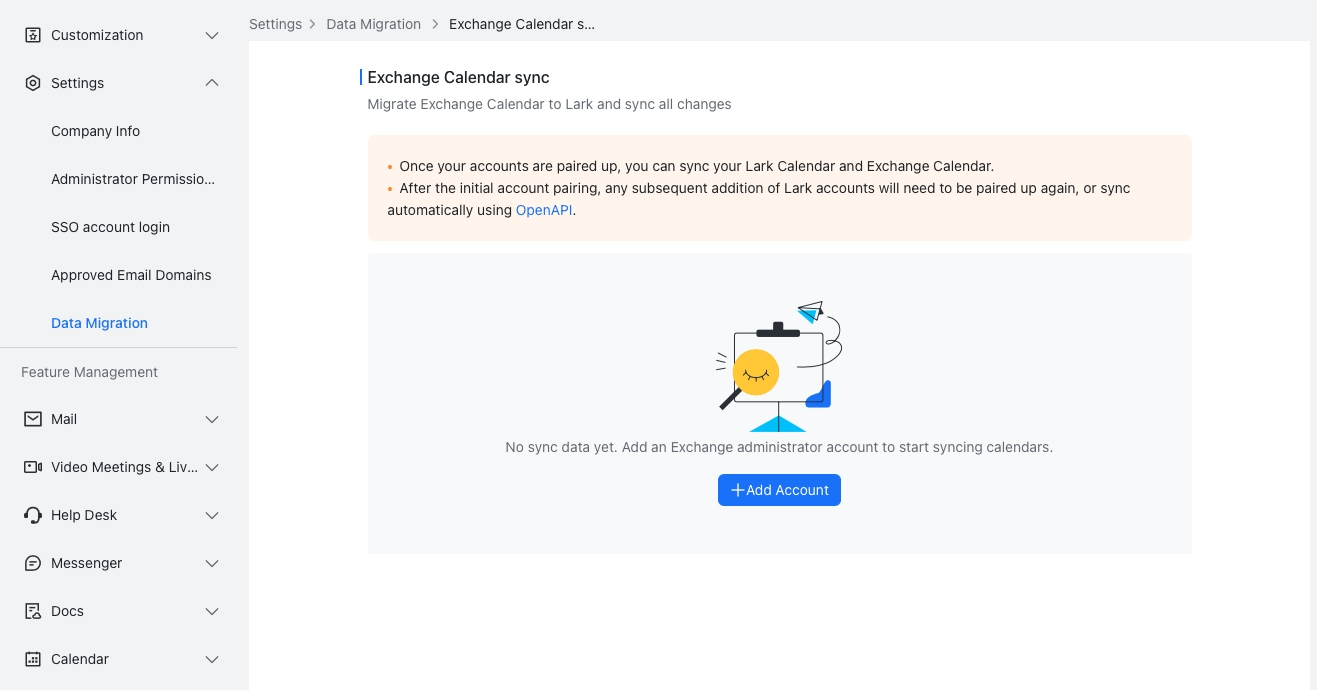
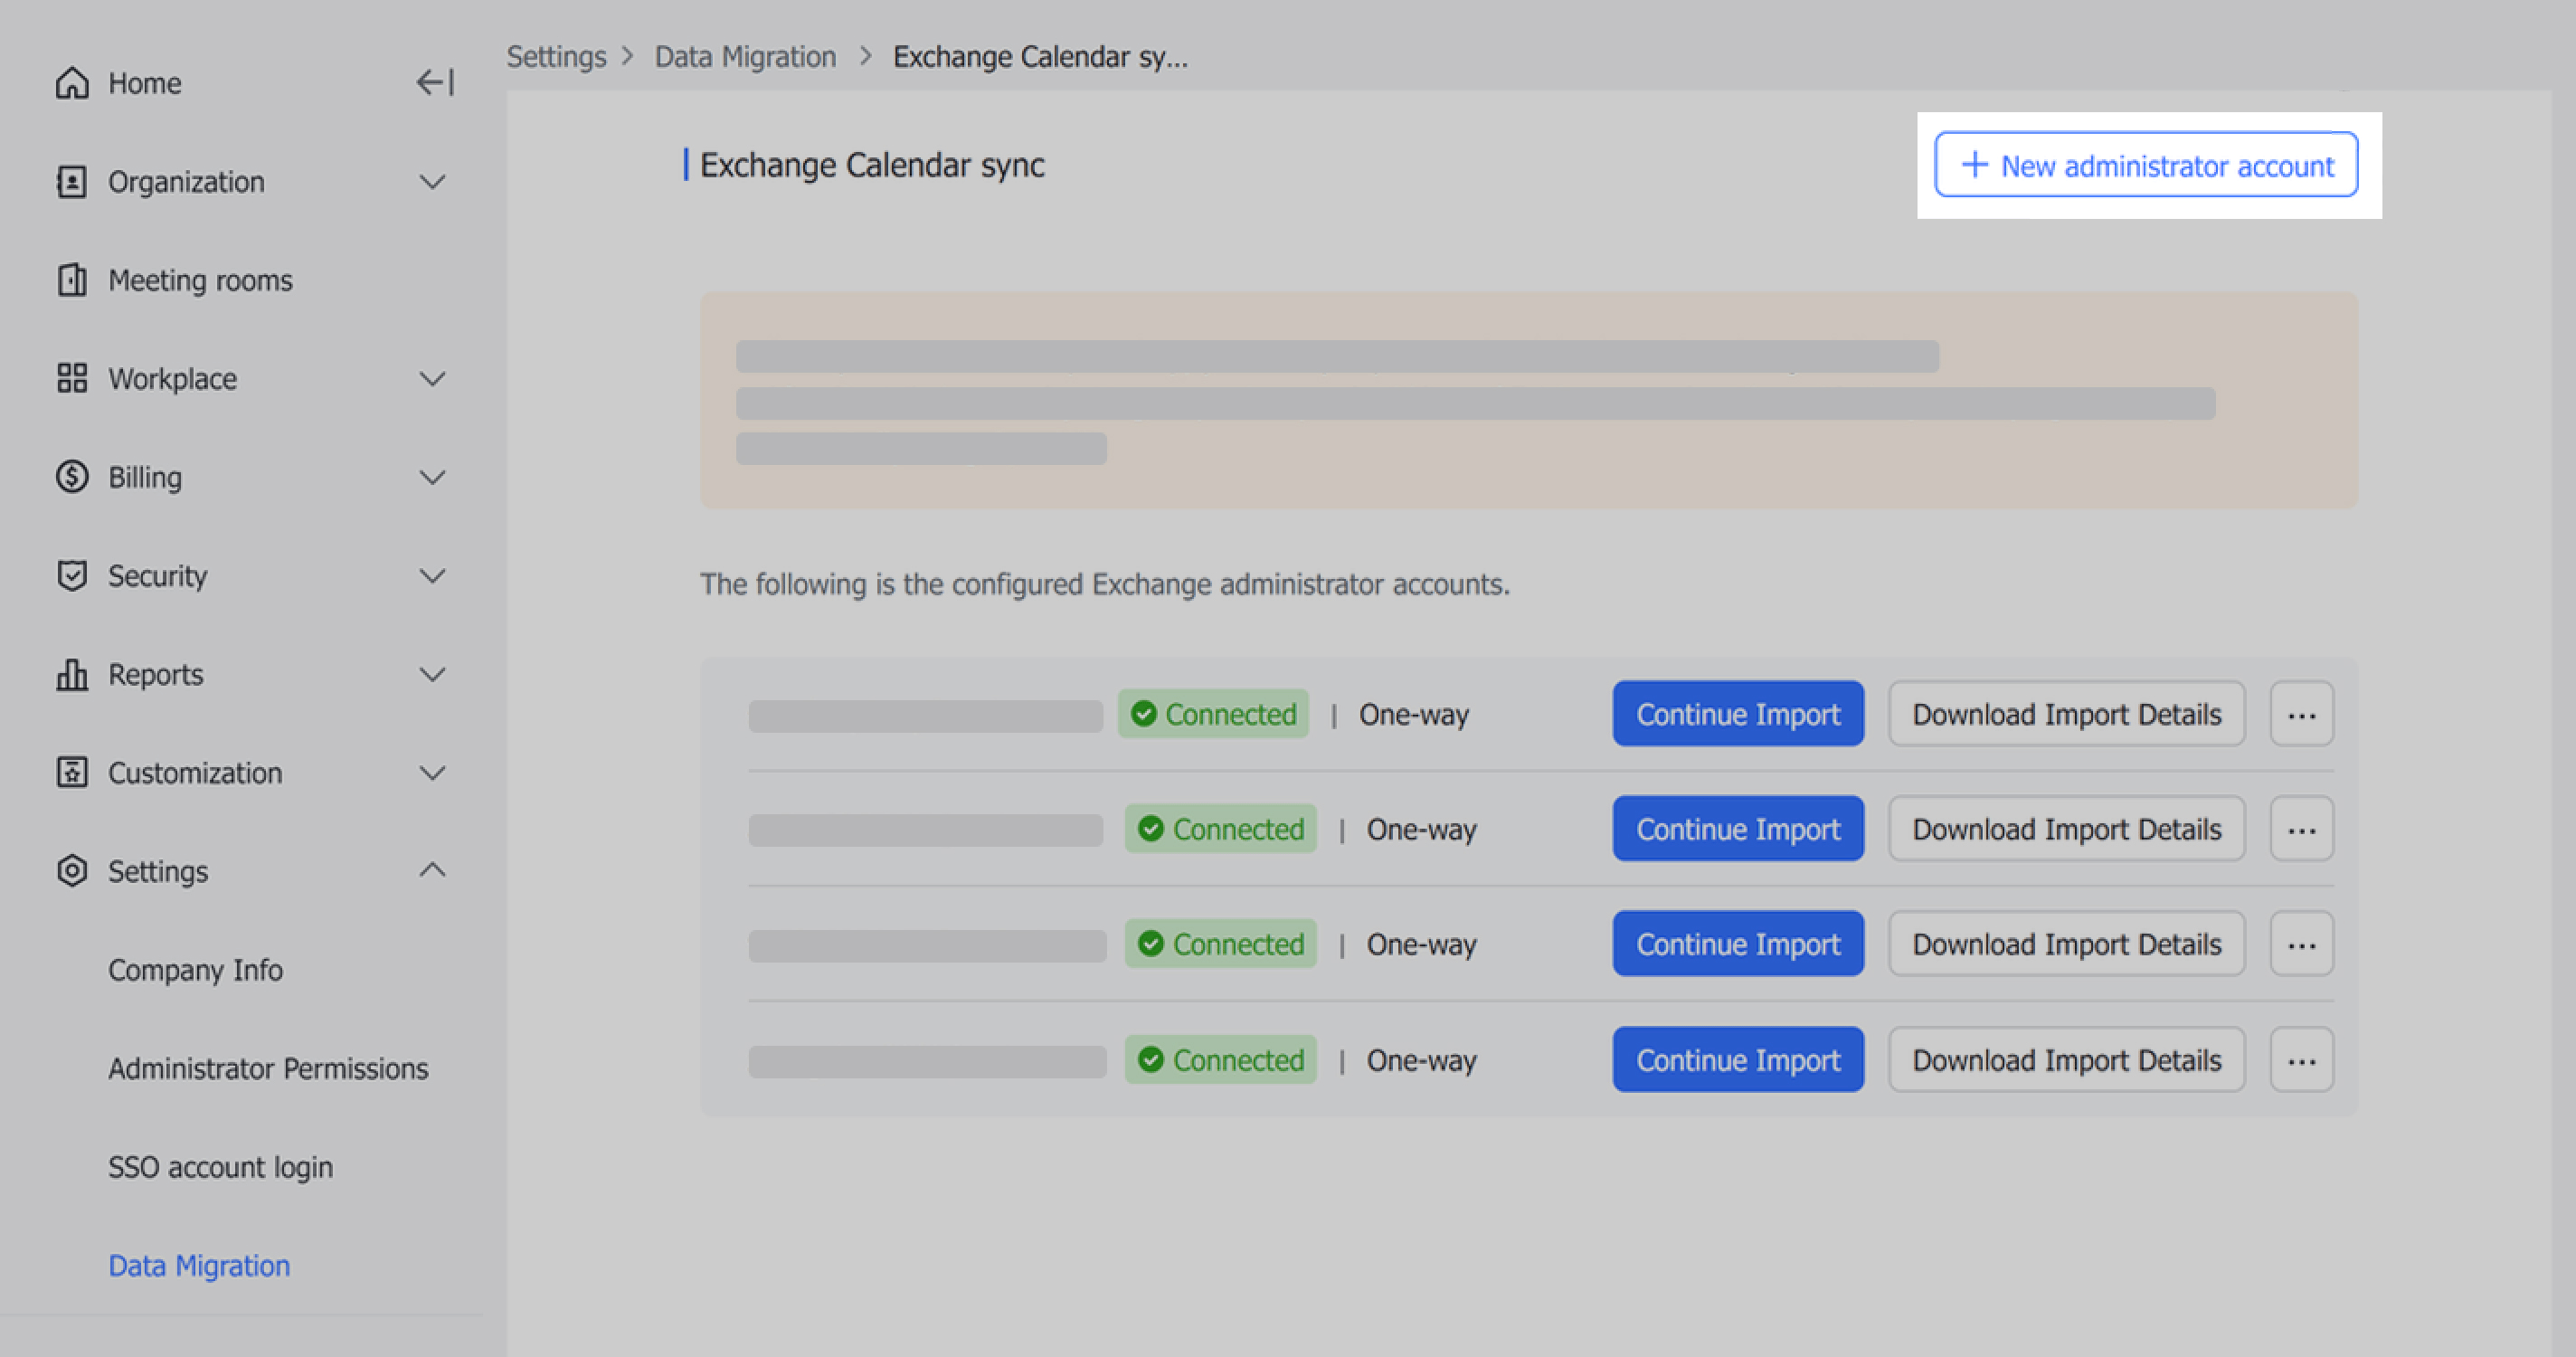
- Go to the Lark Admin Console, and click Settings > Data Migration > Exchange Calendar sync > Add account or New administrator account depending on if an admin has been added in the past or not.
250px|700px|reset
250px|700px|reset
250px|700px|reset

- Enter the email address and password of the Exchange admin accounts.
- Note: If needed, go back to the Exchange Calendar sync page again to add more admins.
- Click Next and follow the prompts to authorize the administrator account and complete its addition.
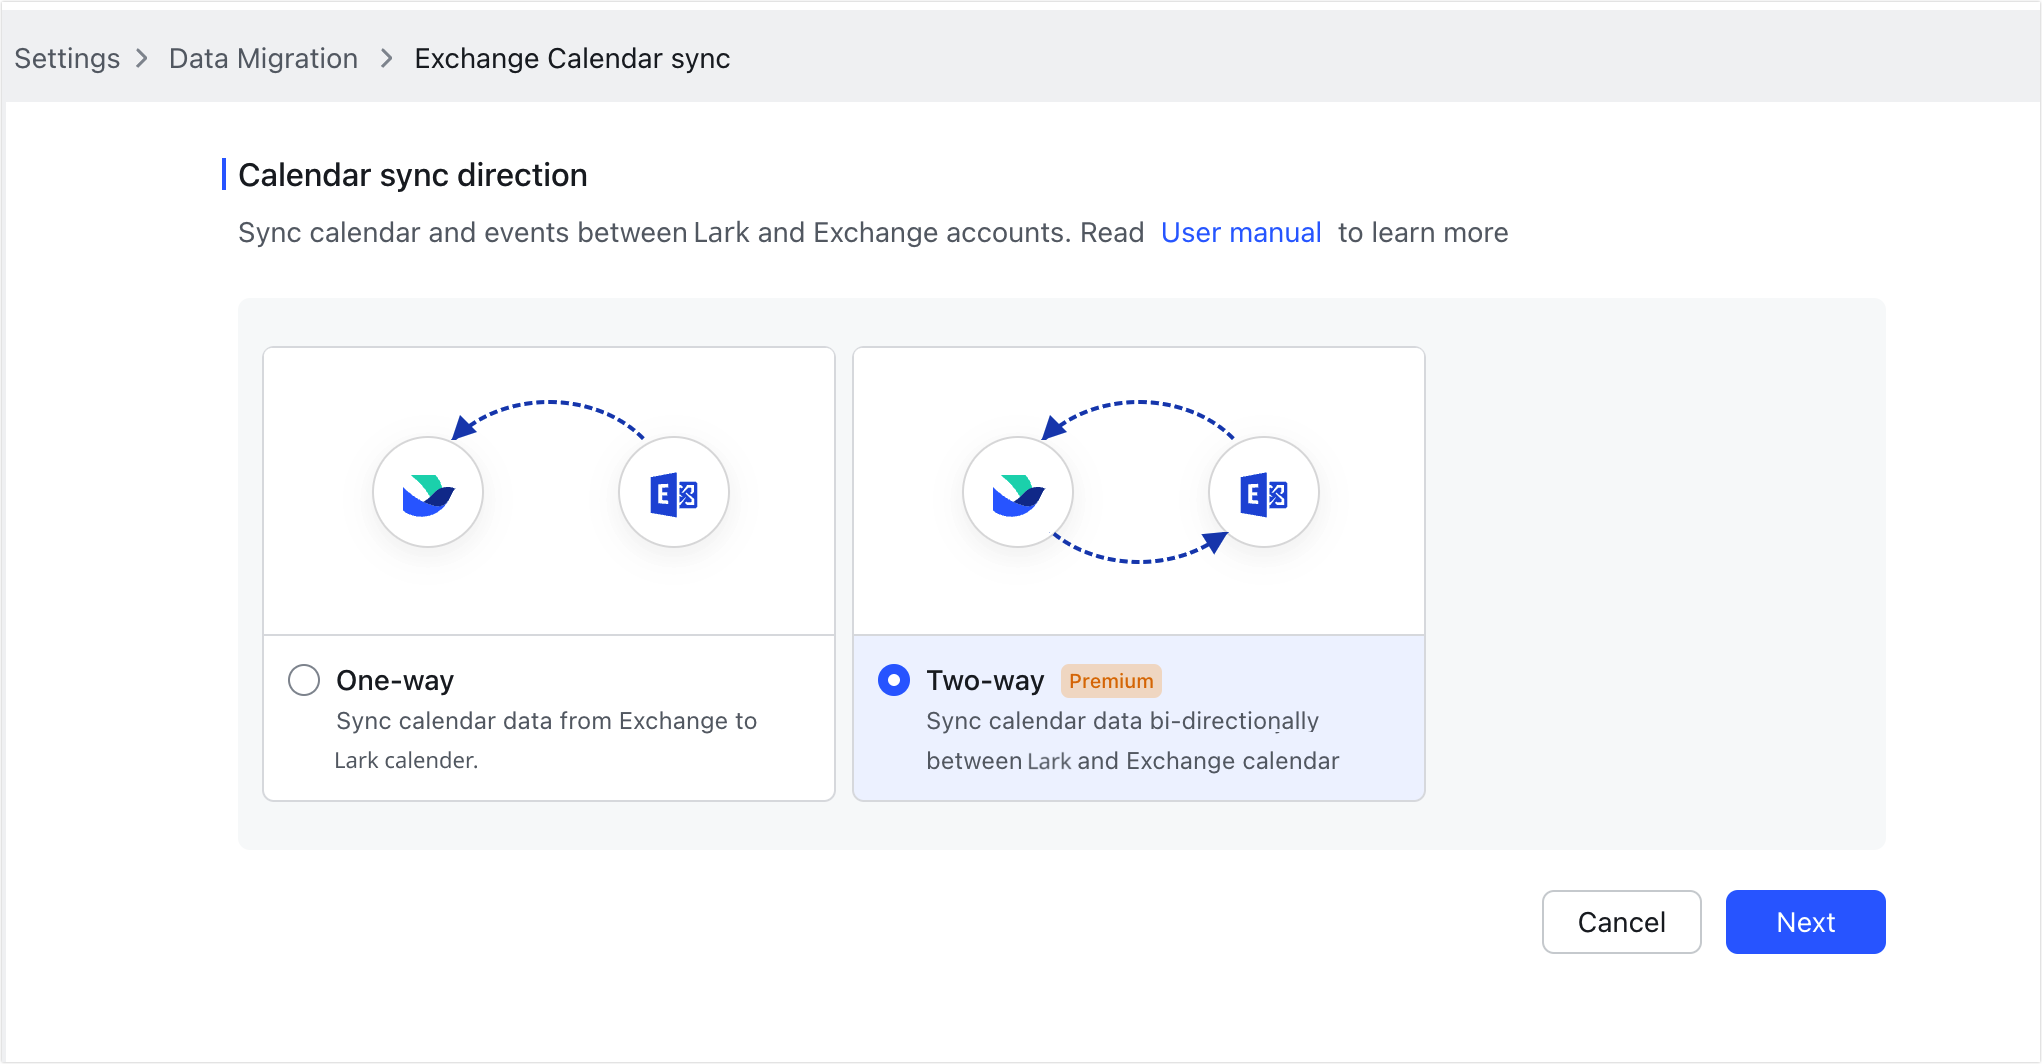
- After the account is successfully added, click Two-way > Next on the Exchange Calendar sync page.
250px|700px|reset
- If you have already completed configuring the email domain allowlist in the Exchange background, click Configuration completed in the pop-up window to proceed. If the configuration has not been completed, follow the provided instructions to complete it first.
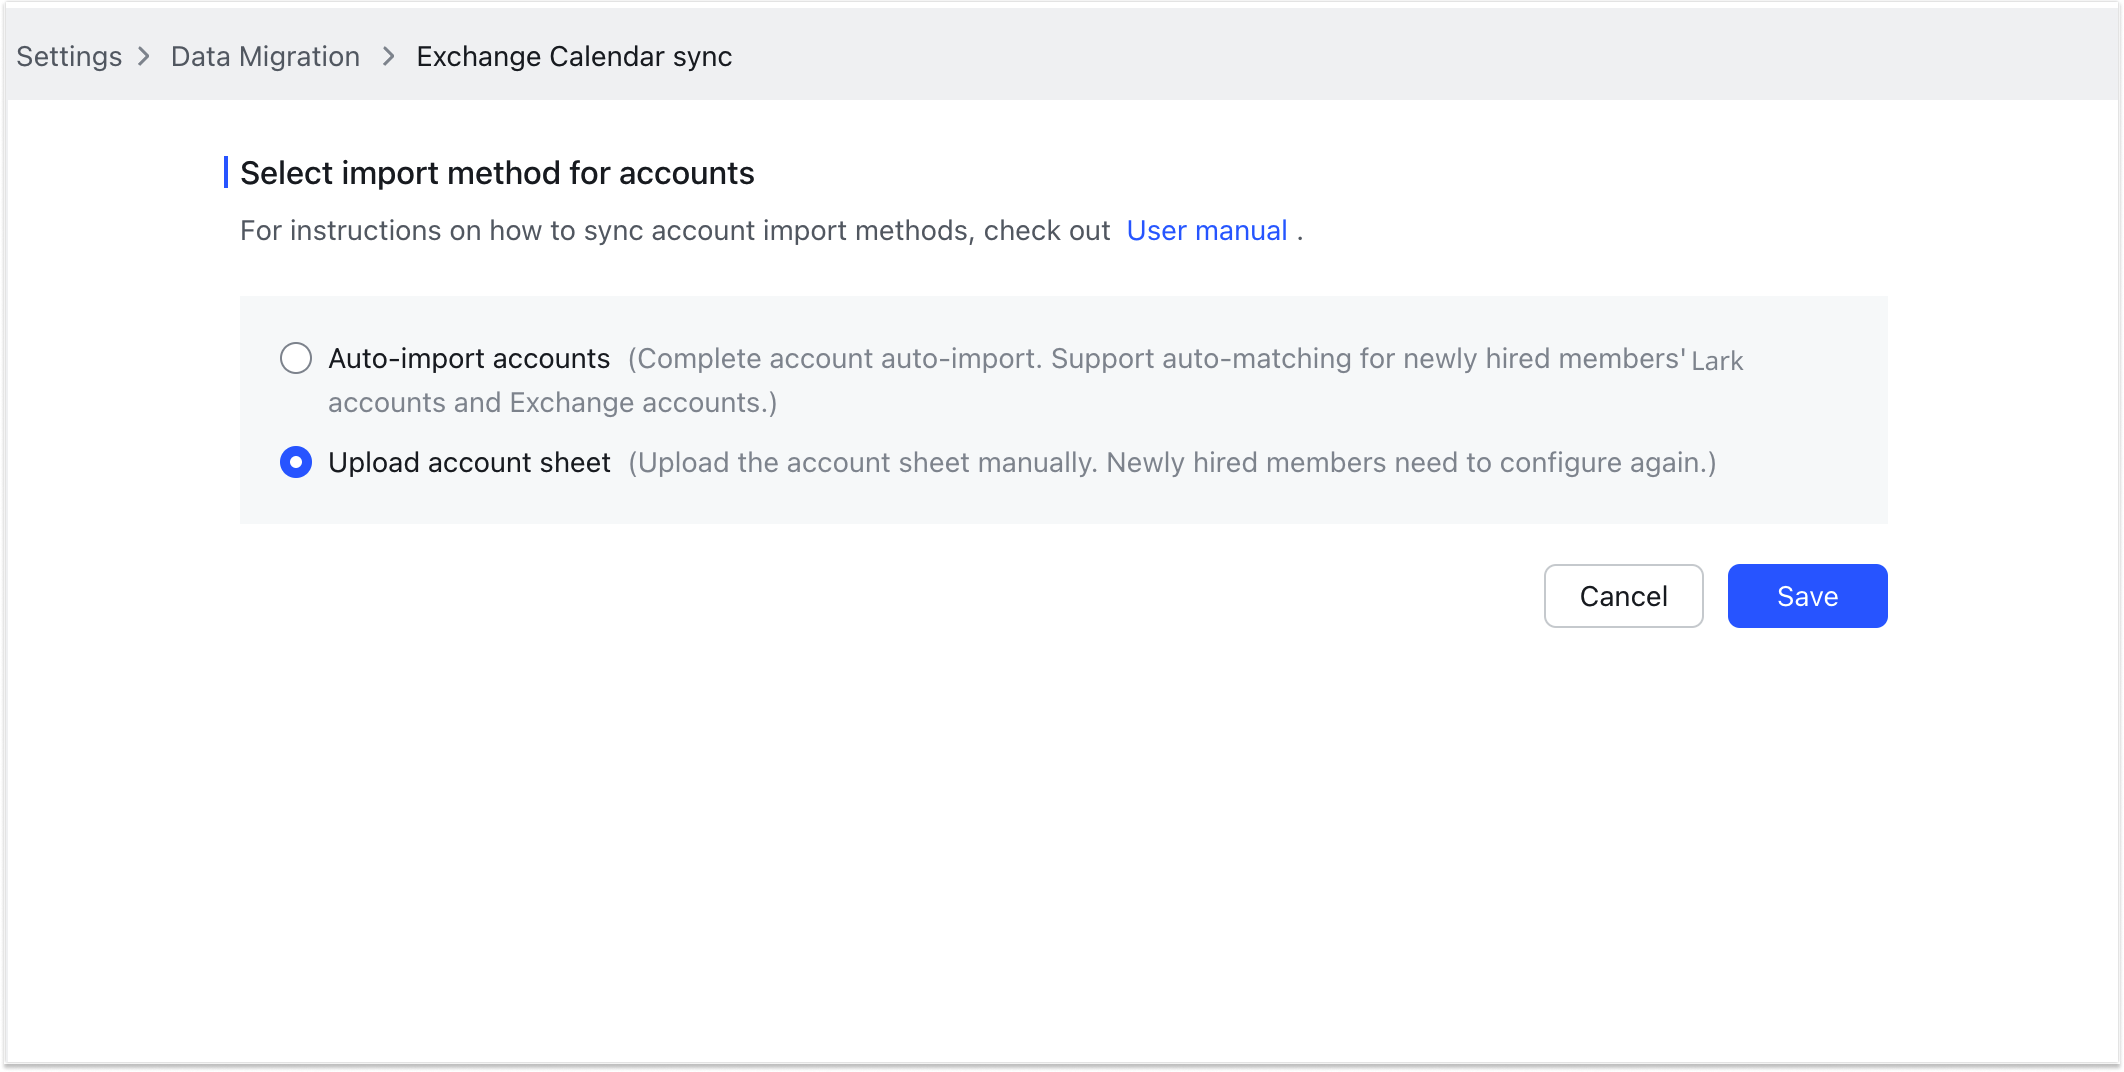
- Set the sync method on the page, or click Cancel and configure it later from the Exchange Calendar sync page.
- Select Auto-import accounts and click Save in the pop-up window. Users who have filled in their email information in Lark will be automatically linked to their Exchange accounts. When employees join, leave, or update their email information in Lark, the matching relationship between Lark and Exchange accounts will be updated accordingly.
- Select Upload account sheet and click Save to access the "Account pair up" page. For more information, see "3. Import member's Exchange accounts" below.
250px|700px|reset
3. Import members' Exchange accounts
- On the Exchange Calendar sync page, click Continue Import at the right of an Exchange admin's entry.
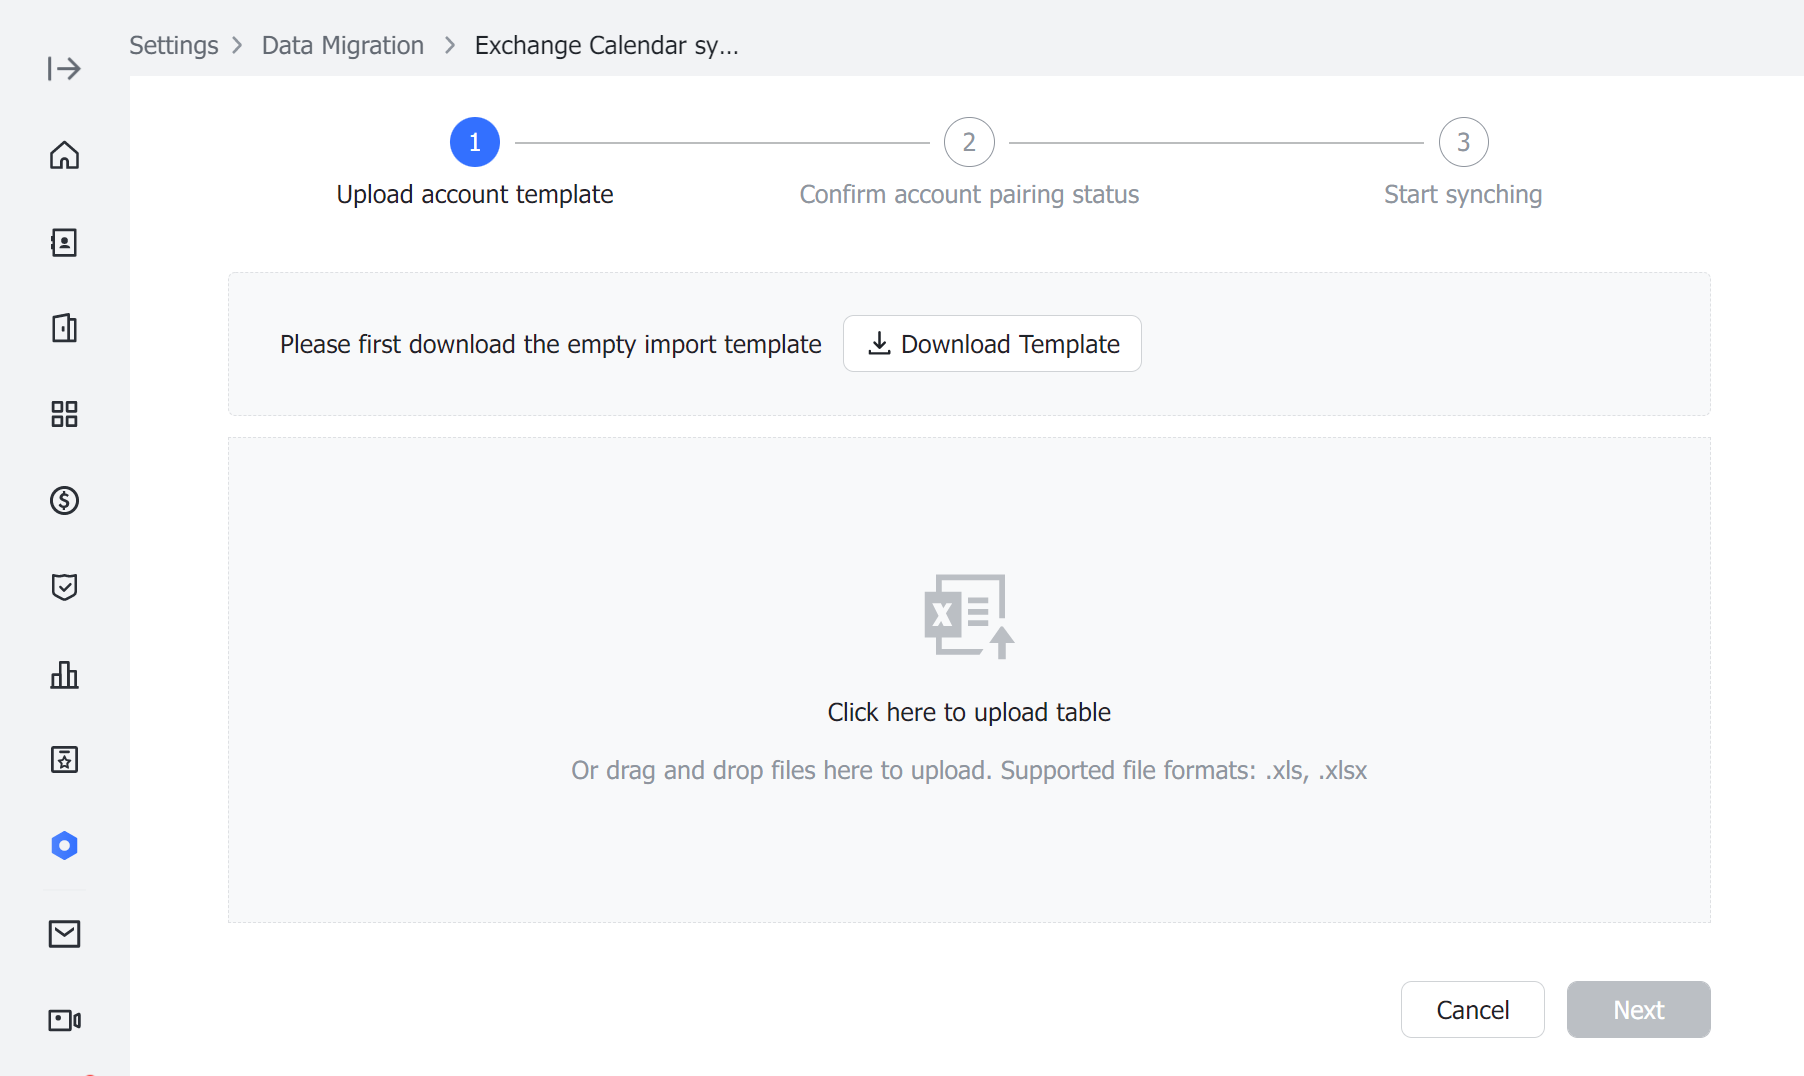
- Click Download Templates for a blank import template.
- Enter the members' Exchange accounts and save the table.
- Drag and drop the saved file to the upload area.
250px|700px|reset
- Once completed, click Next.
- Note: The uploaded accounts will be under the same administrator who uploaded them. If you need to check the list of managed accounts, click Exchange Calendar sync > Download Import Details.
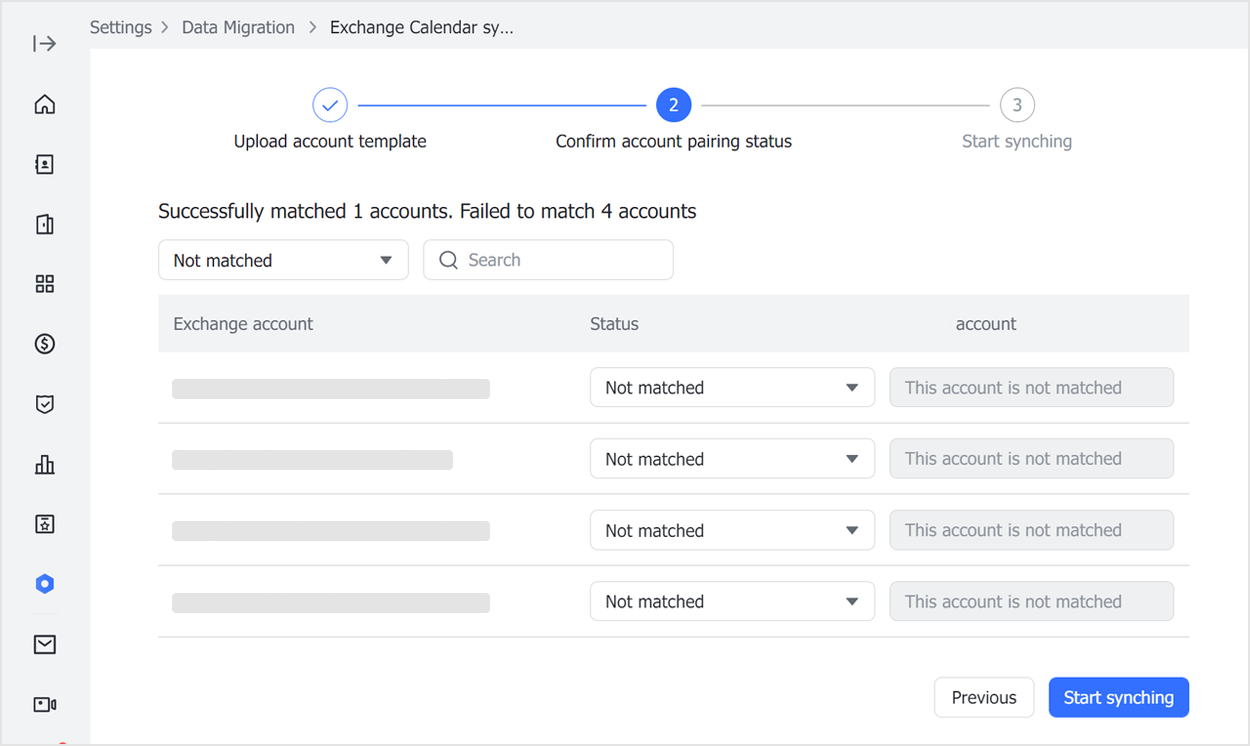
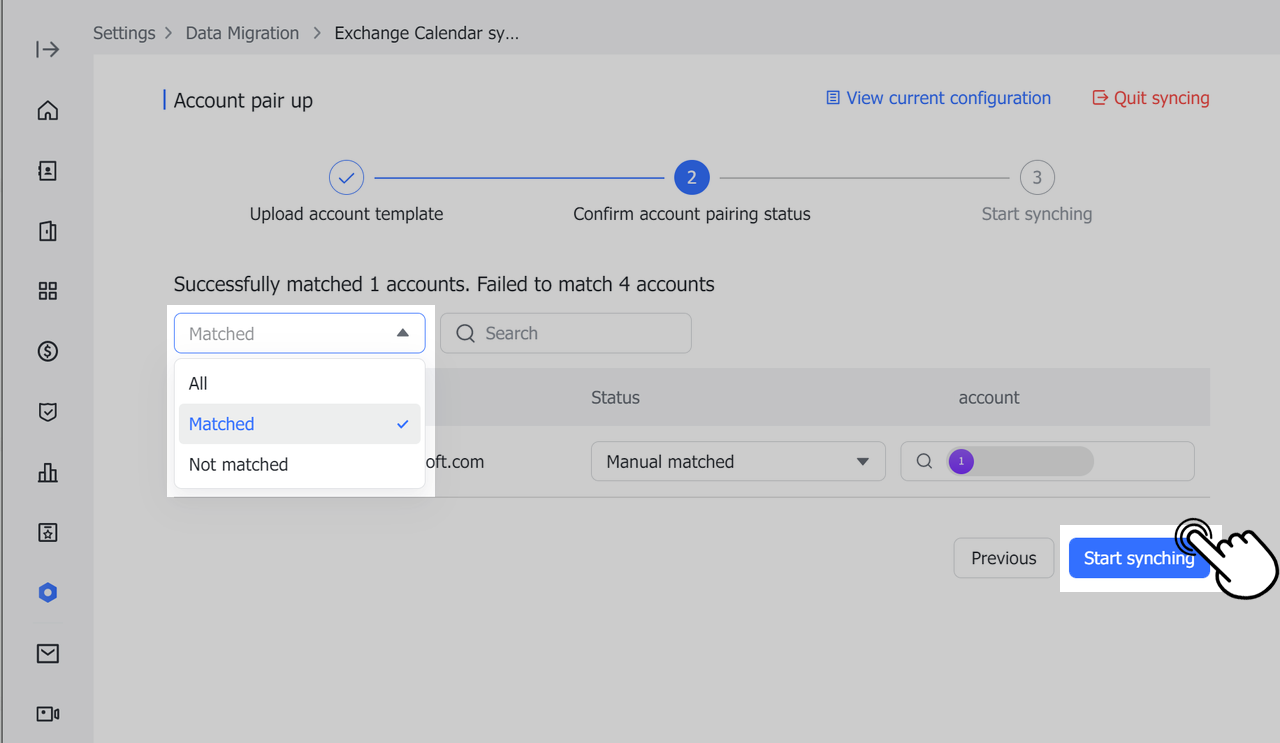
- Use the filters to confirm the pairing status. The tool also provides a summary of accounts successfully matched and not matched.
- If a member's Lark account is connected with their Exchange account already, both accounts will be paired automatically. You can edit Lark account information that's already been paired and manually pair accounts that haven't been matched.
- Click Start syncing.
250px|700px|reset
250px|700px|reset
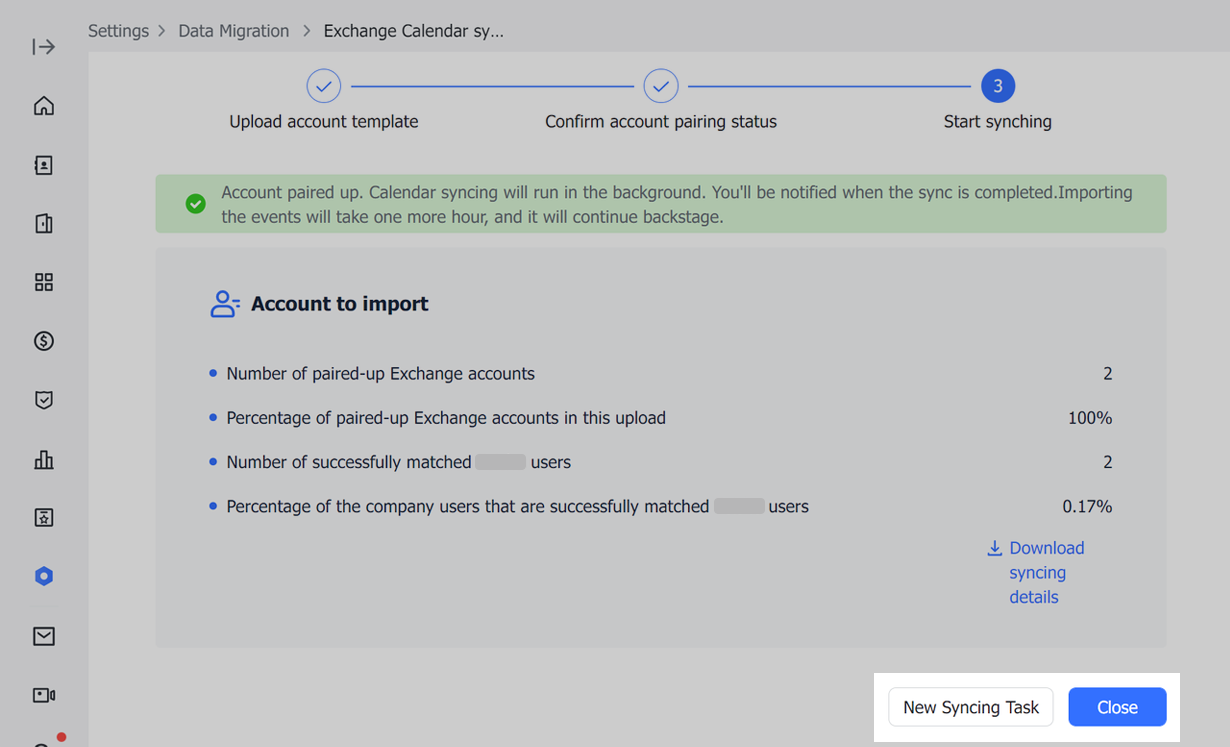
- Confirm all synced account information is correct, then click Close.
- Optionally, click New Syncing Task to upload more accounts.
250px|700px|reset
- Manage sync details
View sync status
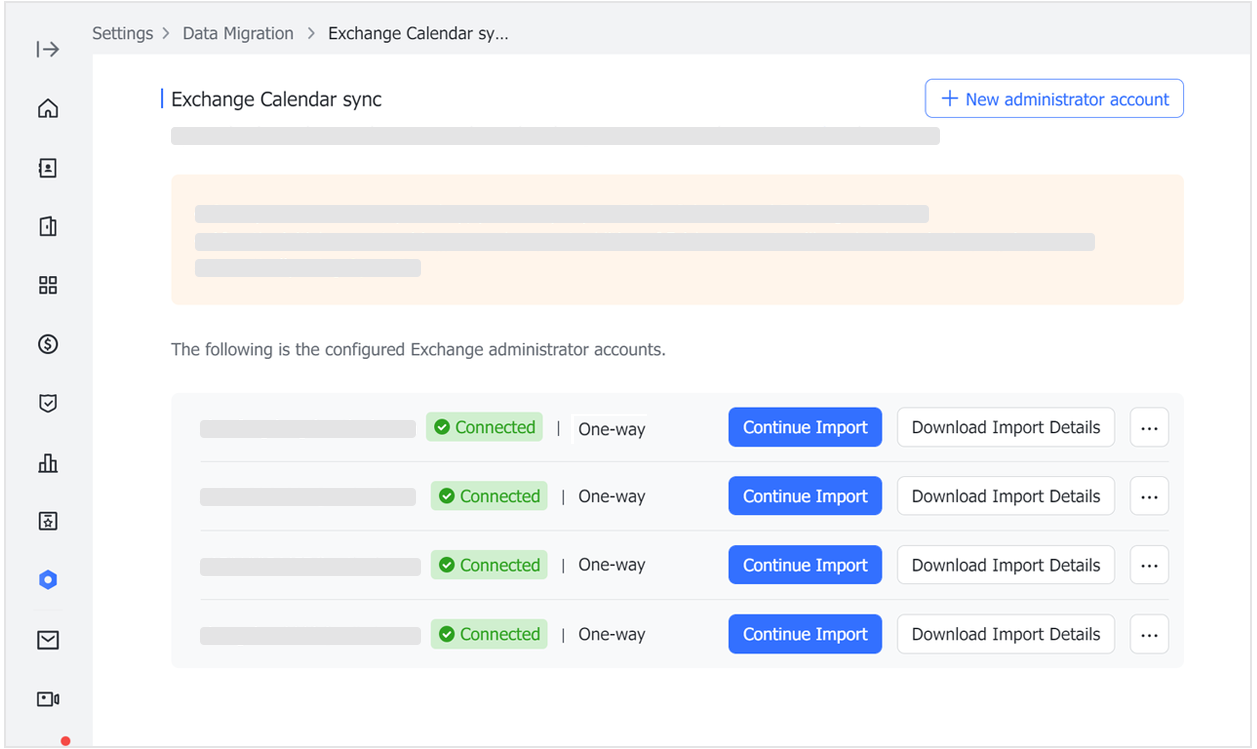
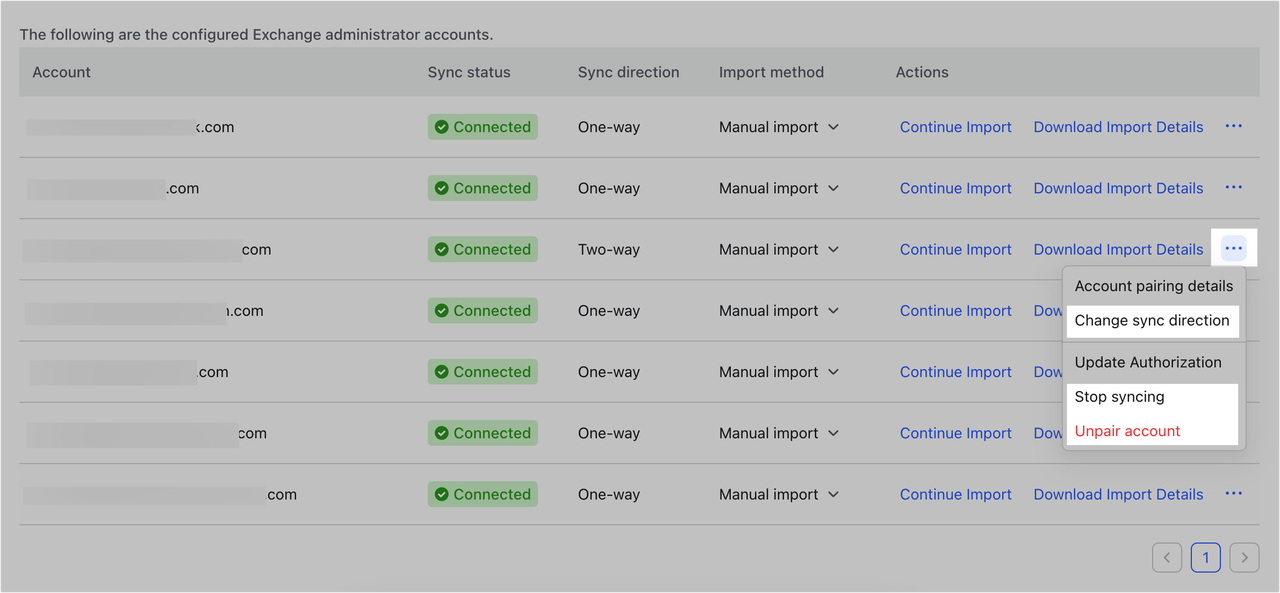
Go to the Exchange Calendar sync page to view configured Exchange admin accounts, sync status, and sync directions. The Connected label indicates that all the members' calendars under that Exchange admin's account are successfully synced.
250px|700px|reset
Change, stop, and remove sync
- Change sync direction: Click the ... icon on the right of an Exchange admin > Change sync direction to change the sync direction of a configured account.
- Note: When changing sync directions from one-way to two-way, if a Lark account is associated with multiple Exchange accounts, you must reconfirm the account's pairing status to continue syncing.
- Stop syncing: Click the ... icon > Stop syncing to pause the calendar data sync of an Exchange admin. The pairing status will remain so you can resume the syncing when needed.
- Unpair accounts: Click the ... icon > Unpair account. If an account is unpaired, its Exchange Calendar will no longer be synced to and displayed in Lark Calendar.
250px|700px|reset
- Two-way sync on the member's calendar
Exchange Calendar > Lark Calendar
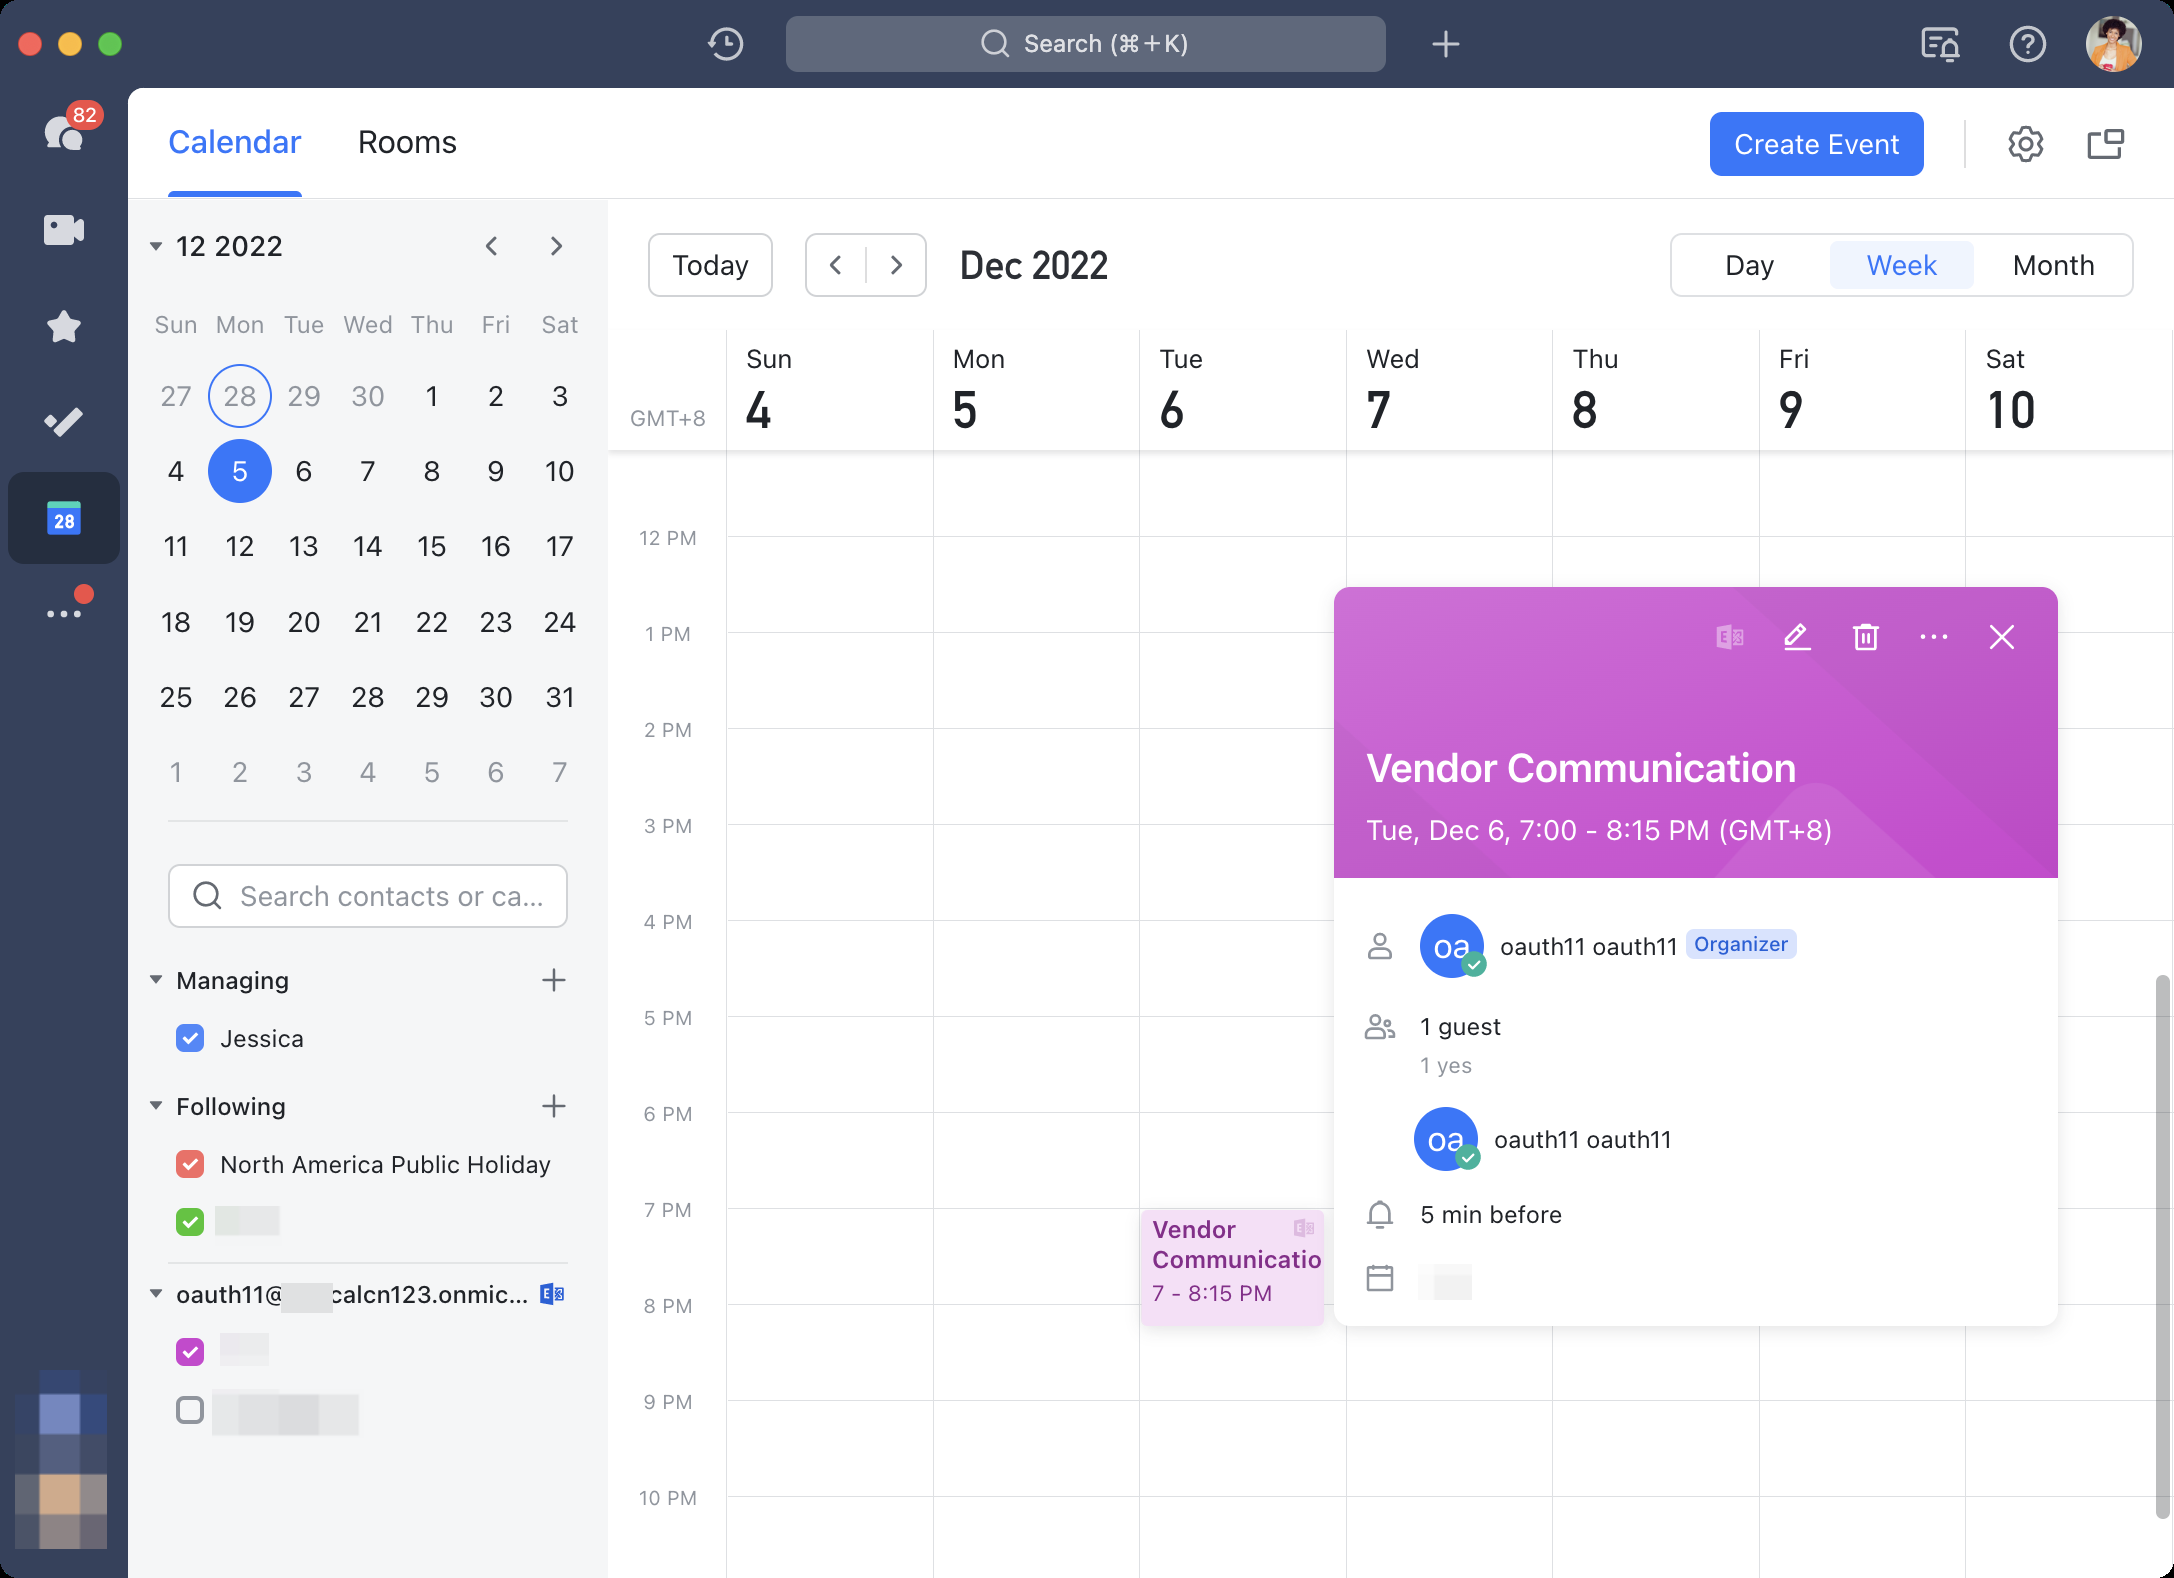
Exchange calendars and events are synced to Lark. When you click an event synced from Exchange, you will see a small “E” Exchange logo in the upper-right corner of the event card. Event organizers, attendees, the event description, and reminder times will also be synced. Any accept, decline, and maybe replies you make will also sync back to Lark.
250px|700px|reset
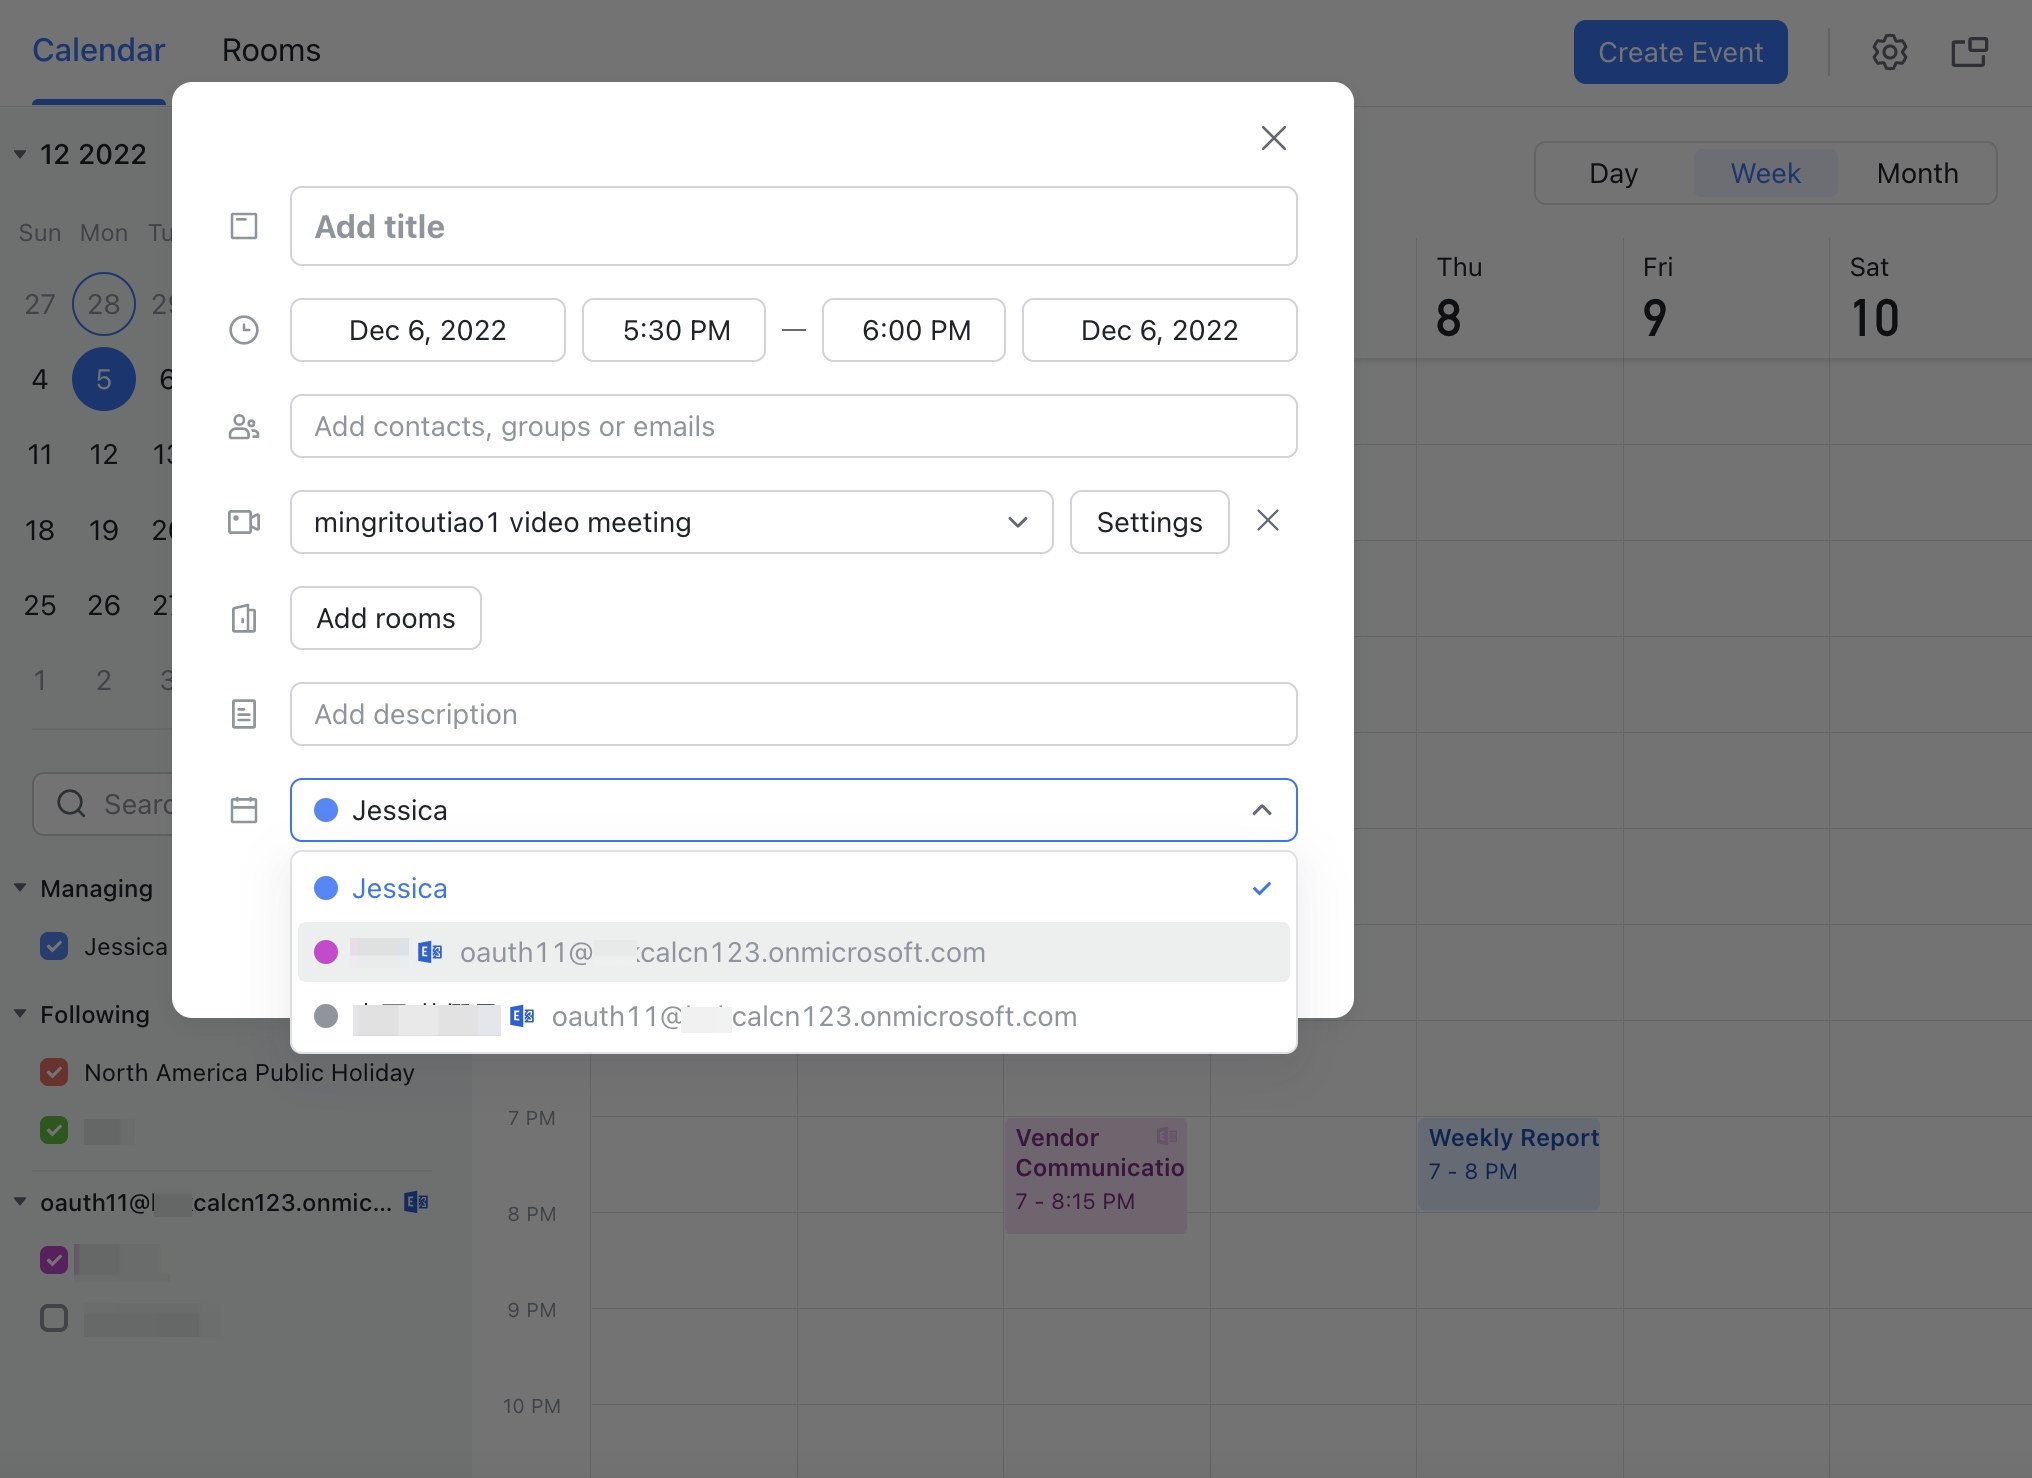
If you have event editing permissions, you can edit events on Lark. Changes will be synced back to Exchange.You can also create Exchange events within Lark Calendar. Open Lark Calendar, select the event time, and in the event, the editor can select the corresponding Exchange Calendar.
250px|700px|reset
Lark Calendar > Exchange Calendar
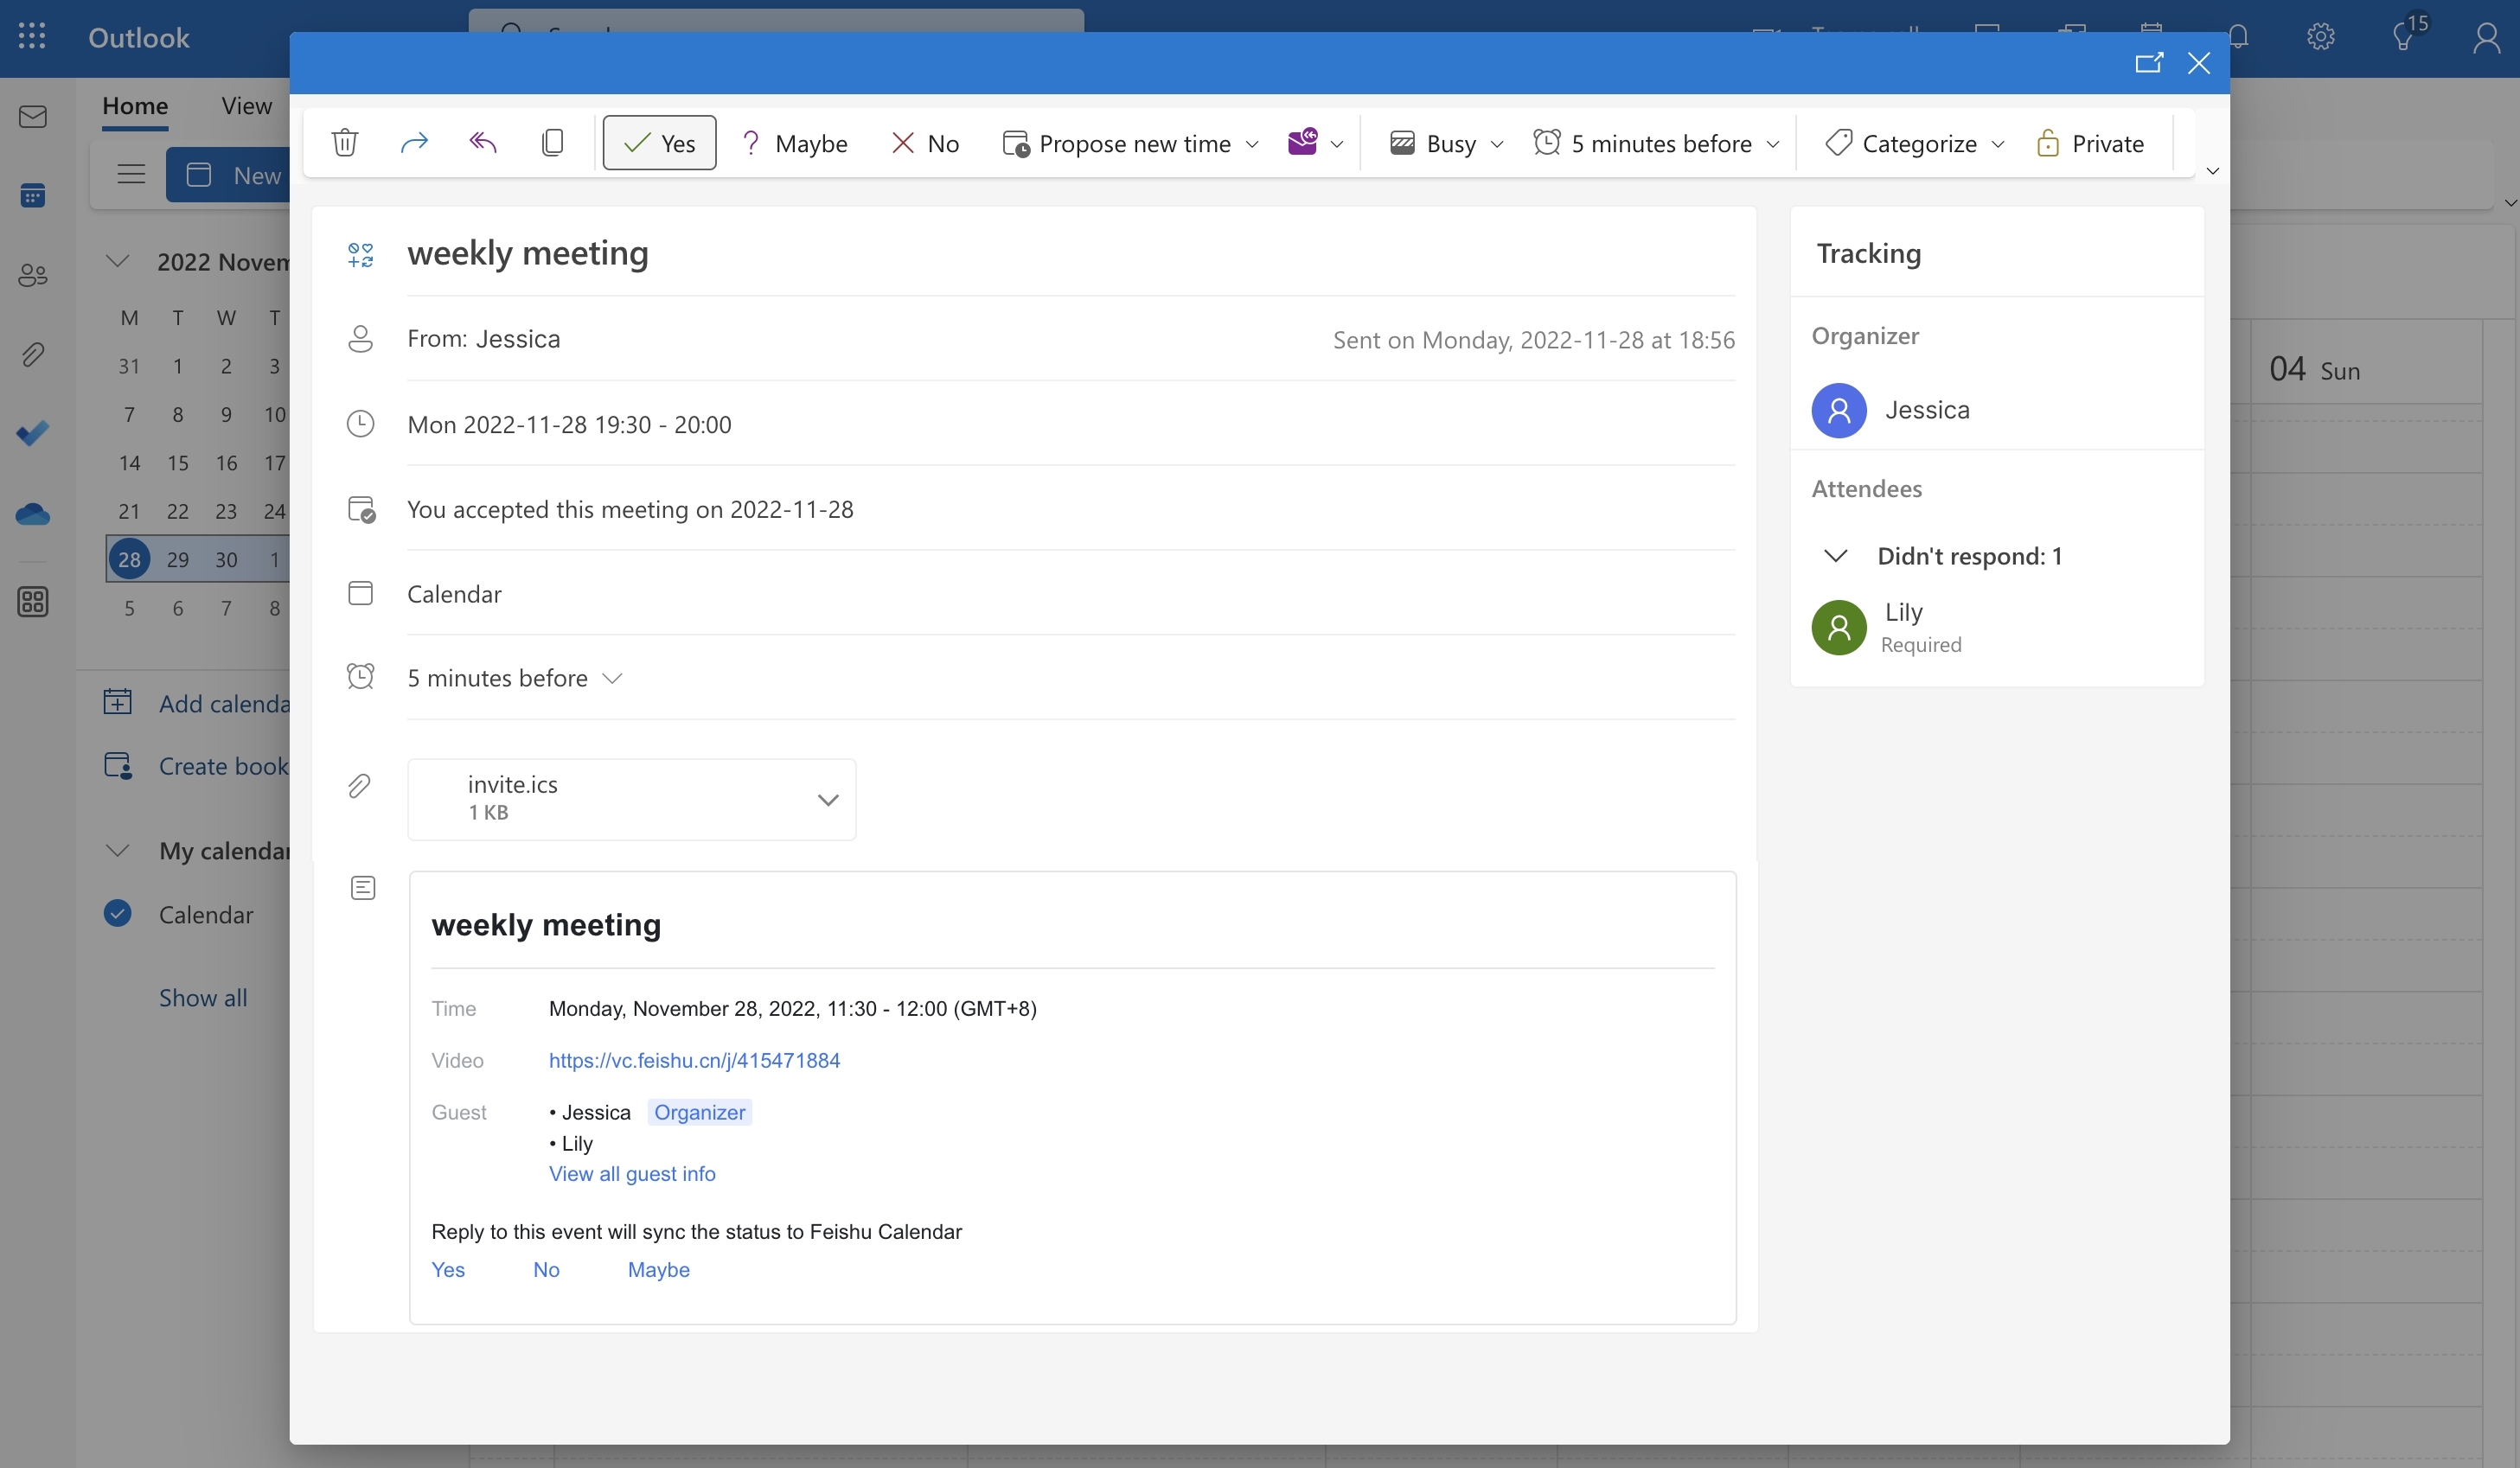
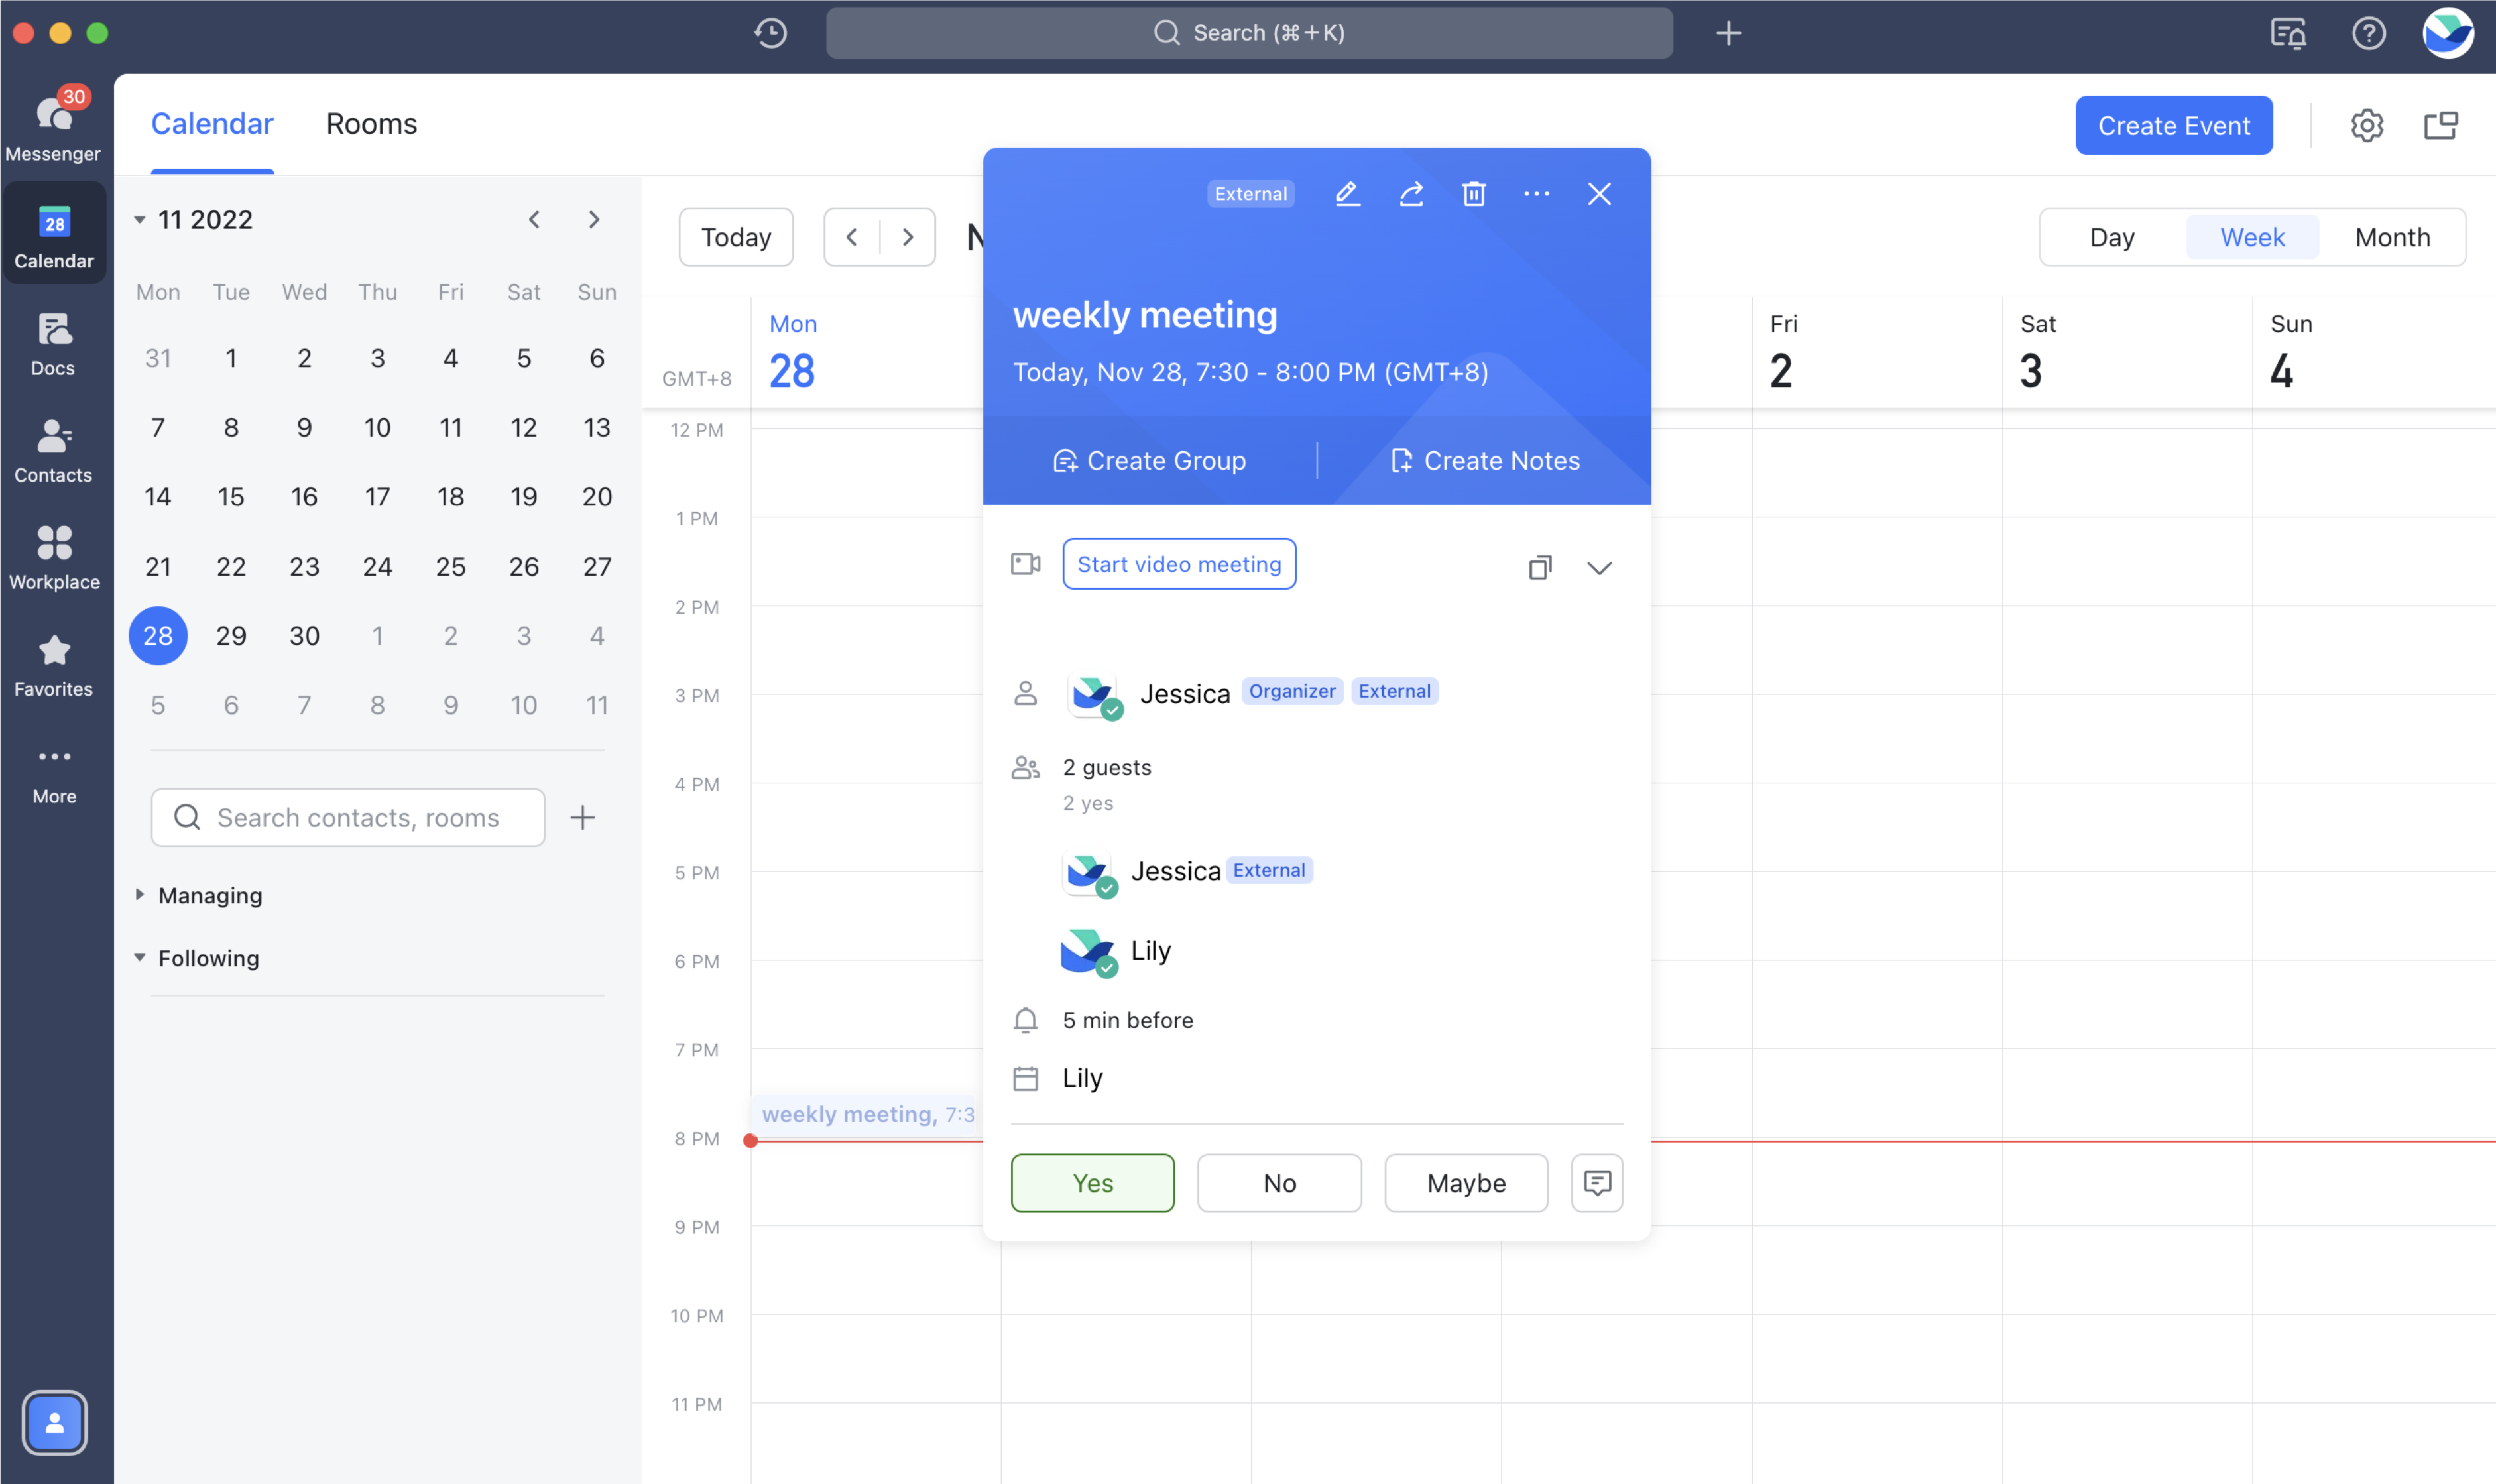
Lark Calendar events will be synced to your Exchange Calendar, and you will be able to view them on the calendar page. Synced events will include the title, time, meeting room, location, and reminder time. Lark event information such as meeting links, organizers, guests, and descriptions will also be synced across.
When a Lark event is synced to your Exchange Calendar, you can accept, decline, or reply as tentative on Exchange, and your response will be synced to the corresponding Lark account and event.
250px|700px|reset
250px|700px|reset
III. FAQs
