I. Intro
Lark Survey has been rebranded to Lark Forms, which has been redesigned from the ground up to better integrate with Base.
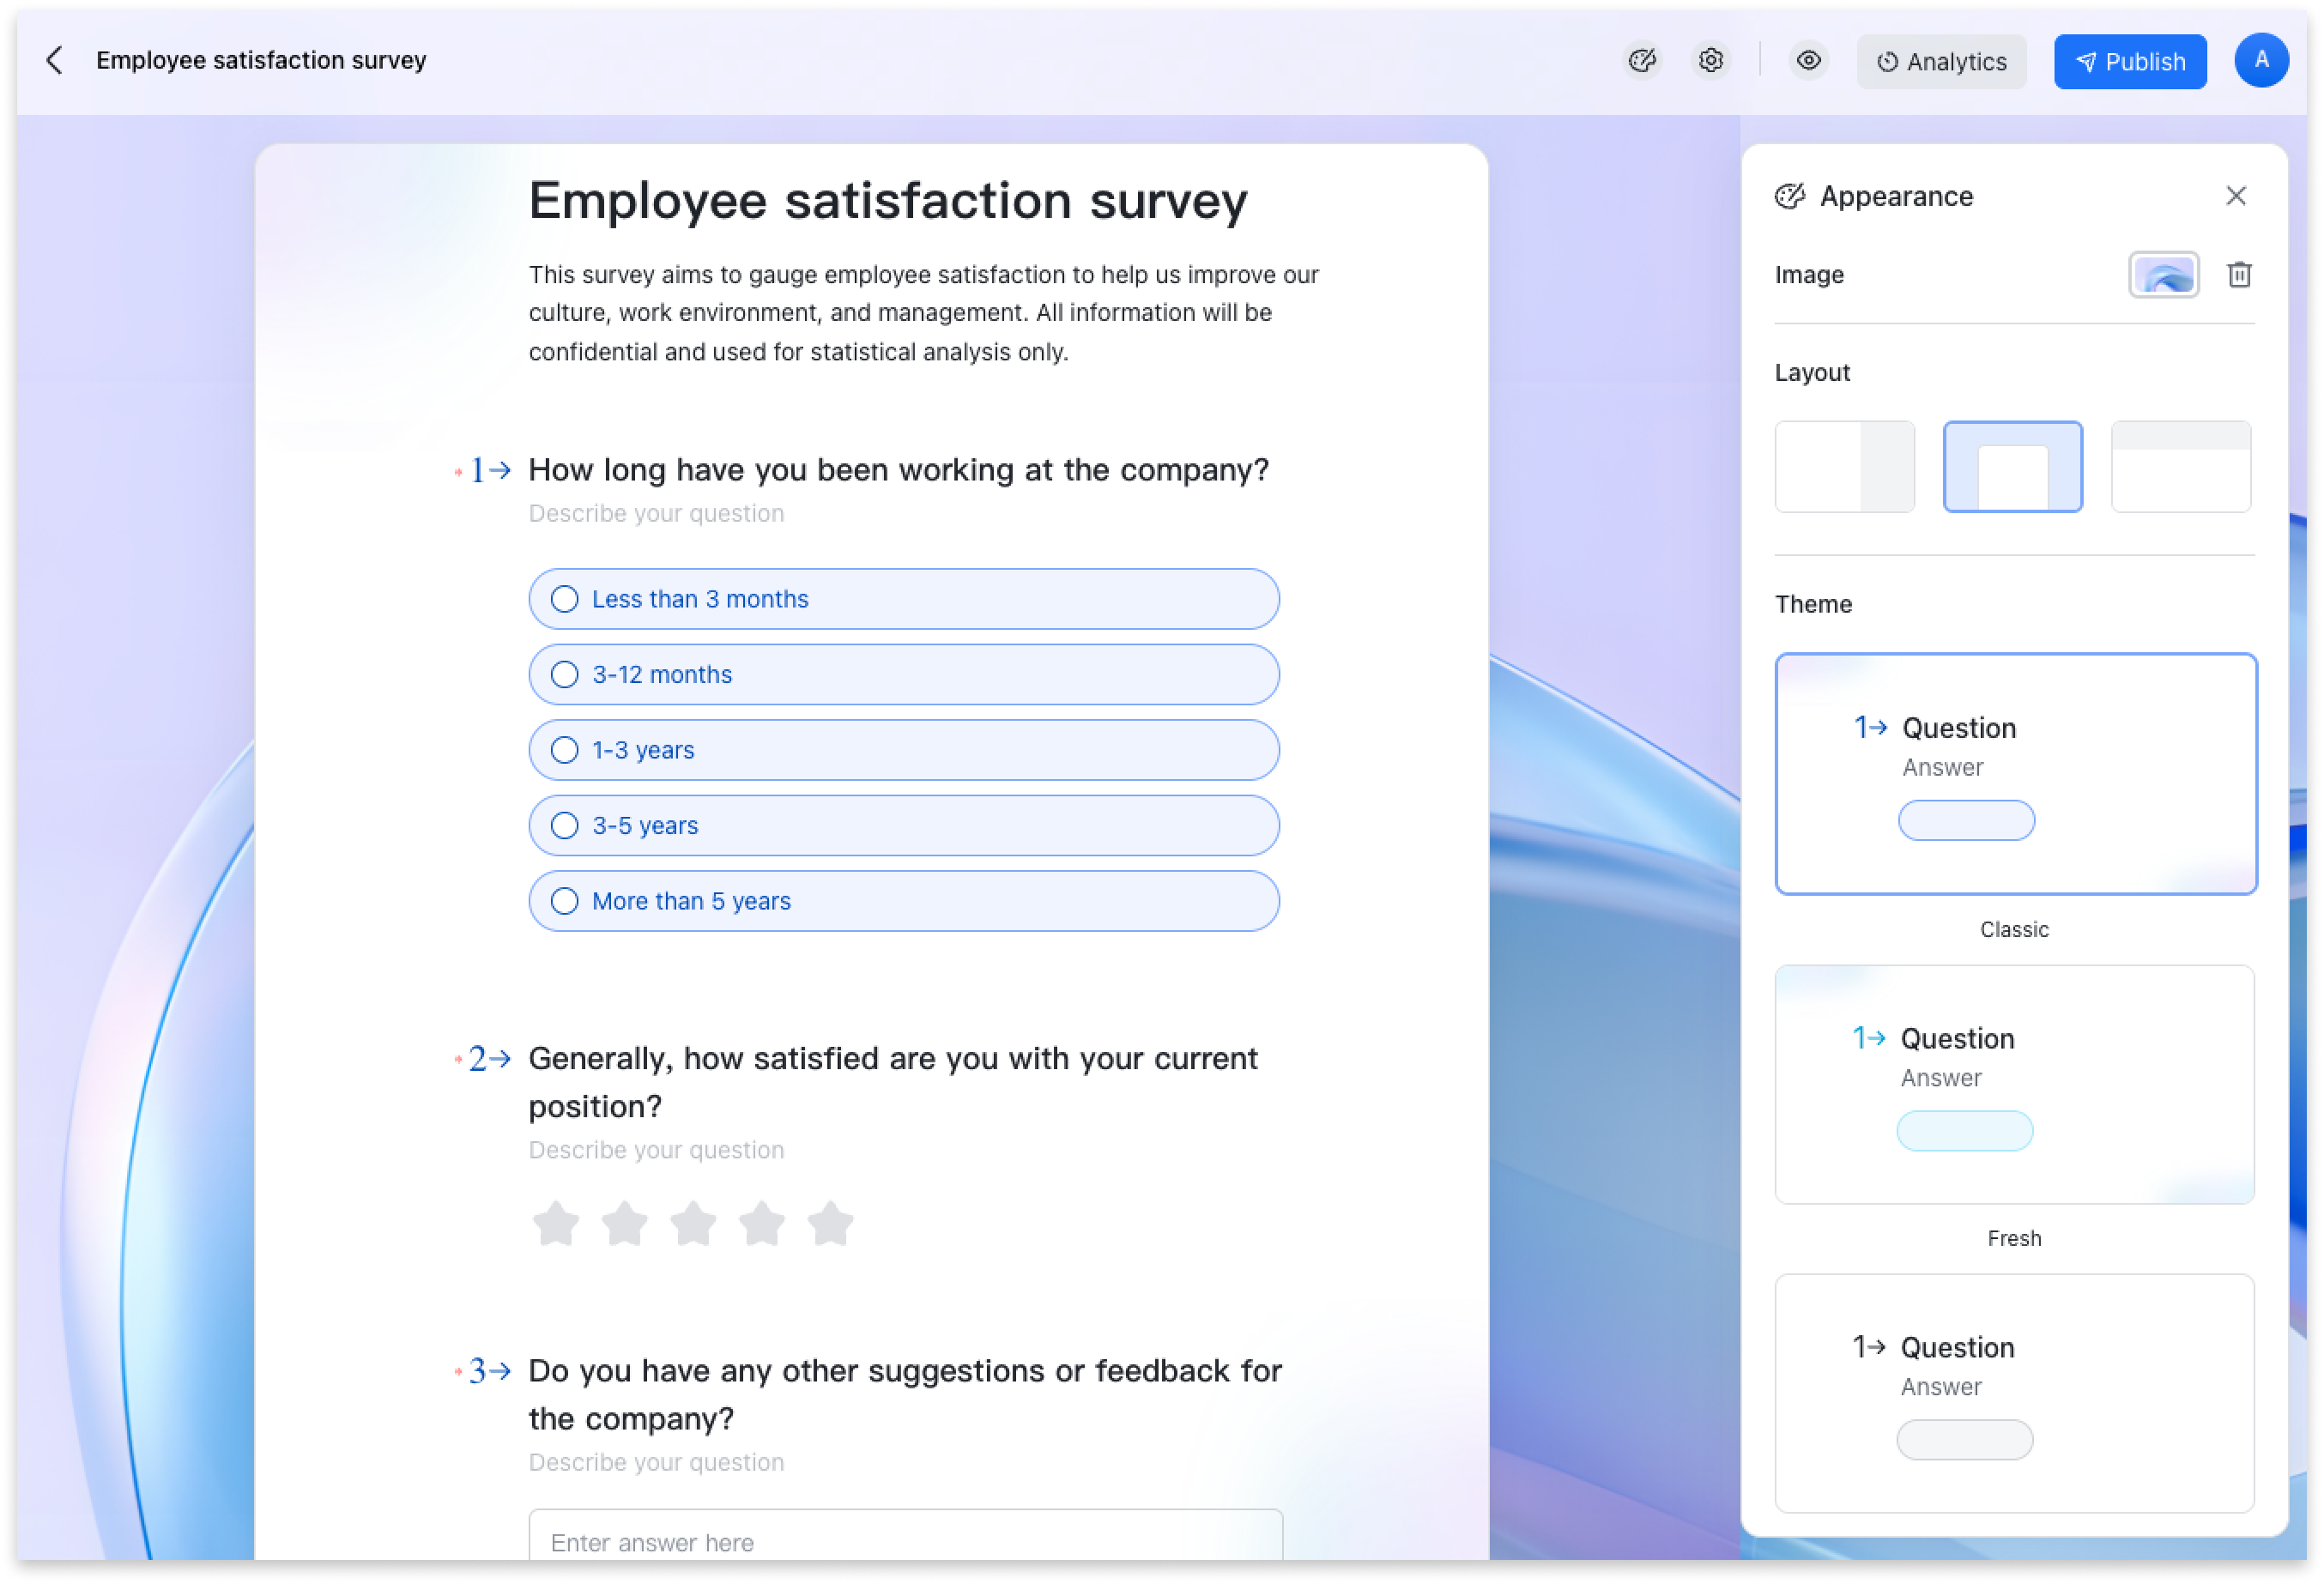
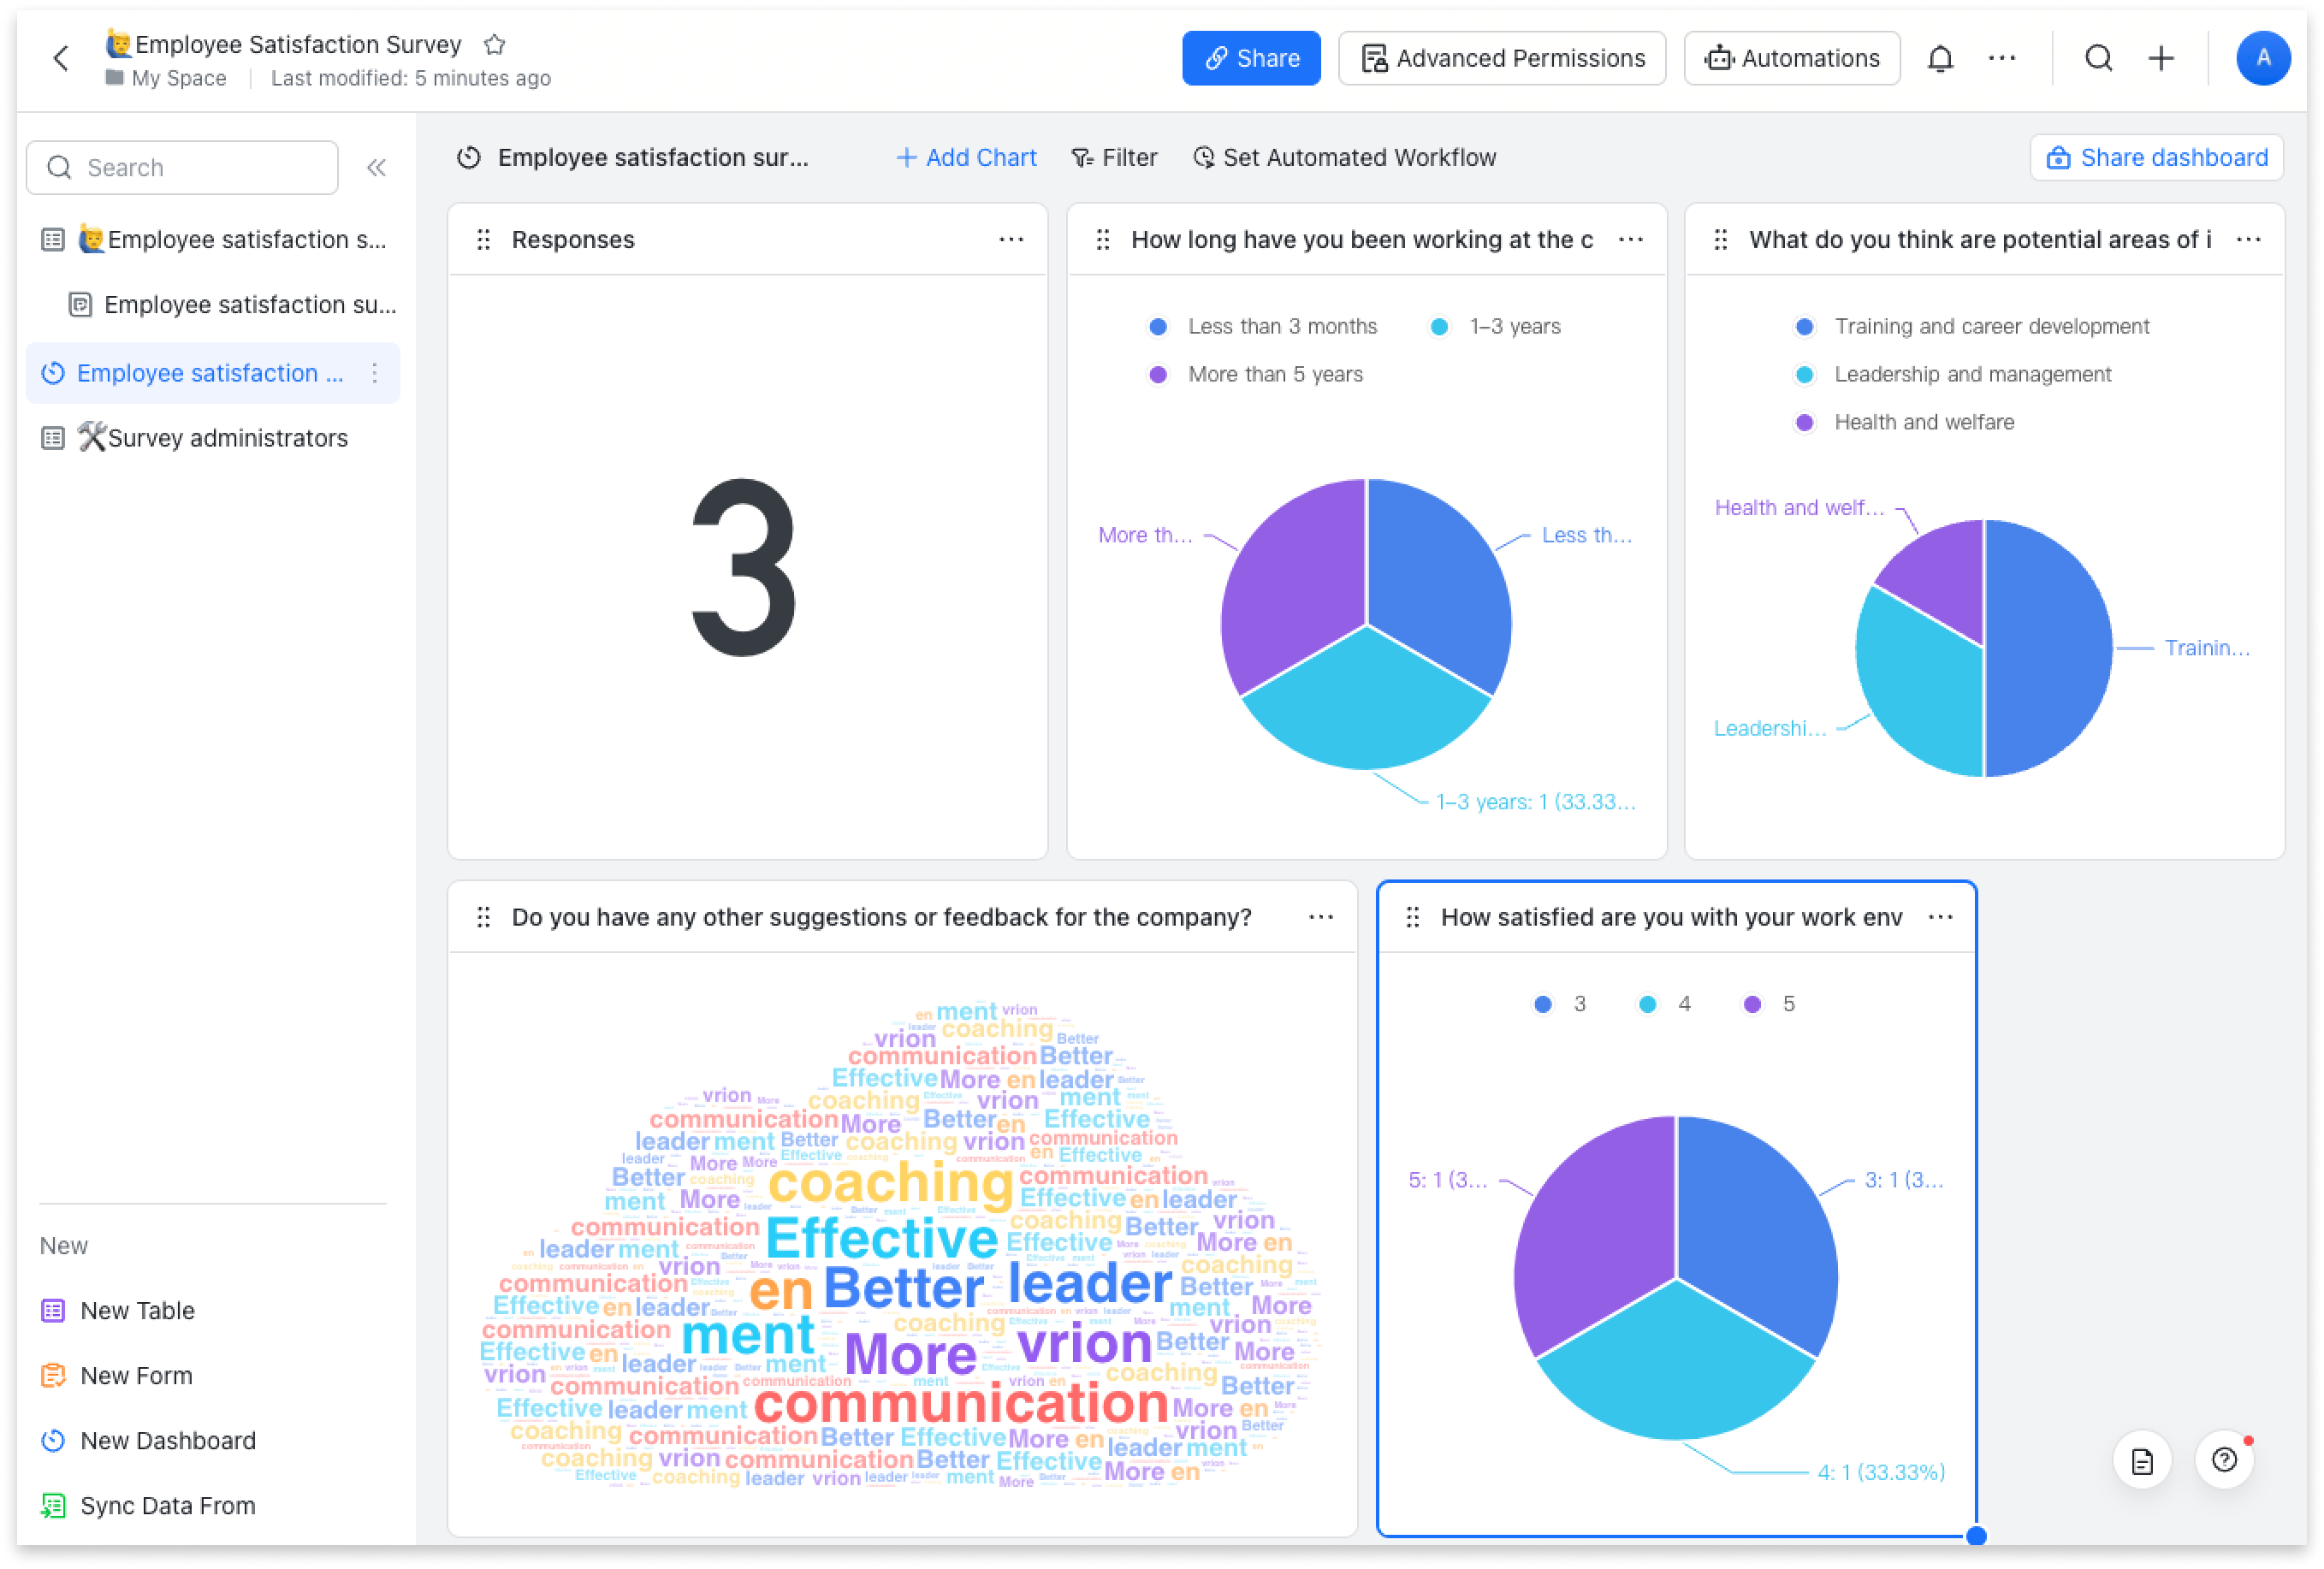
You can create a Lark form, and customize it by setting the theme and adding a background image. What's more, you can now use the Base dashboard to view and analyze form responses to uncover deeper insights.
250px|700px|reset
250px|700px|reset
II. Steps
Create a Lark form
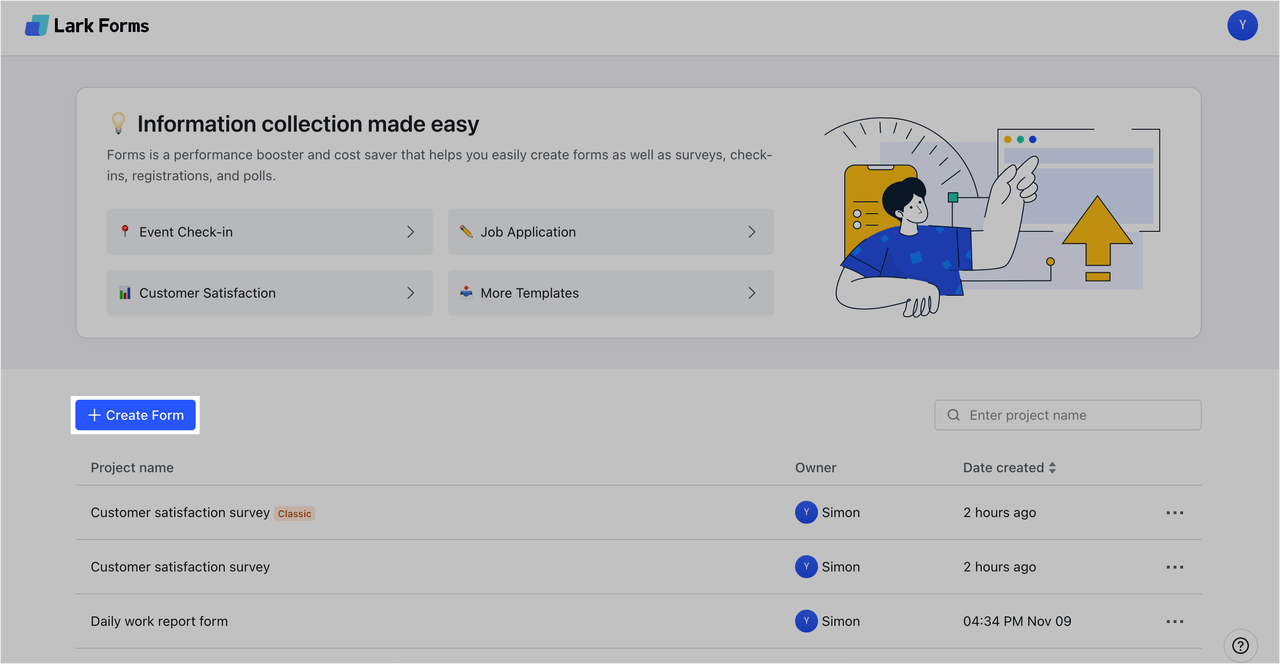
On the Lark Forms homepage, click Create Form. You can start with a blank form or pick a template.
The form and form responses will be recorded in a new base.
Note: Lark forms will take up your cloud storage space. For more details, see Admin | View and clean up storage space and View and manage storage.
250px|700px|reset

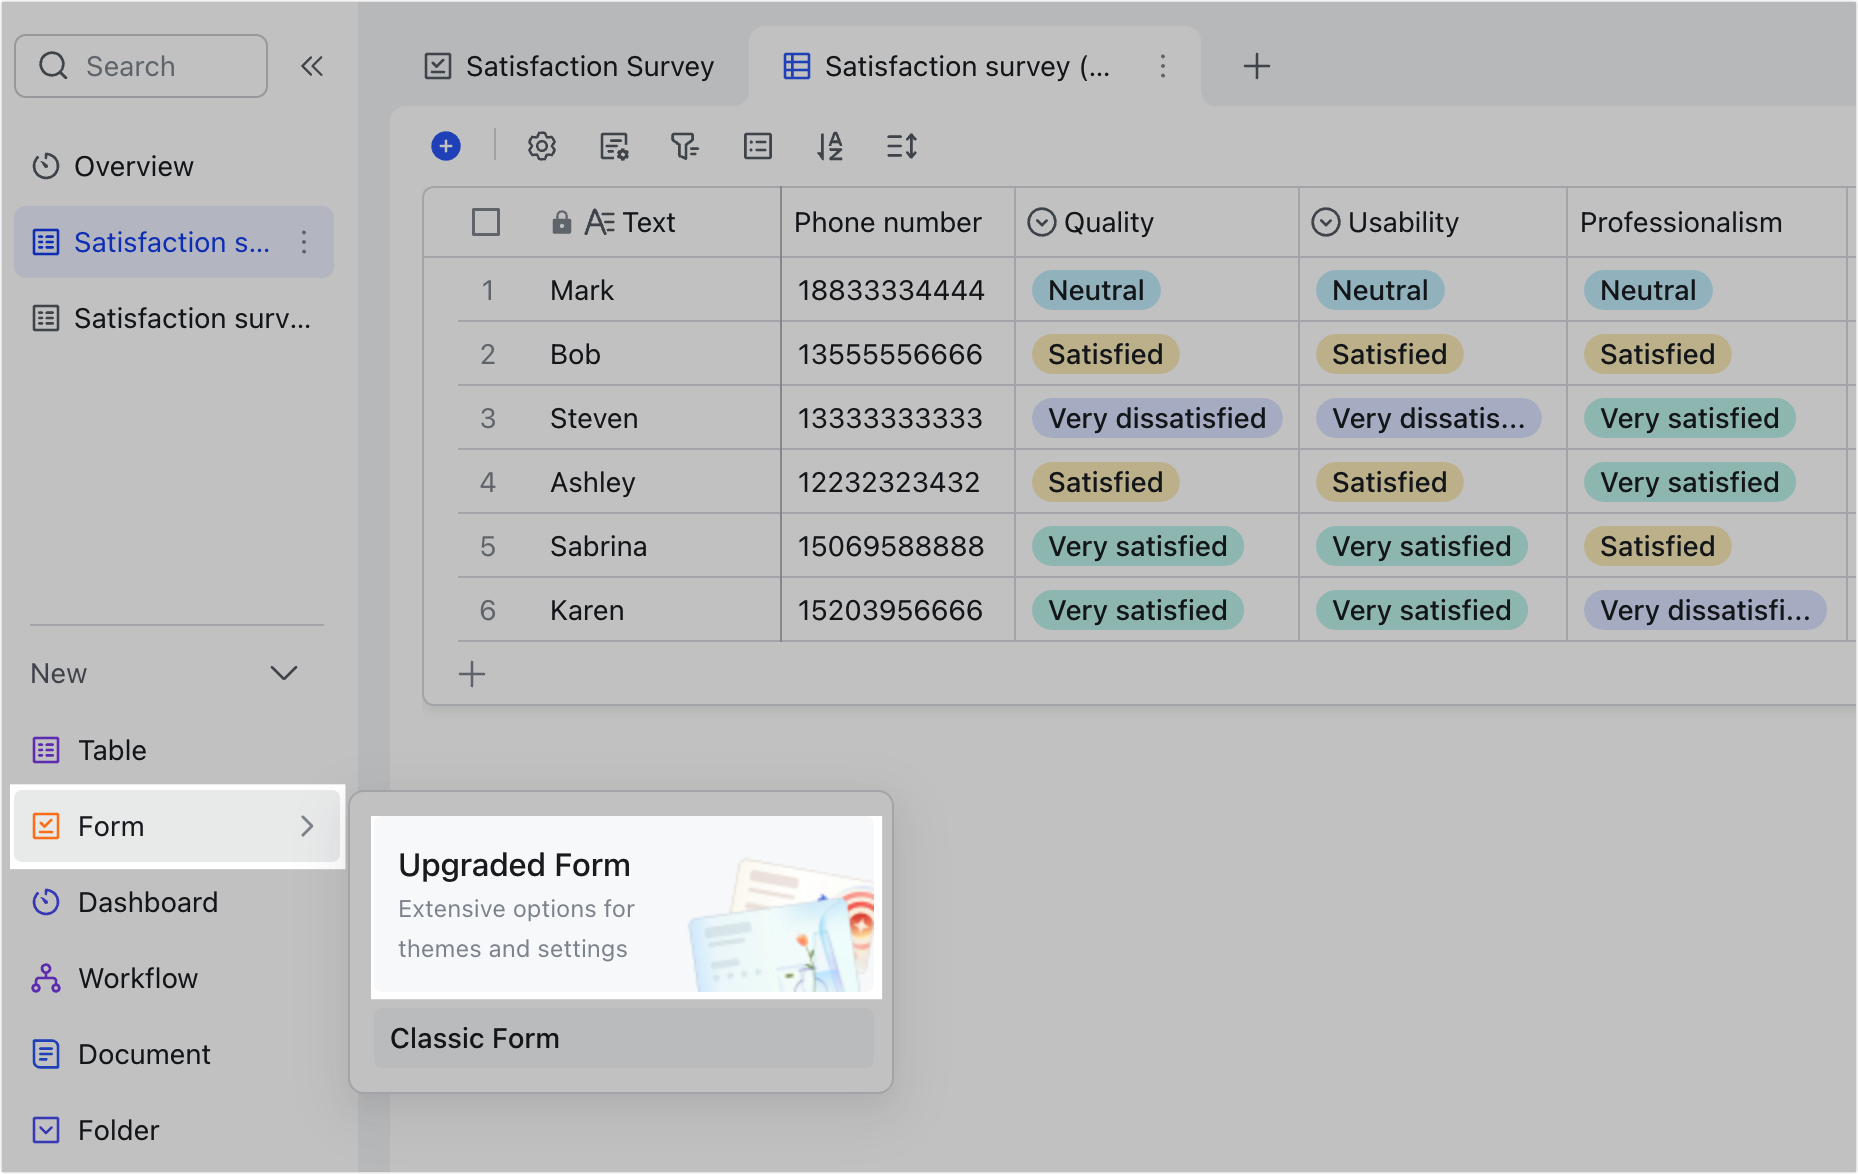
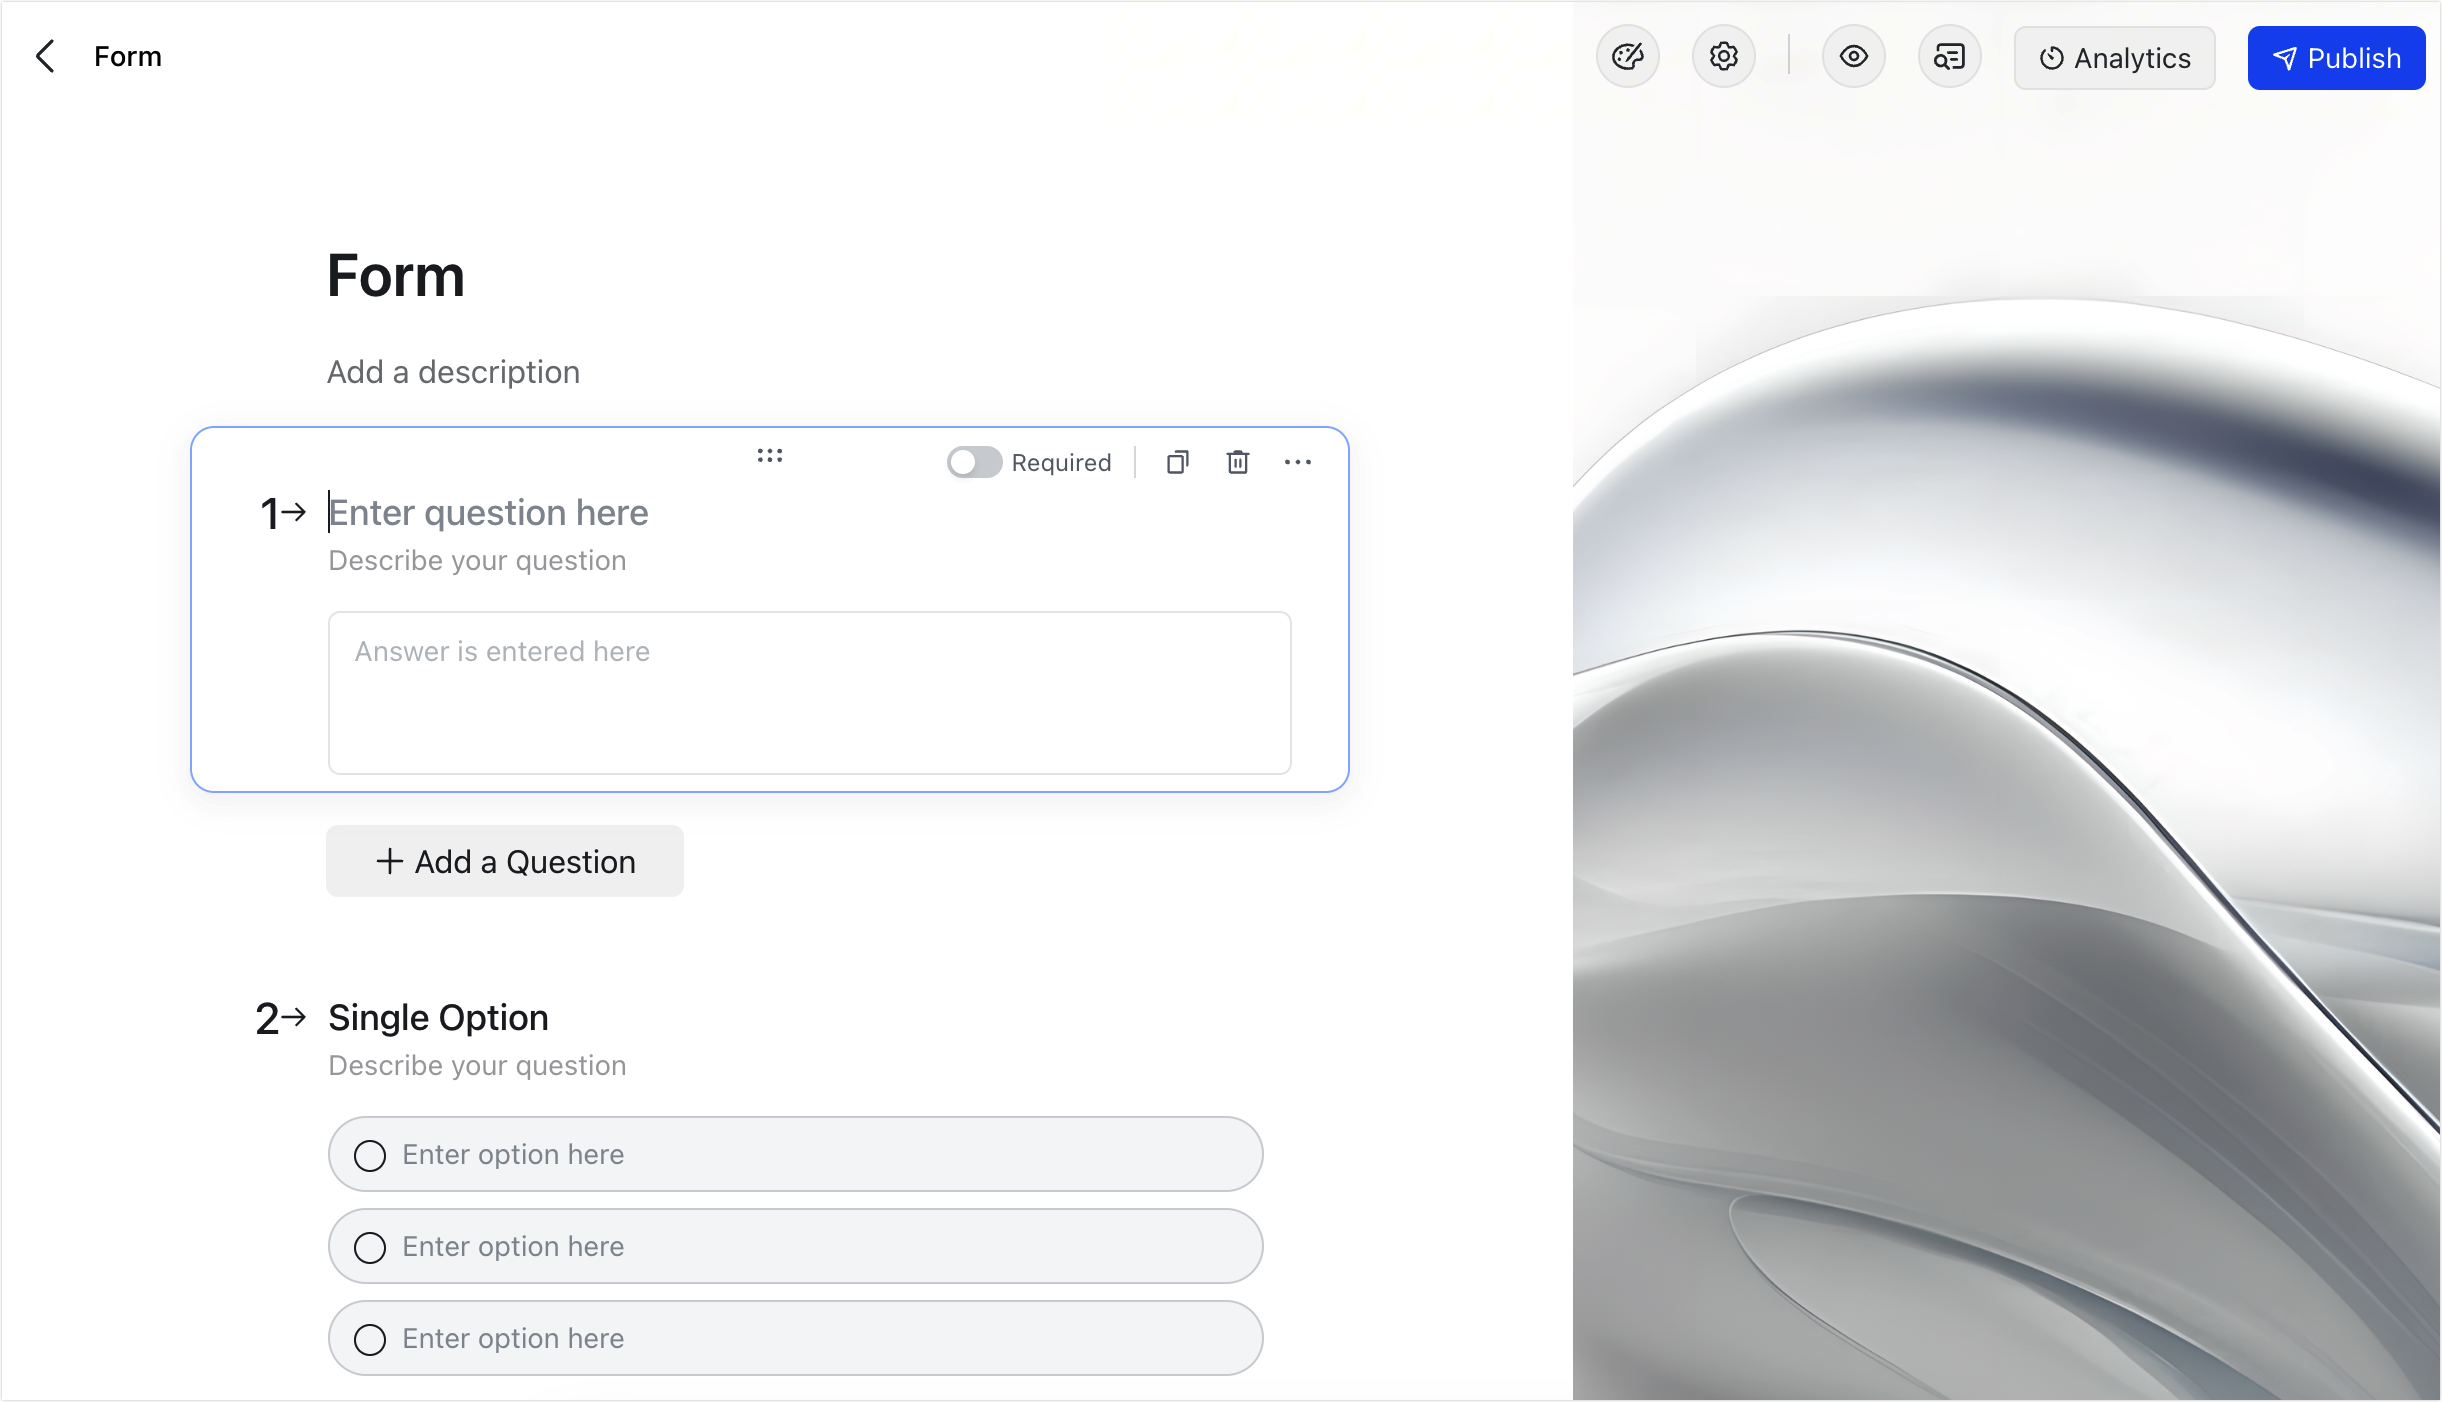
You can also create a new form in a base. Open a base, click Form in the lower-left corner, and select Upgraded Form. Forms created this way will have the same functionalities as Lark Forms.
250px|700px|reset
250px|700px|reset
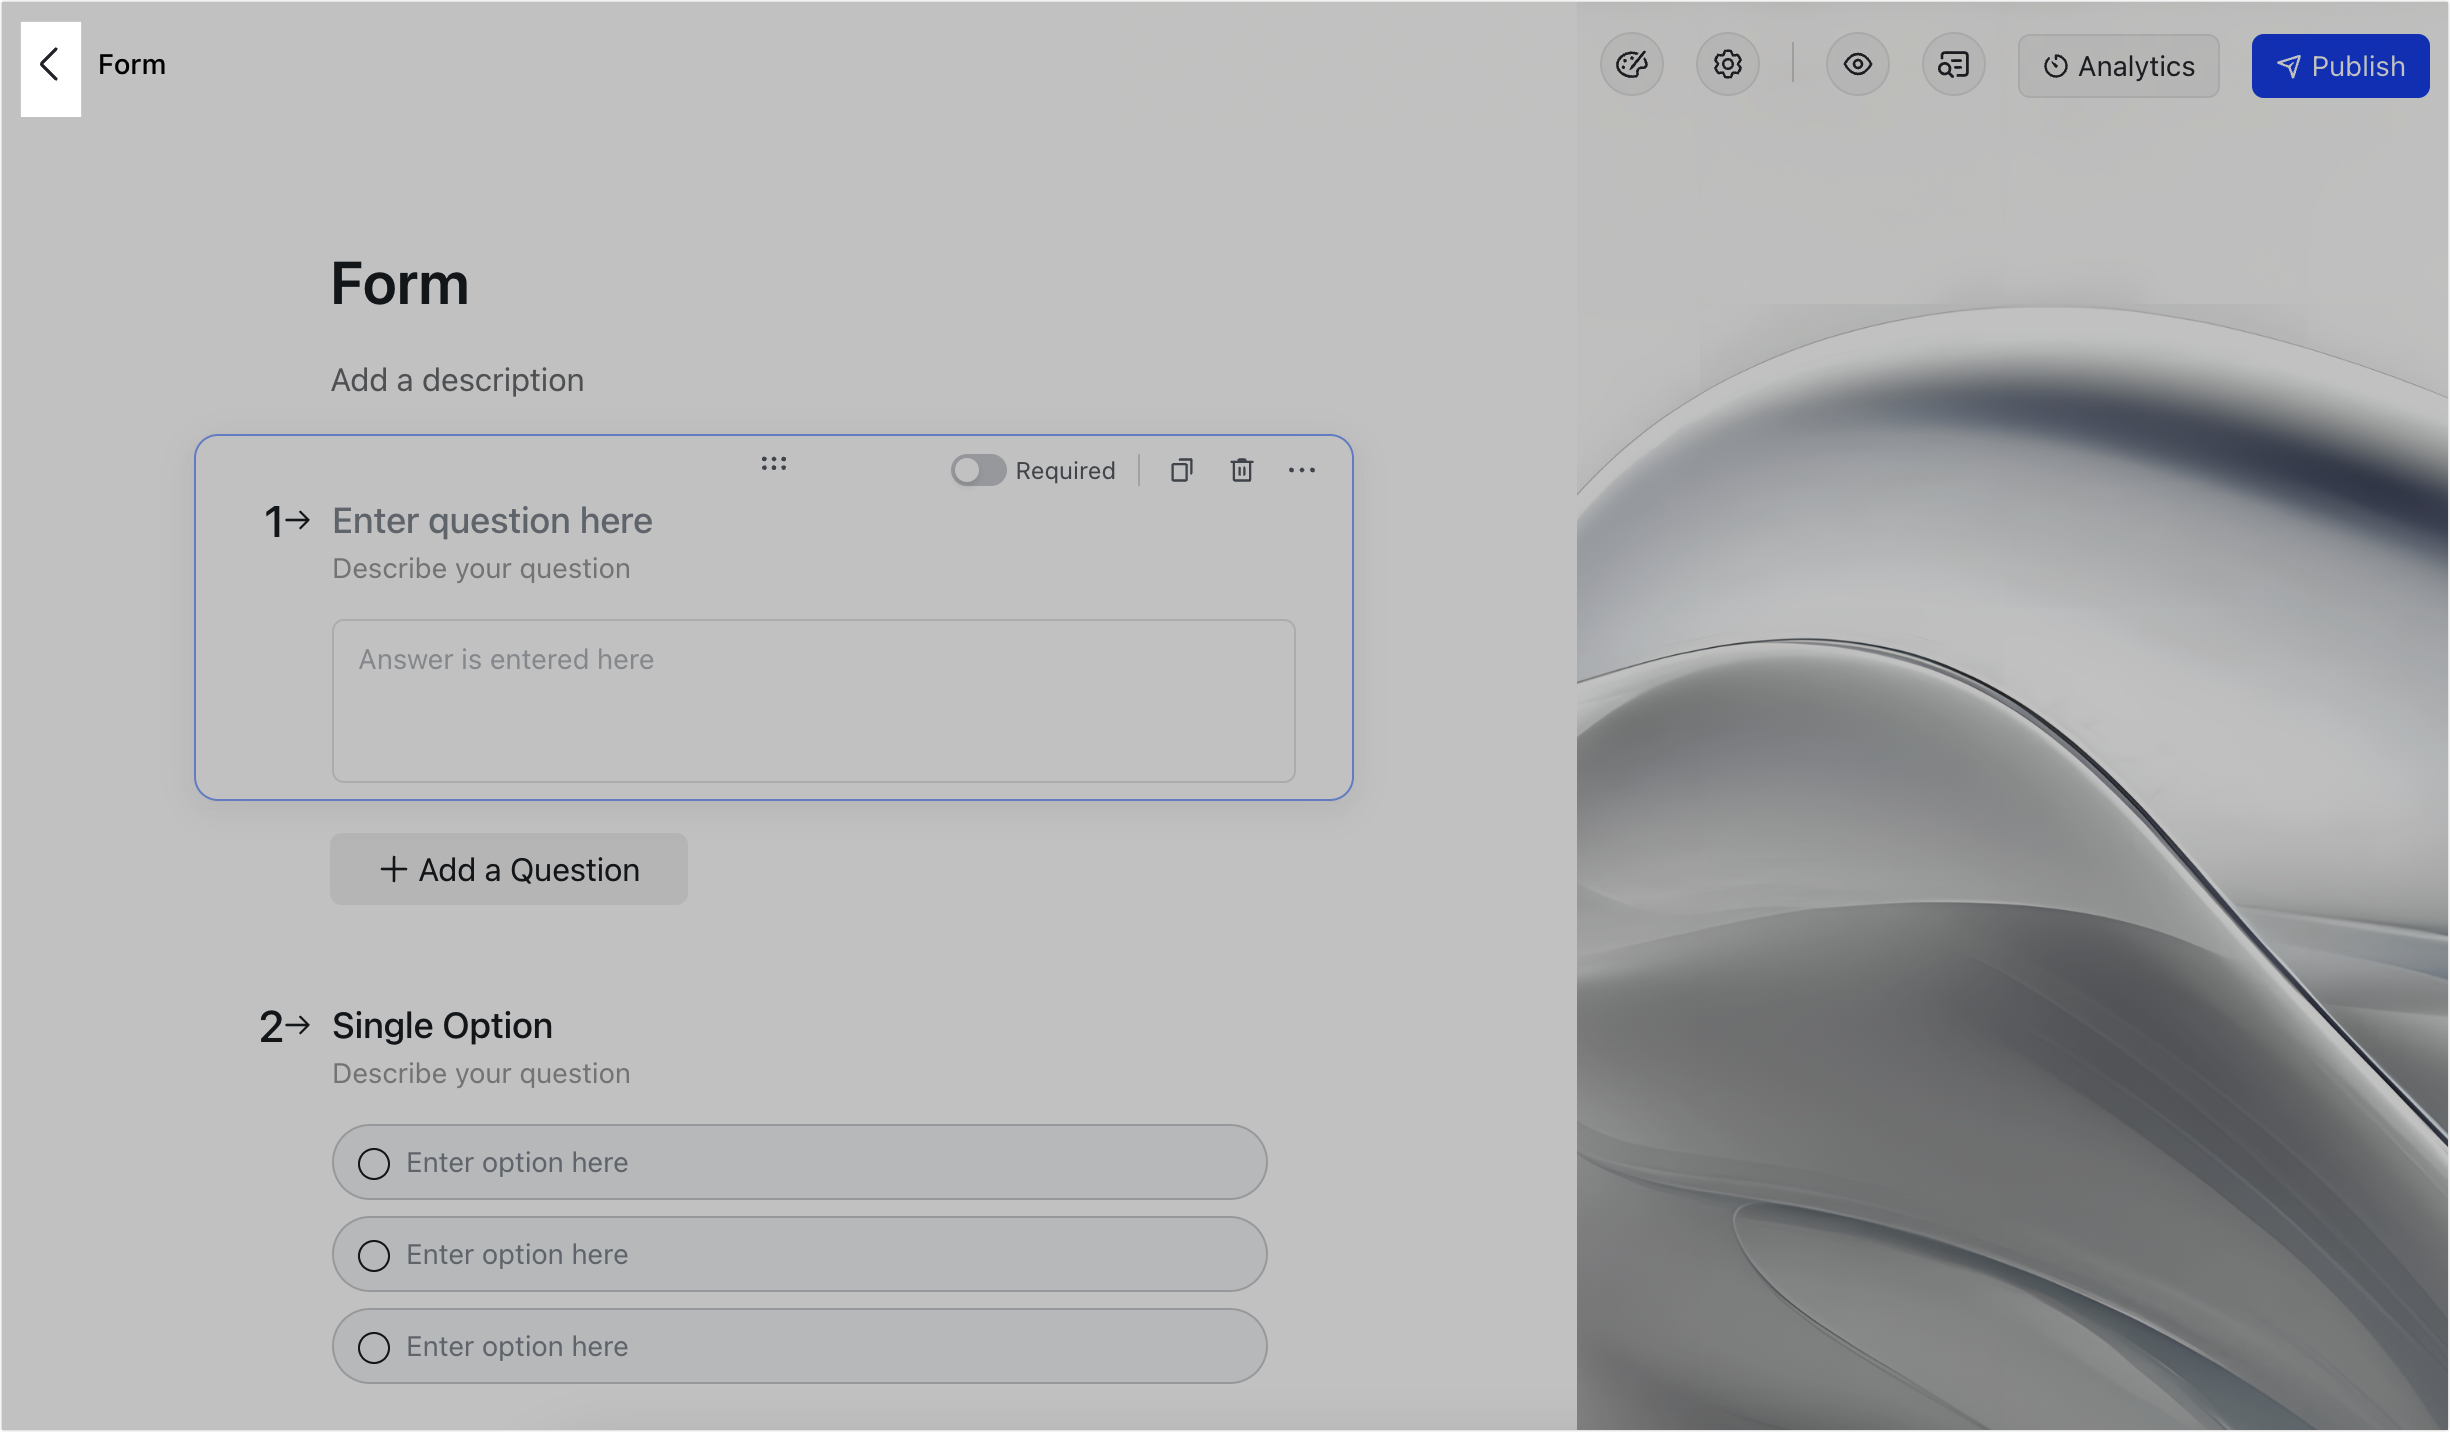
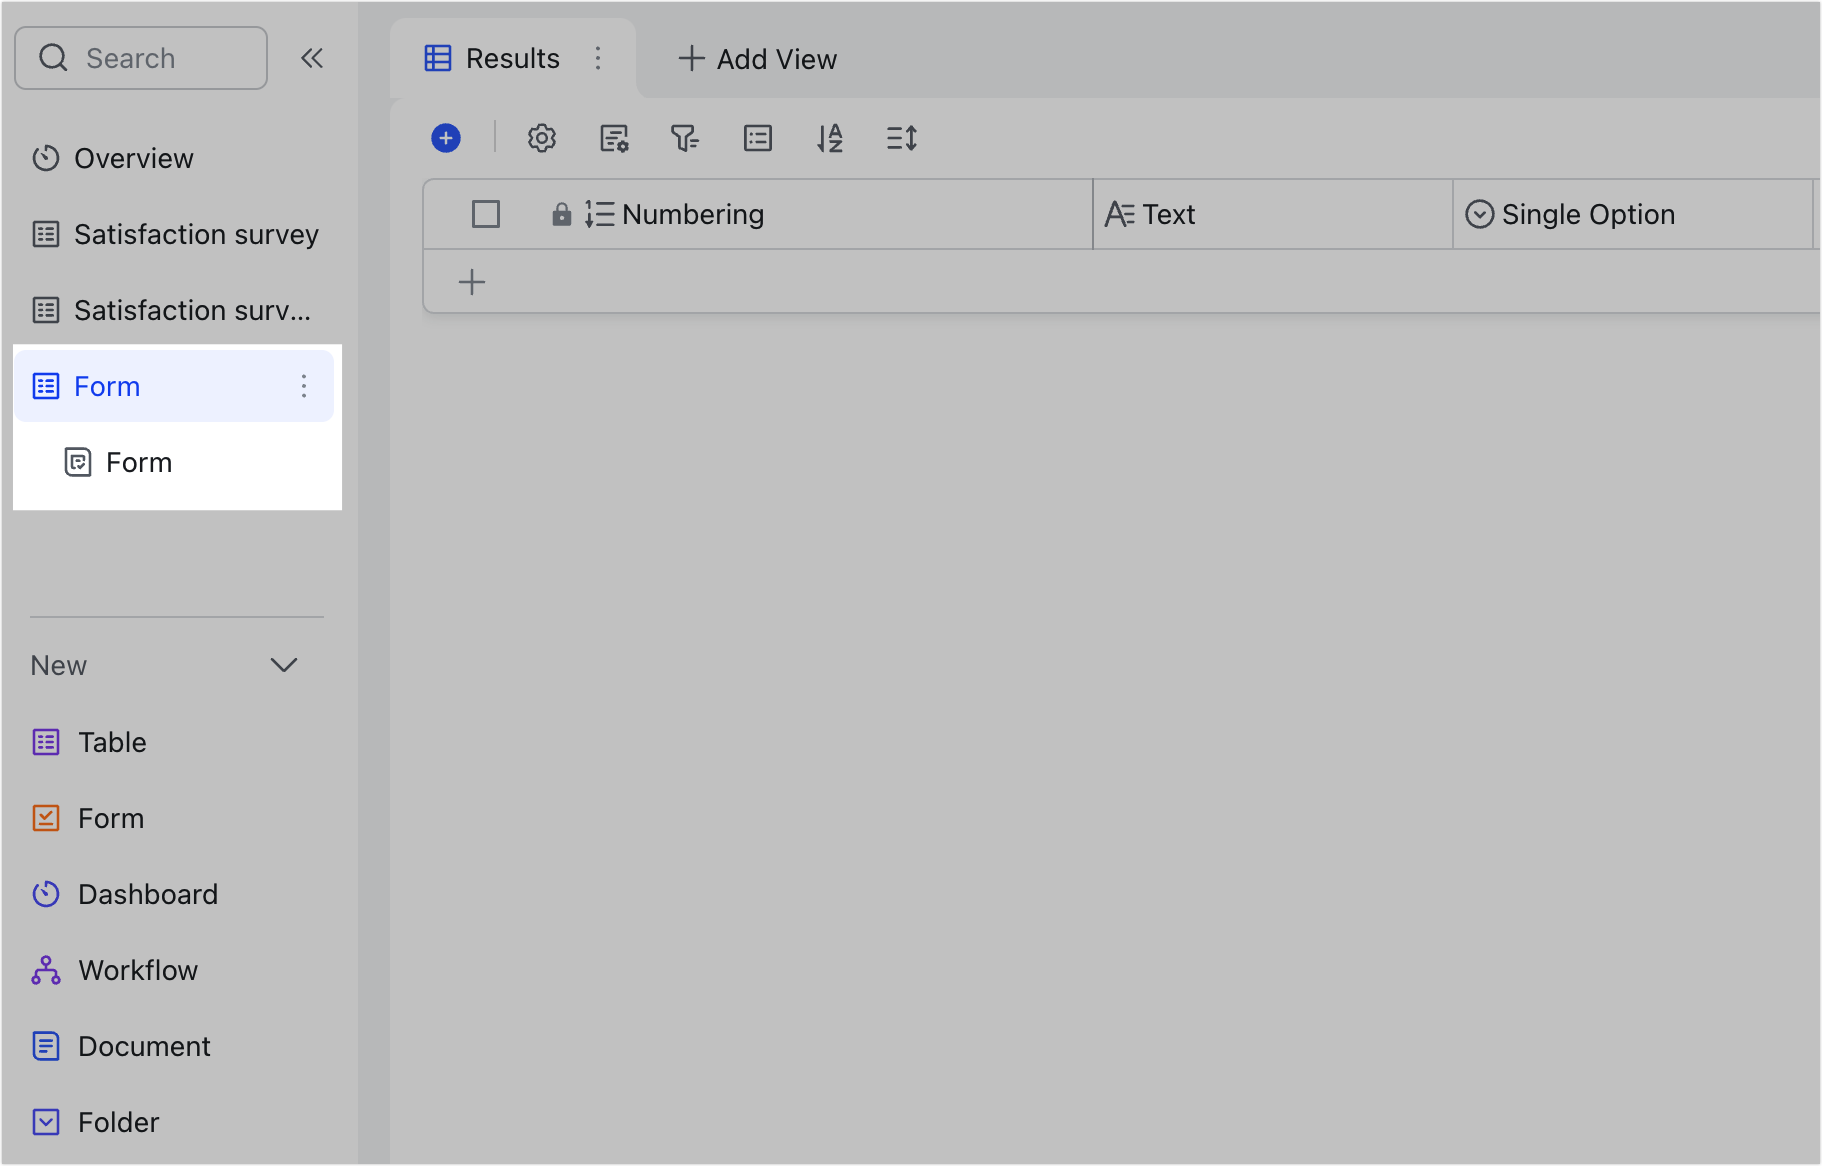
On the editing page of the form, click the Back icon in the upper-left corner to return to the base. The form will will appear as a table on the left. Click the sub-page below the table to go to the form's editing page.
250px|700px|reset
250px|700px|reset
Add and edit questions
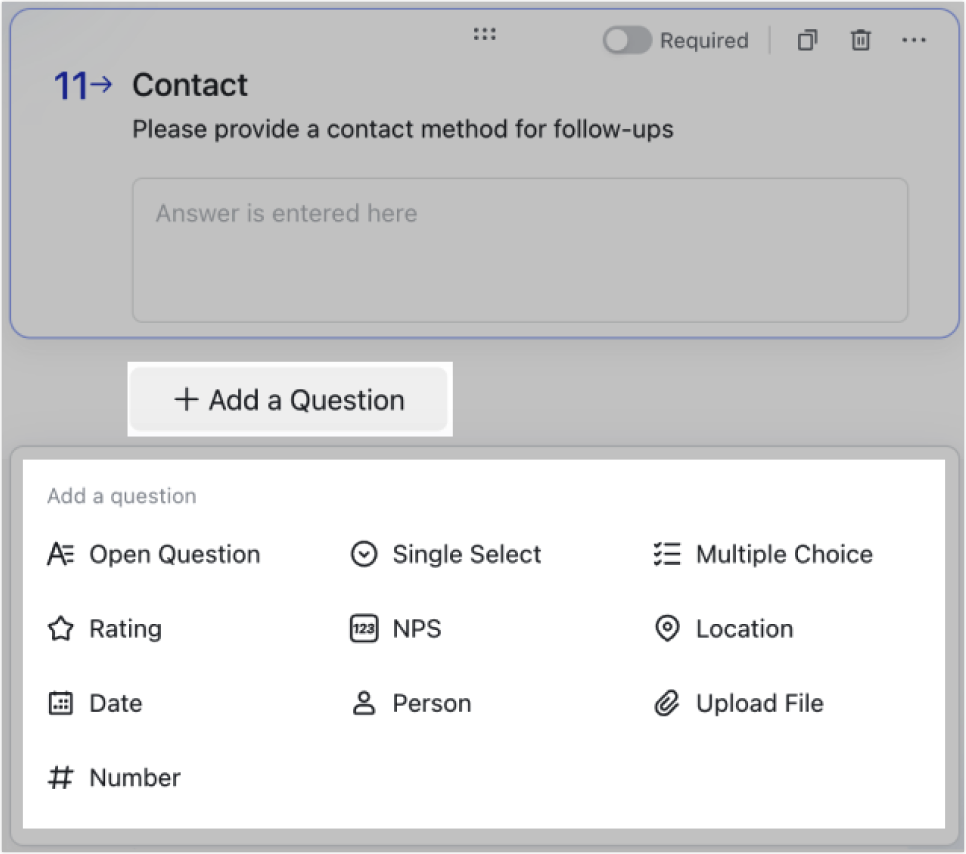
Click Add a Question and select the question type. You can choose from Open Question, Single Select, Multiple Choice, Rating, NPS, Location, Date, Person, Upload File, and Number.
Note: Unlike form view, you can't directly select existing fields in the base to add them as questions in Lark Form.
250px|700px|reset
- Open question: Text can be entered.
- Single select and multiple choice: You can add or delete options, and rearrange the order through drag and drop. Click the ··· icon in the upper-right corner to select the layout (Display All or Dropdown). Display All is selected by default. If you select Dropdown, you can set the color for each option.
- For single select or multiple choice questions, a maximum of 10,000 options can be added. Batch import of options and referencing options are both not supported.

250px|700px|reset
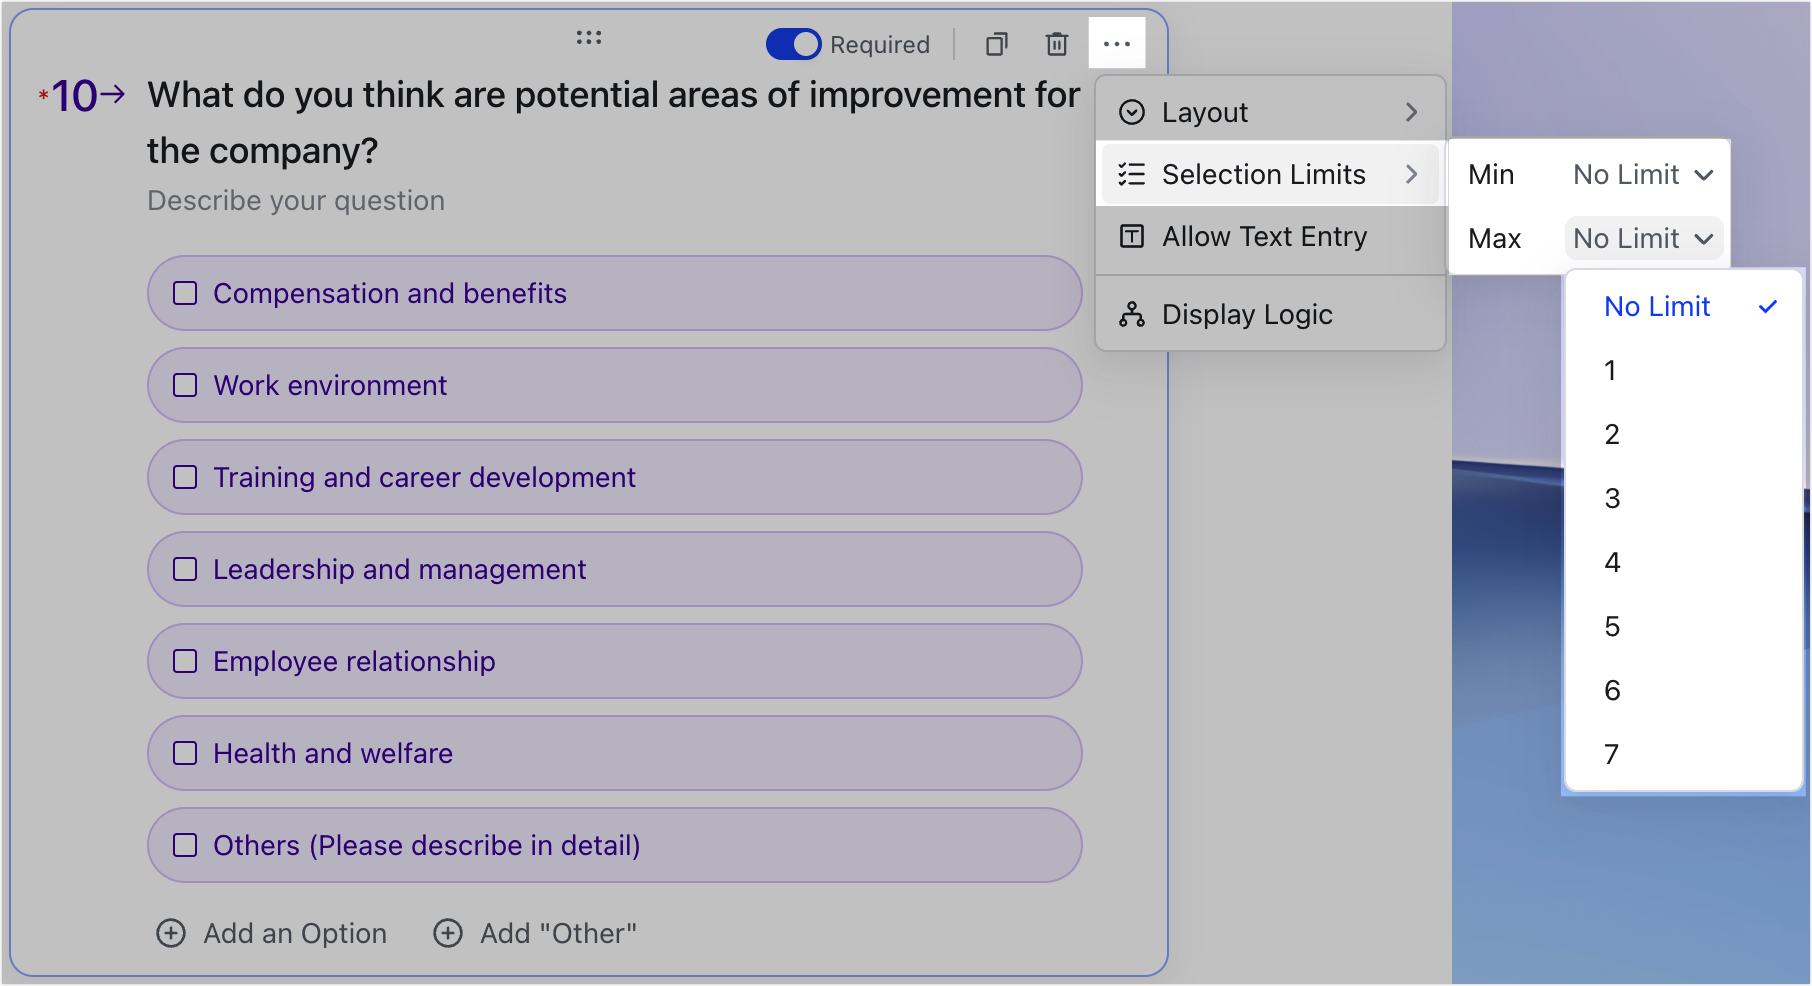
- You can limit the number of selections allowed for multiple choice questions: In the ··· More menu of multiple choice questions, you can set a max and min limit for the number of selections that users can make, which could be useful in scenarios such as voting.
250px|700px|reset
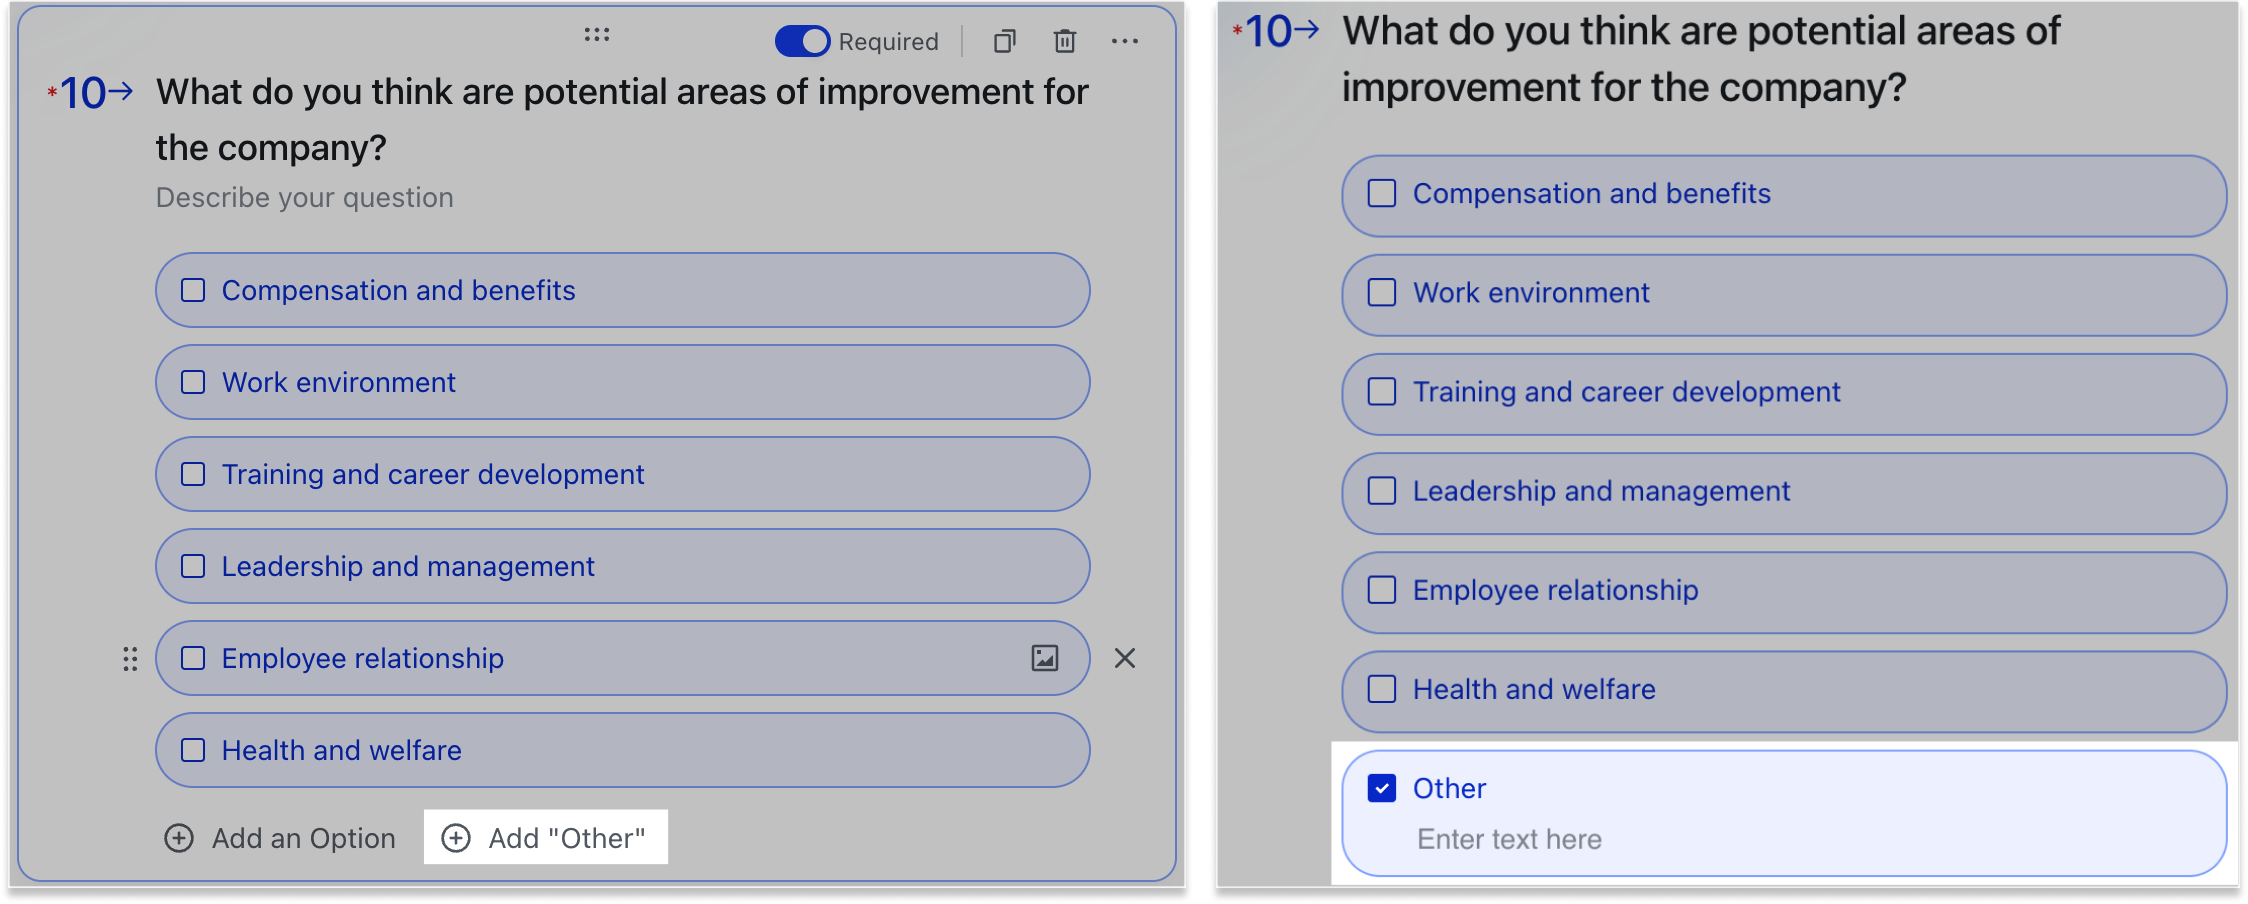
- You can add an "Other" option: At the bottom of single select and multiple choice questions, click Add "Other" to add an option that allows respondents to enter a custom answer in text (300 character limit).
- Note: The Add "Other" option is only available in the Display All layout.
250px|700px|reset
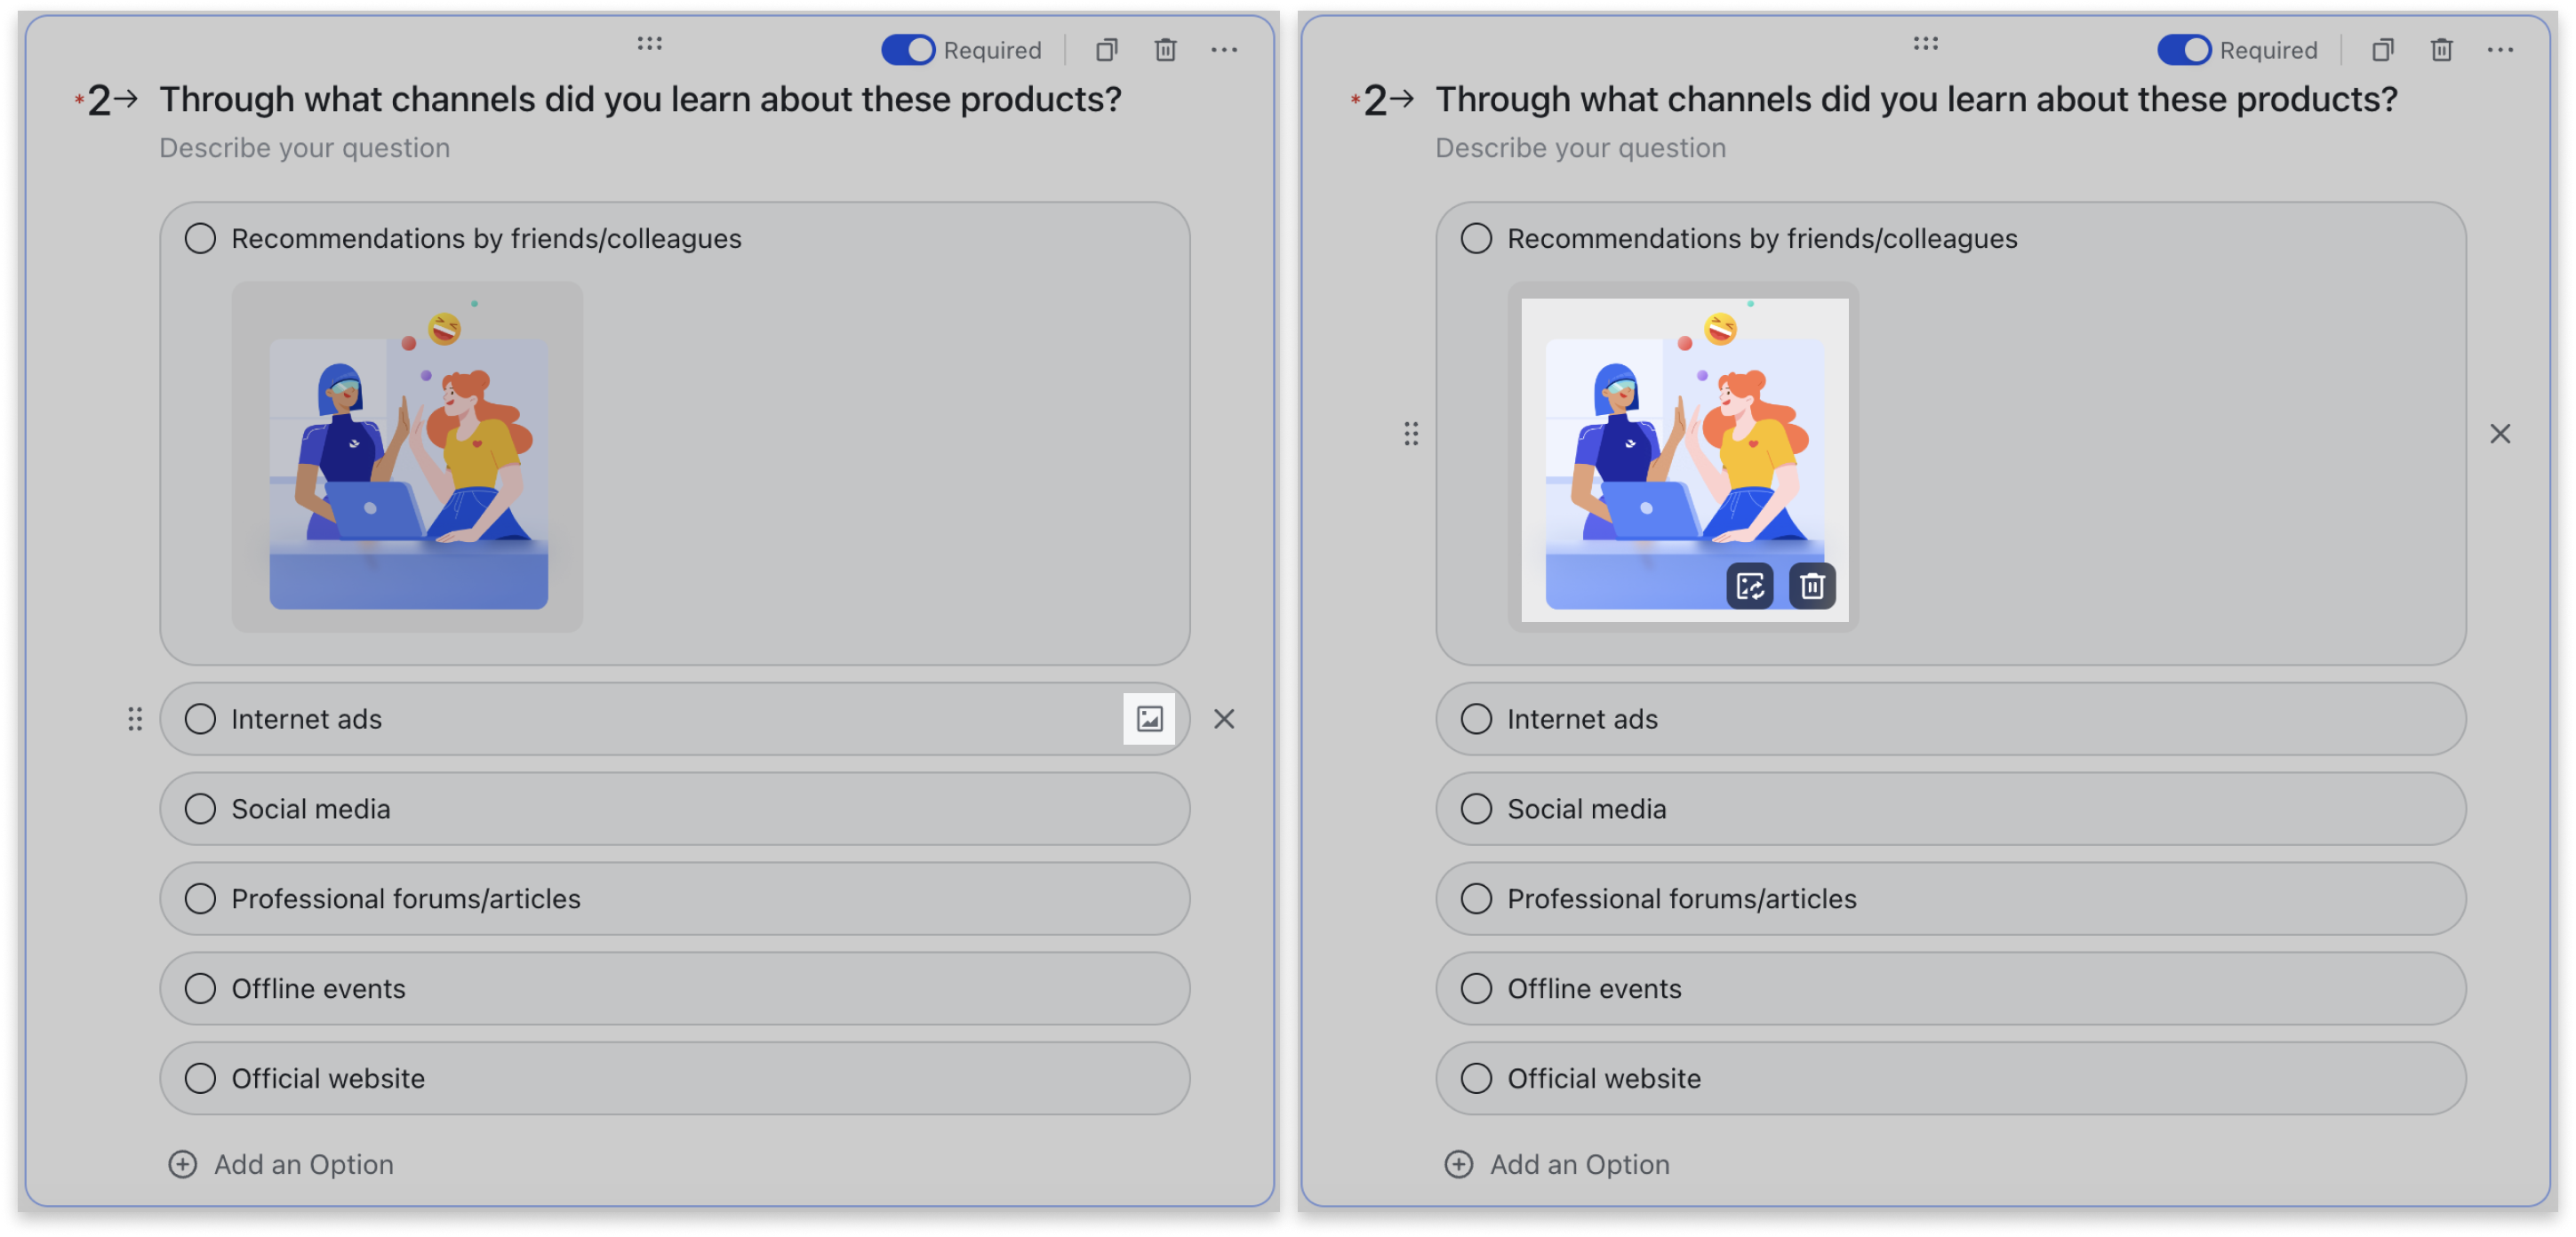
- You can upload images to options: The images will be displayed below the text of each option. Click a single select or multiple choice question, hover over an option, and an Upload image icon will appear. Click the icon to upload an image. One image (no bigger than 20 MB) can be uploaded per option. Supported formats: .jpg, .jpeg, .png, .heif. Click the uploaded image to enlarge it and view image details. Click the icons in the lower-right corner to replace or delete the image.
- Note: Uploading images is only available when layout is set to Display All.
250px|700px|reset
- You can allow text to be entered: In single select and multiple choice questions, click the ··· icon in the upper-right corner, then Allow Text Entry to add text fields to all the options for respondents to supplement details as needed. You can make filling in the text field a requirement.
The text field will appear when respondents make a selection.
Note: The text field option is only available when layout is set to Display All.

250px|700px|reset
- Rating and NPS: You can set the rating icons and values, as well as the NPS values.
- Location: Click the ··· icon in the upper-right corner to select the location input method: Enter Manually or Locate on Mobile Only.

250px|700px|reset
- Date: Click the ··· icon in the upper-right corner to set the date format. You can also turn on Autofill time created (the time when the respondent opened the form).

250px|700px|reset
- Person: Click the ··· icon in the upper-right corner to select whether people can be added to the form.
- Note: When Anyone can respond is selected, the person question will be hidden from respondents outside the organization.
- Upload File: Click the ··· icon in the upper-right corner to turn on Only allow upload from mobile.
- Note: Attachments will use up the base owner's (form creator) Docs storage space.
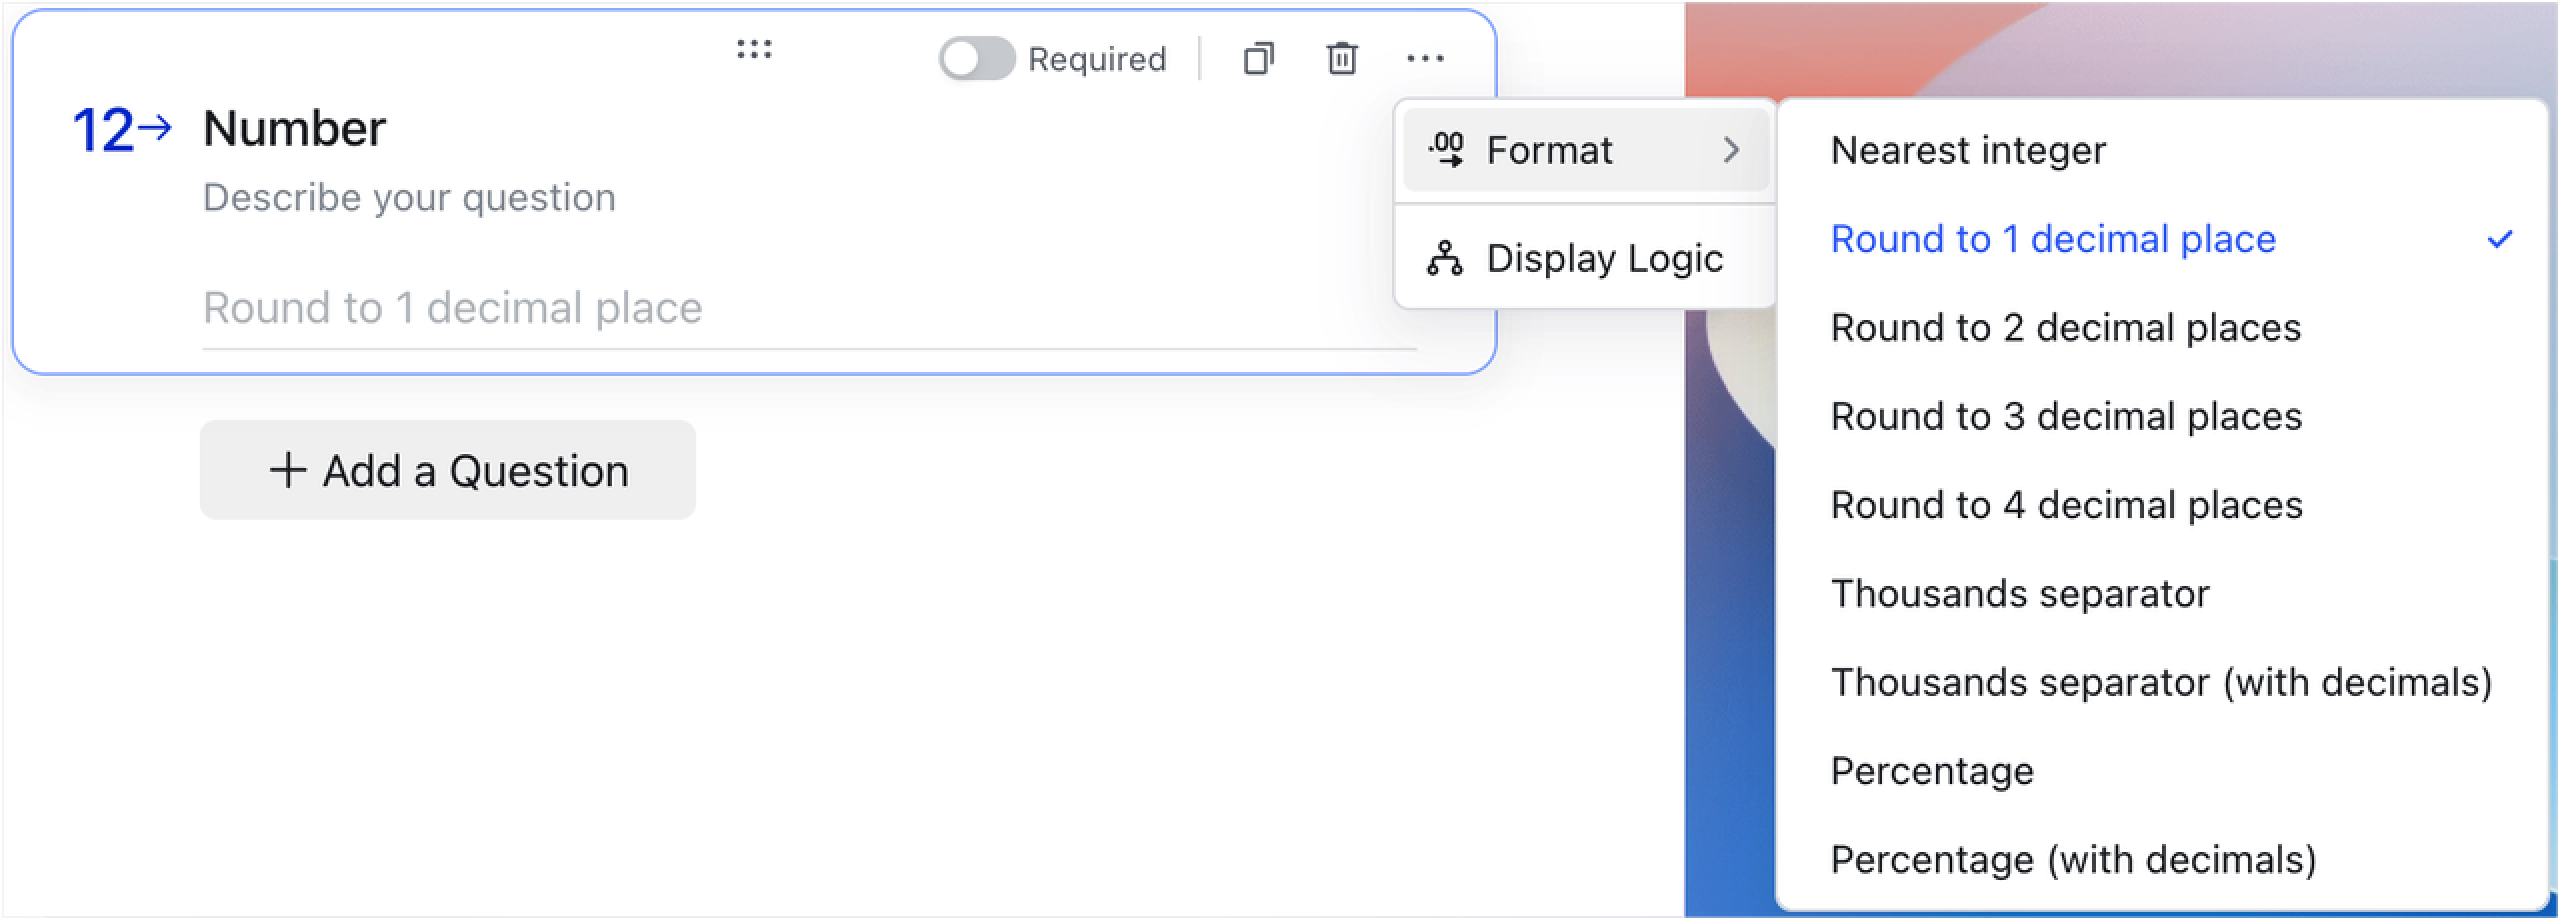
- Number: Click the ··· icon in the upper-right corner to set the number format, which can be integers, decimals, percentages, and thousands separators. For decimal numbers, two decimal places is used by default.
250px|700px|reset
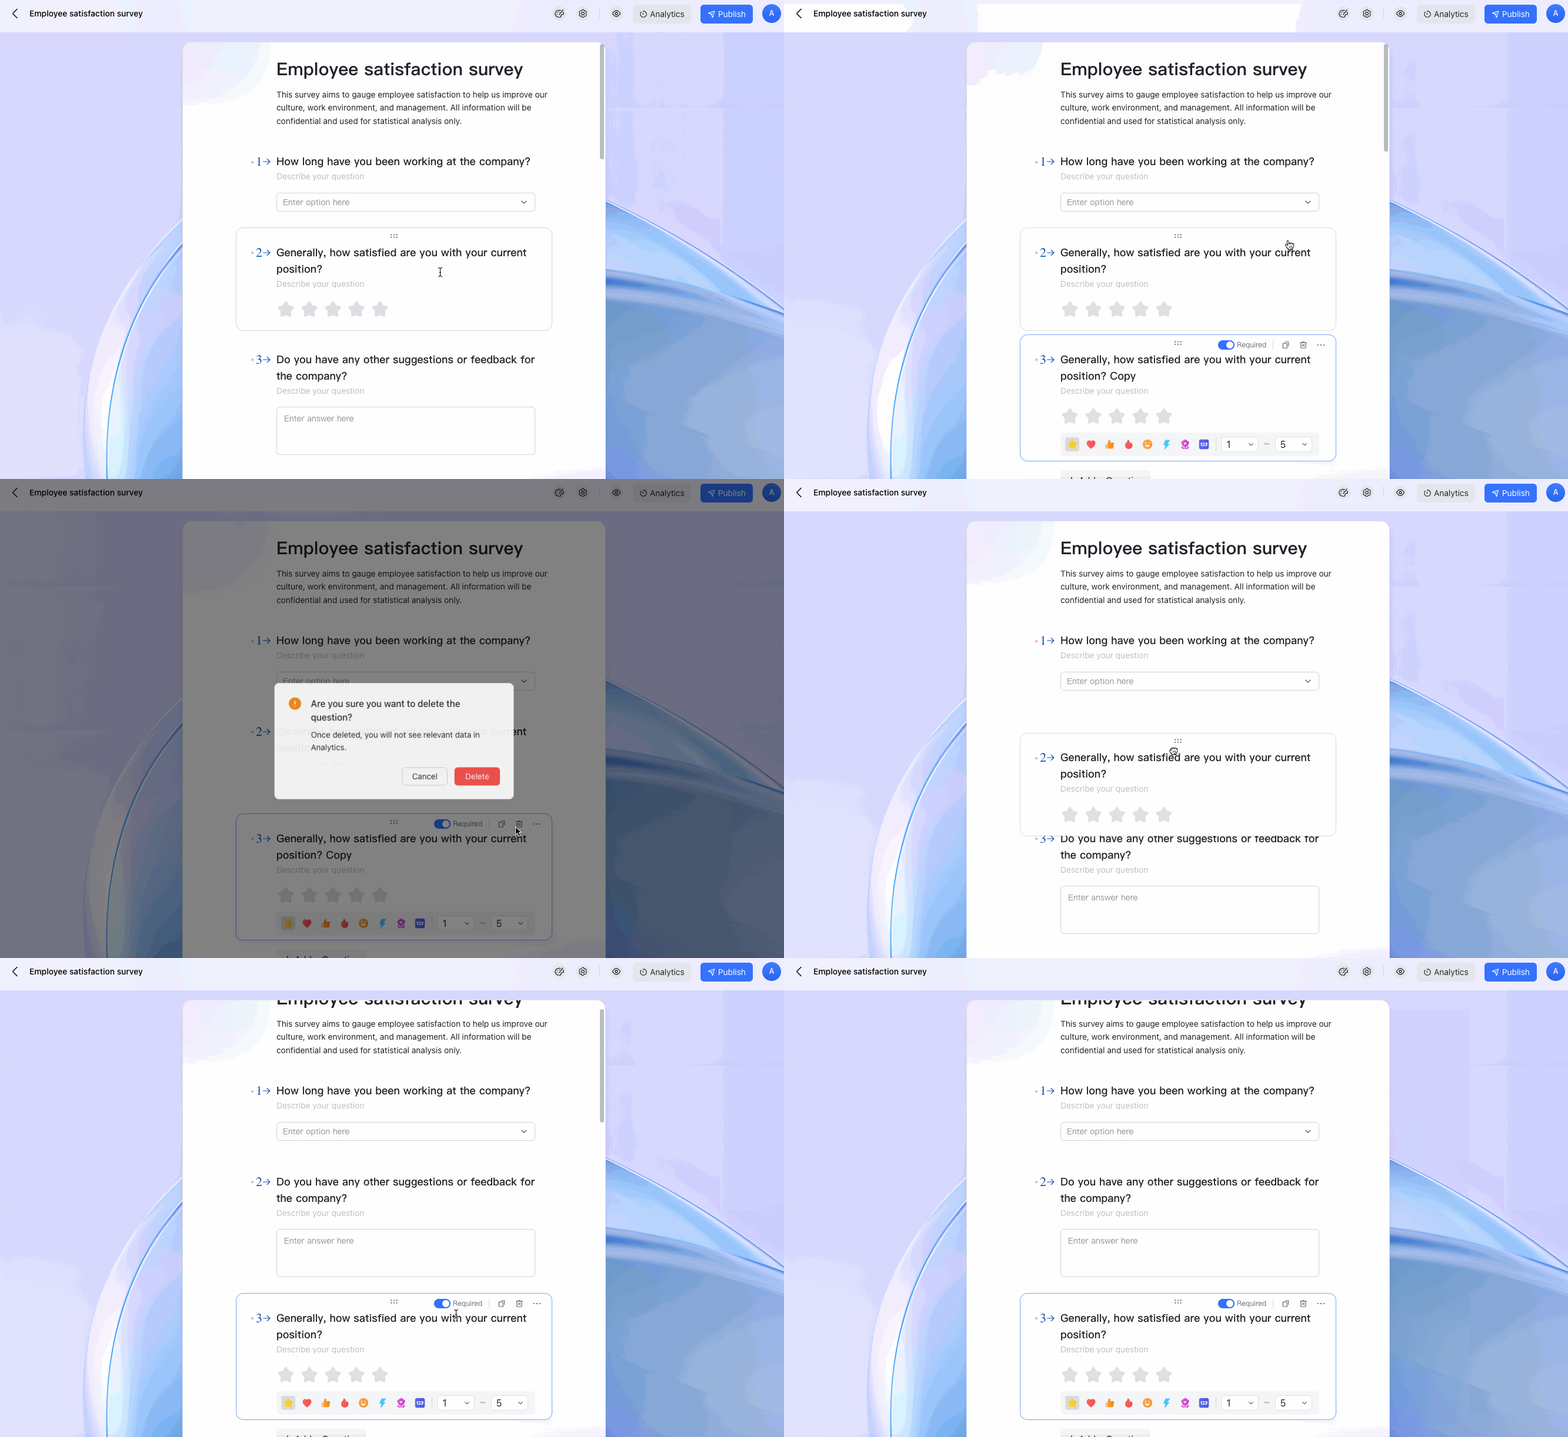
- Edit questions:
- Select a question to edit its title and description.
- Click the icons in the upper-right corner to copy or delete a question. After deleting a question, the corresponding field in the table will also be deleted.
- You can also use keyboard shortcuts (Ctrl + Z (Windows), Command + Z (Mac)) or restore a previous version of the Base to restore deleted questions, and submitted responses will also be restored.
- Drag the ::: icon at the top of the question to rearrange its order.
- Turn on Required to make it a mandatory question.
250px|700px|reset
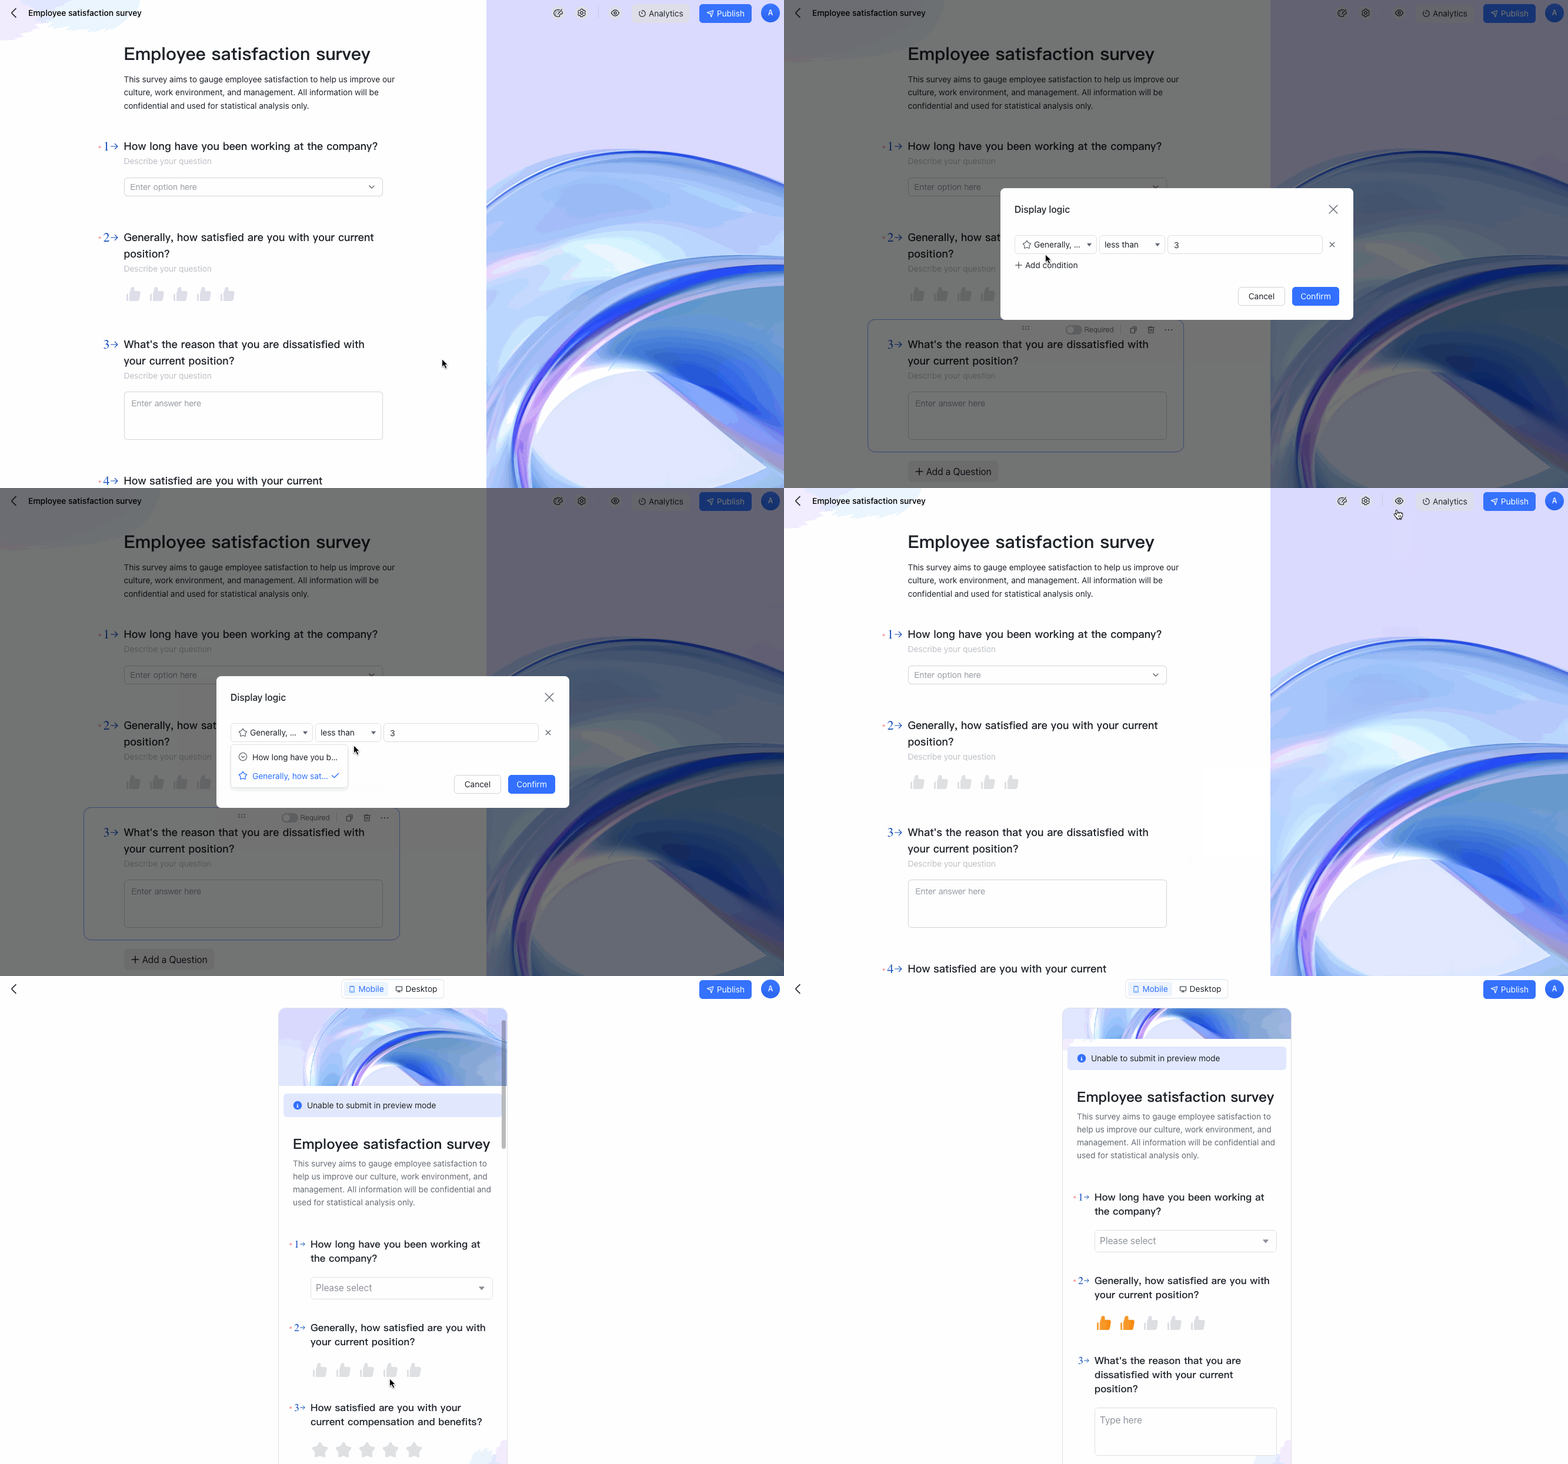
- Set display conditions: You can set conditions for revealing follow-up questions. Select a question, then click the ··· icon in the upper-right corner > Display Logic to set conditions. For example, you can set that when a user enters a rating lower than 3, this question will appear: What's the reason that you are dissatisfied with your current position?
250px|700px|reset
- Permissions for editing forms:
- If advanced permissions are turned on for the base, the form owner and users with manage permission for the form can edit it.
- If advanced permissions are not turned on for the base, only users with edit permission can edit the form.
- Syncing between the table in the base (where form answers are added to) and form questions:
- If you modify the title of a form question, the corresponding field in the table will also be updated.
- If you modify the name of a field in the table, the form question title will not be updated. If you subsequently update the question title, the corresponding field name in the table will not change, nor will a new field be generated.
- If you delete a question in the form, the corresponding field in the table will also be deleted. You can find it from the base's edit history.
- If you rearrange the order of the questions in the form, the order of the fields in the table will not change accordingly.
- If you add a new question in the form, the corresponding field will be added to the right side of the table, regardless of the position of the question in the form.
- The form will only show questions created in the form. Fields created in the base will not be displayed in the form.
Appearance, settings, preview, and publishing
In the form edit page, you can select the theme and upload a background image, as well as configure form settings, or preview and publish the form.
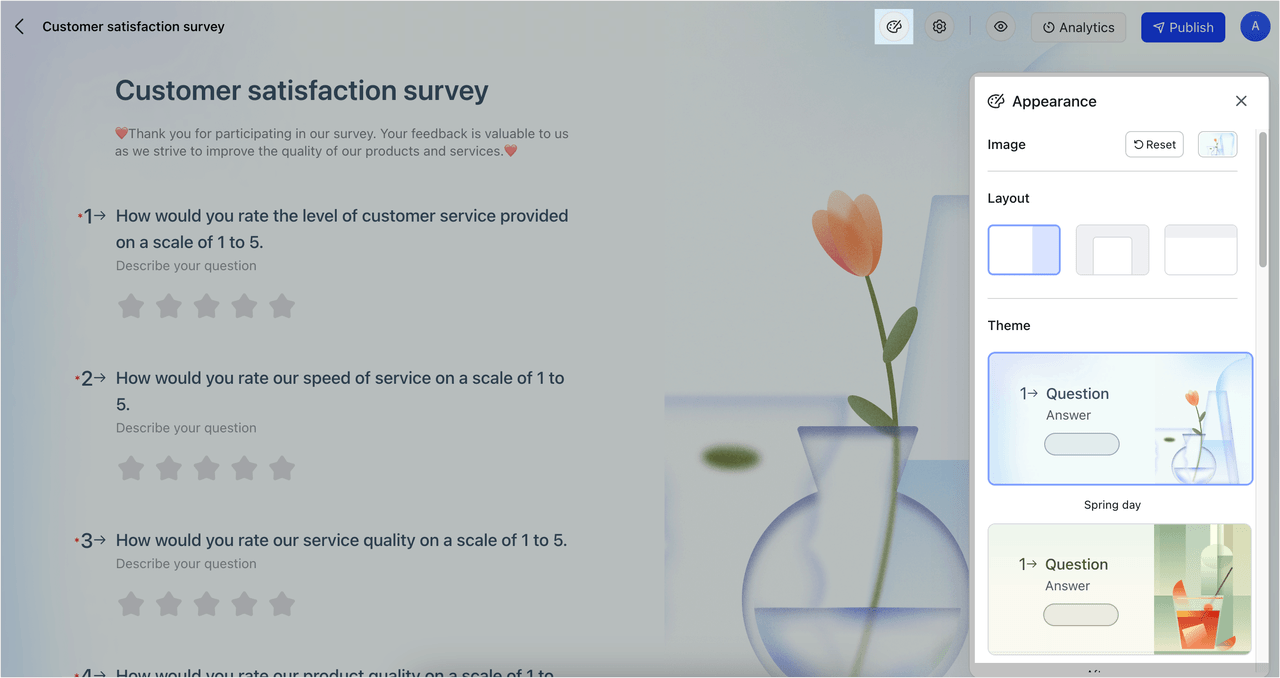
- Appearance: Click the Appearance icon in the upper-right corner to set the background image and layout and select a theme.
250px|700px|reset

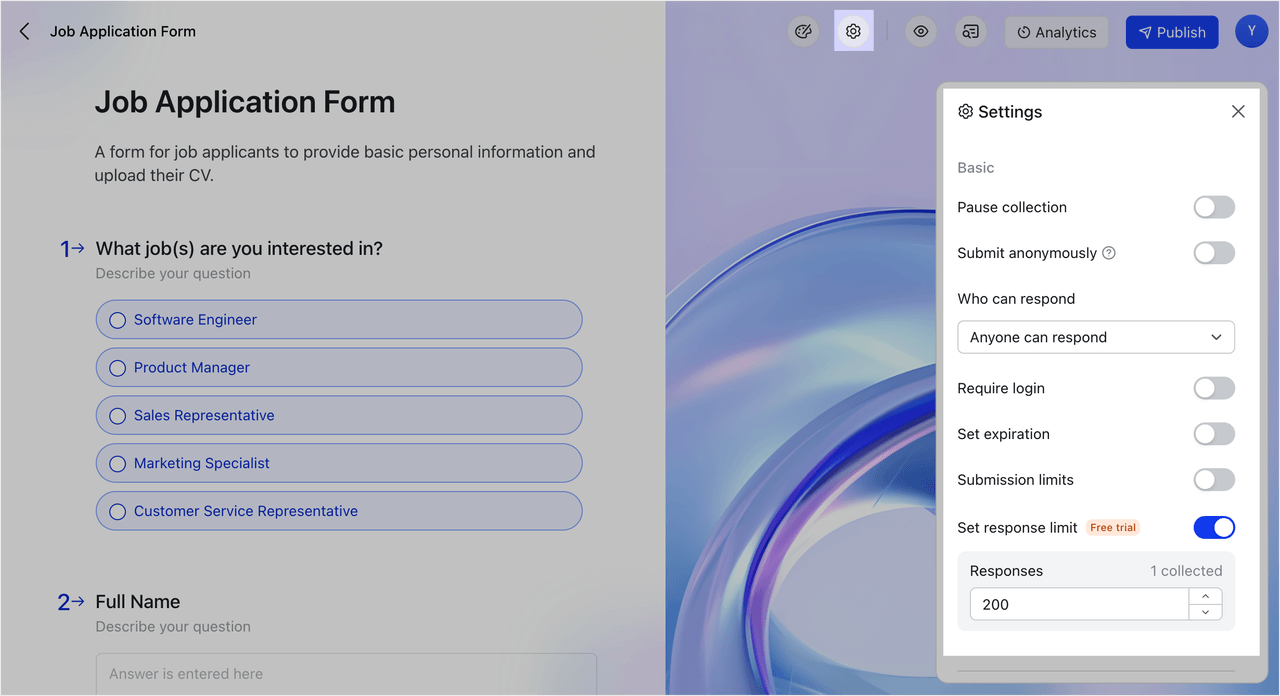
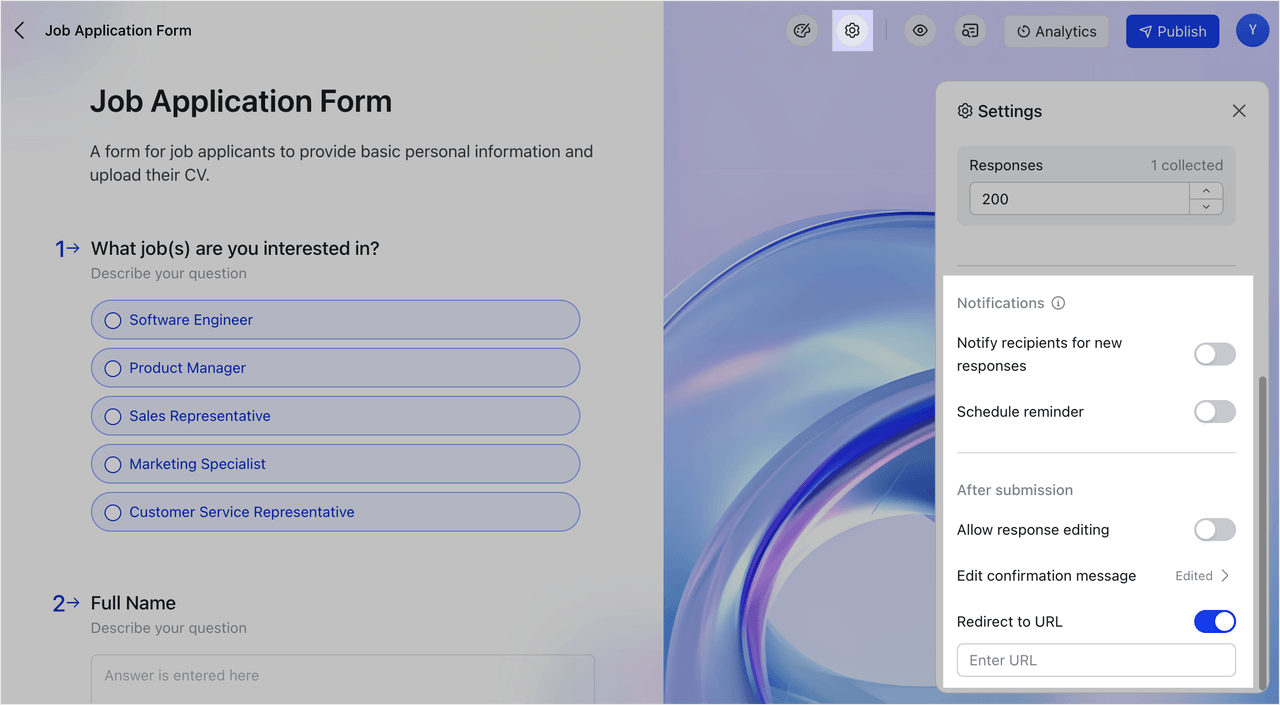
- Form settings: Click the Settings icon in the upper-right corner to configure settings, including:
- Pause collection or turn on anonymous submissions.
- Set who can respond (Only invited people can respond/People in the organization with the link can respond/Anyone can respond).
- Require users to log in to their Lark account to submit the form. This is suitable for scenarios such as gift redemptions or event registration, where users need to be identified.
- Set start and end times (hh:mm:ss format in document's time zone).
- Set submission limits per respondent based on different timeframes (per day, per week, per month, or total). For example, you can limit respondents to one submission per day.
- Set response limit to limit how many responses can be submitted, which may be useful for event registrations, appointments, and other situations where first come, first served is important. The highest limit you can set is 100,000. The number of forms submitted will be shown next to Responses. When the number of submissions has reached the limit, new forms can no longer be submitted.
250px|700px|reset

- Set scheduled notifications for filling out the form. To learn more, see Use the notification function in Lark Forms.
- After submitting a form, the recipient can view their own responses. You can set whether to allow them to edit their submitted responses by turning on Allow response editing.
- You can configure what is shown on the result page of the form (the page users see after they've submitted the form). On that page, the title cannot exceed 12 characters and closing remarks cannot exceed 240 characters. You can use this page to provide details such as next-step instructions or links.
- You can set a redirect link, and users will jump to the link after submitting the form. Only web links starting with http: or https: are supported, and only one address can be entered
250px|700px|reset

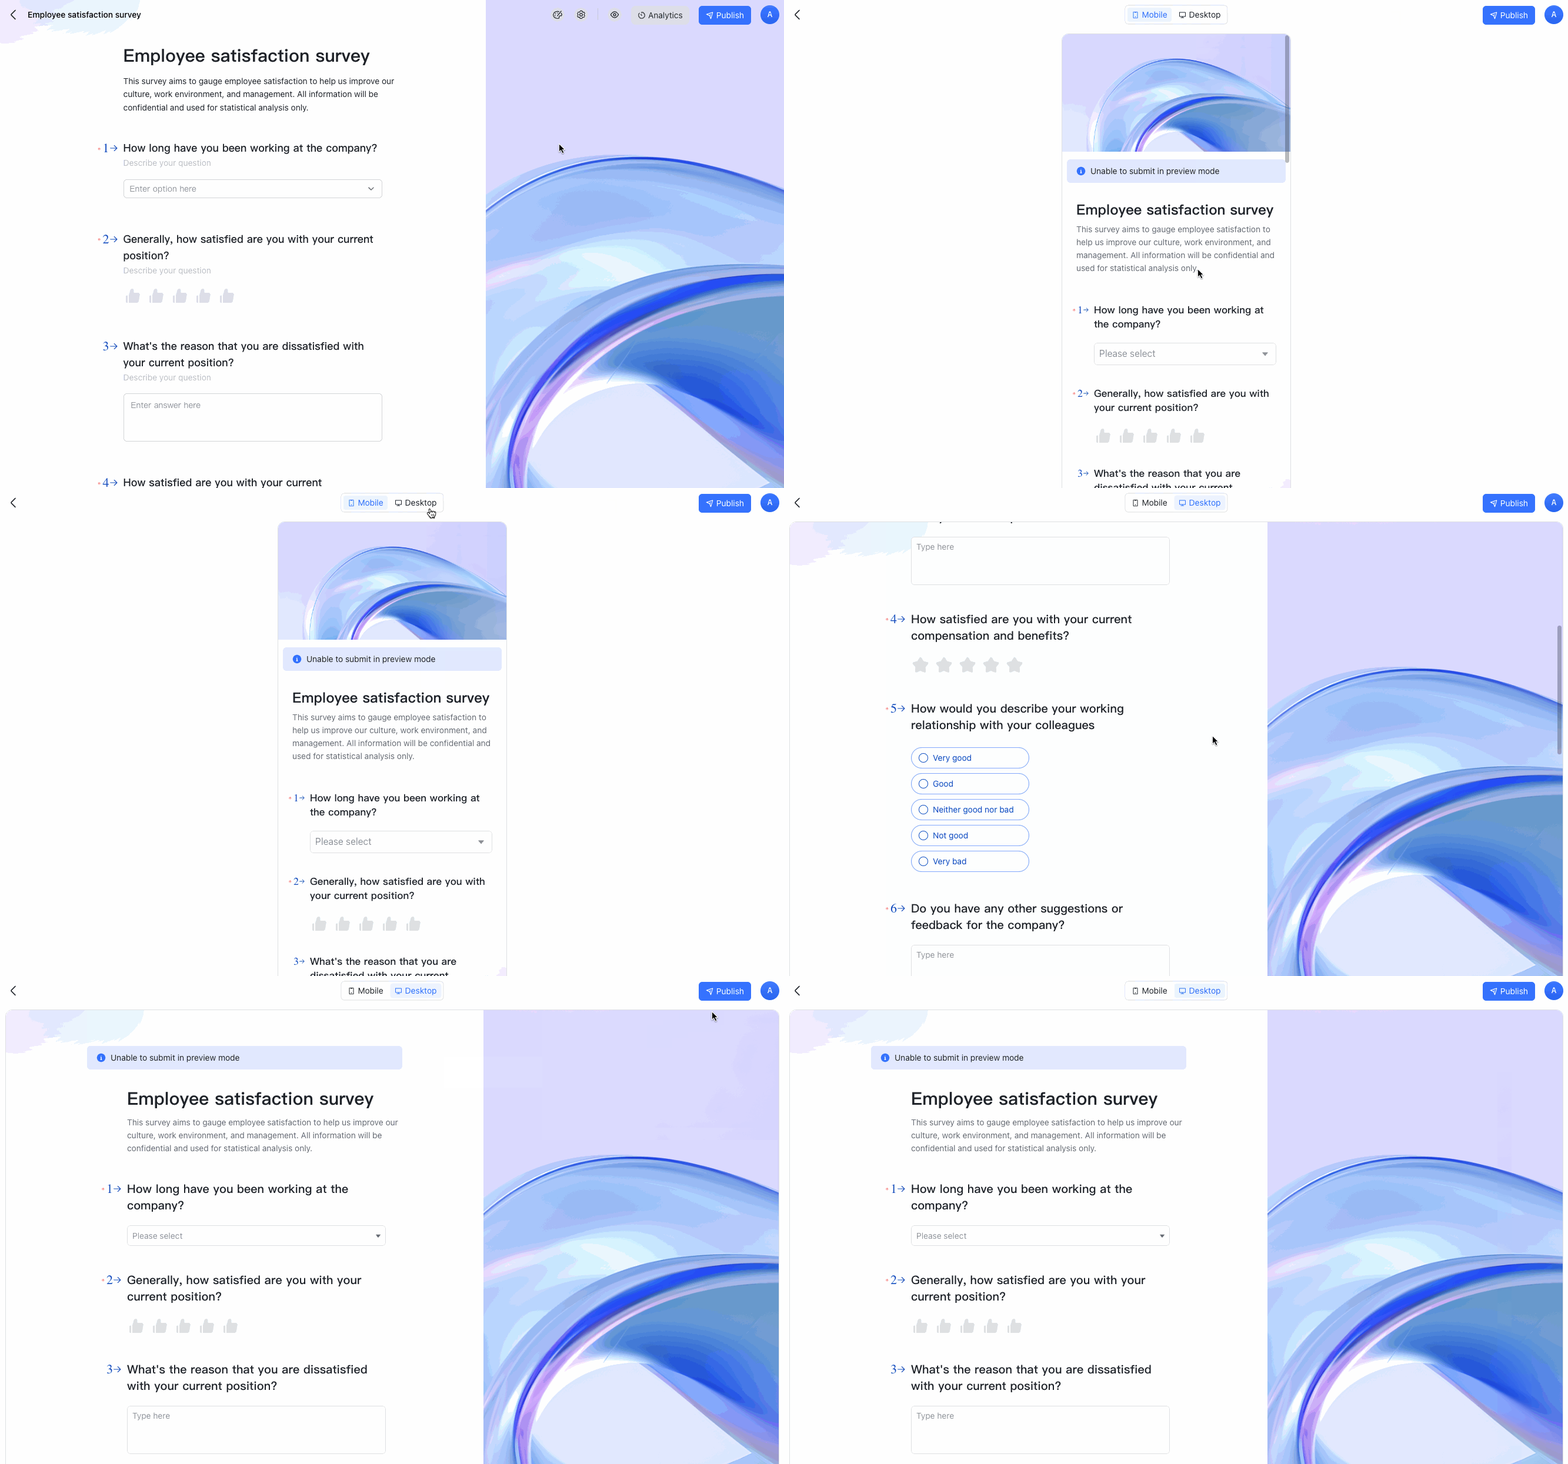
- Preview: Click the Preview icon in the upper-right corner to preview how the form will appear on phones and computers. On the preview page, you can click Publish in the upper-right corner to share the form.
250px|700px|reset
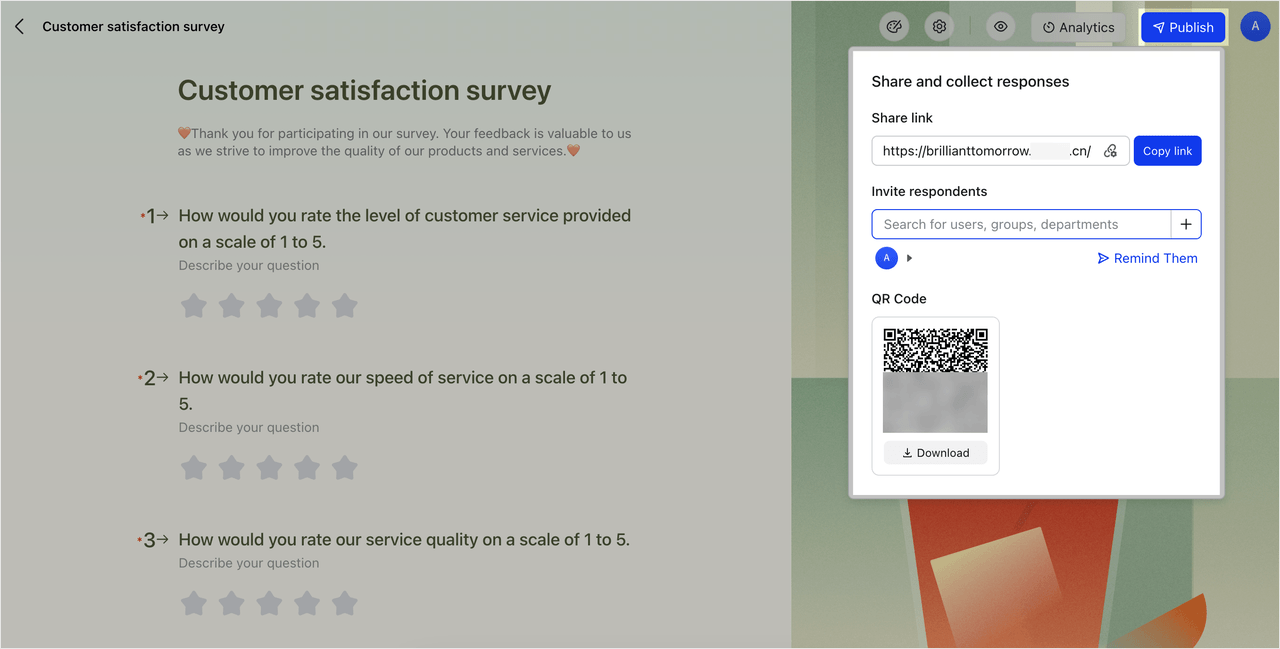
- Publish: Click Publish to share the form. You can share forms through links, Messenger, and QR codes. Click the QR code to enlarge it or right-click to copy it. You can also download the QR code and send it. If you want to stop sharing, turn on Pause collection in form settings.
- In the sharing panel, you can select Notify me for new responses to get a notification when someone submits the form. Note that you must be in the same organization as the form owner to be able to select this option.
- Note: If you have changed the title of the form, but the form notification still shows the old name, you can troubleshoot by doing the following: Deselect Notify me for new responses, select it again, and share the form link.
- After pausing collection, the form's shareable link and QR code will become invalid and users won't be able to fill out the form. If sharing is reopened later, the shareable link and QR code will become valid again.
250px|700px|reset

View responses
View responses as respondents:
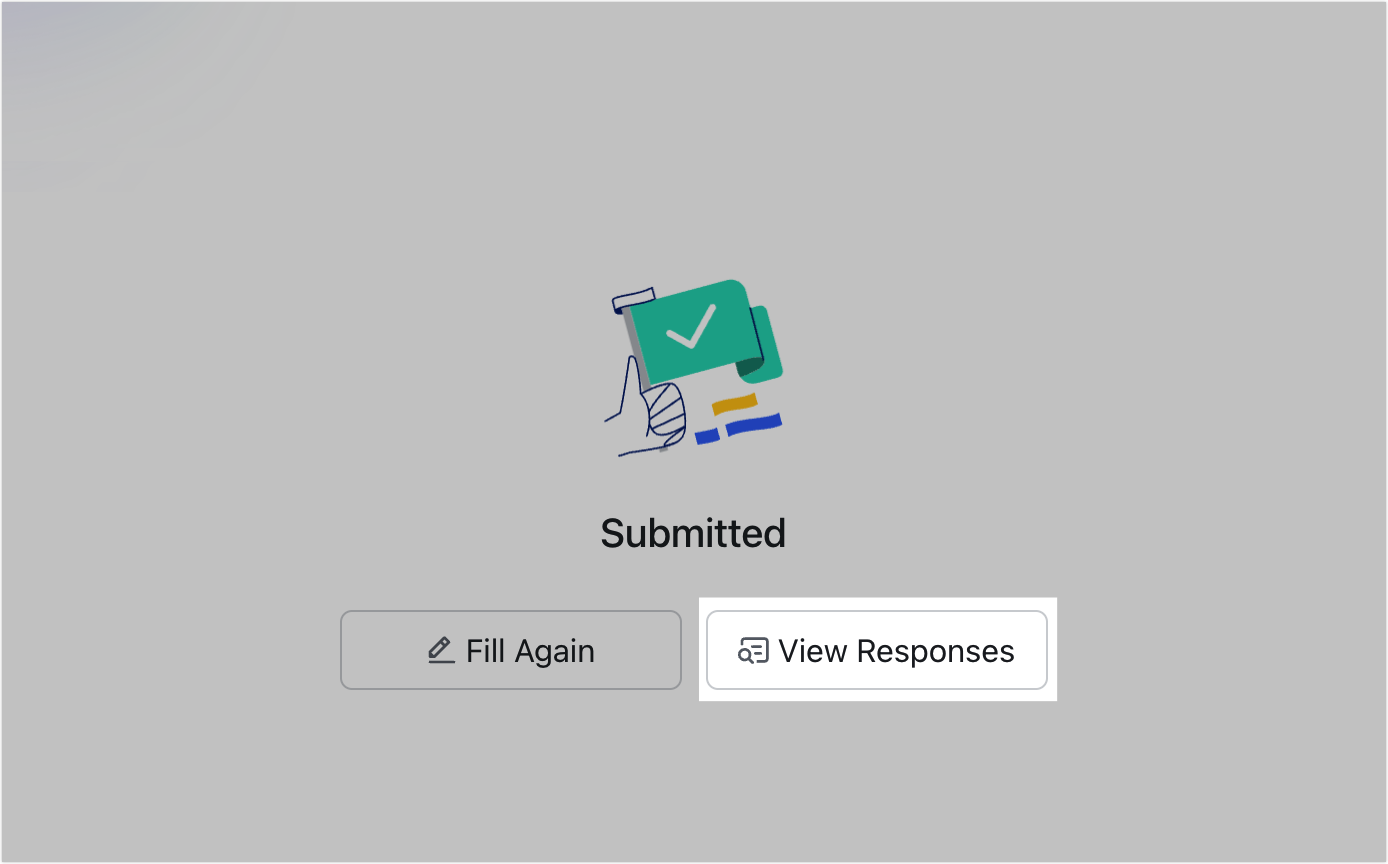
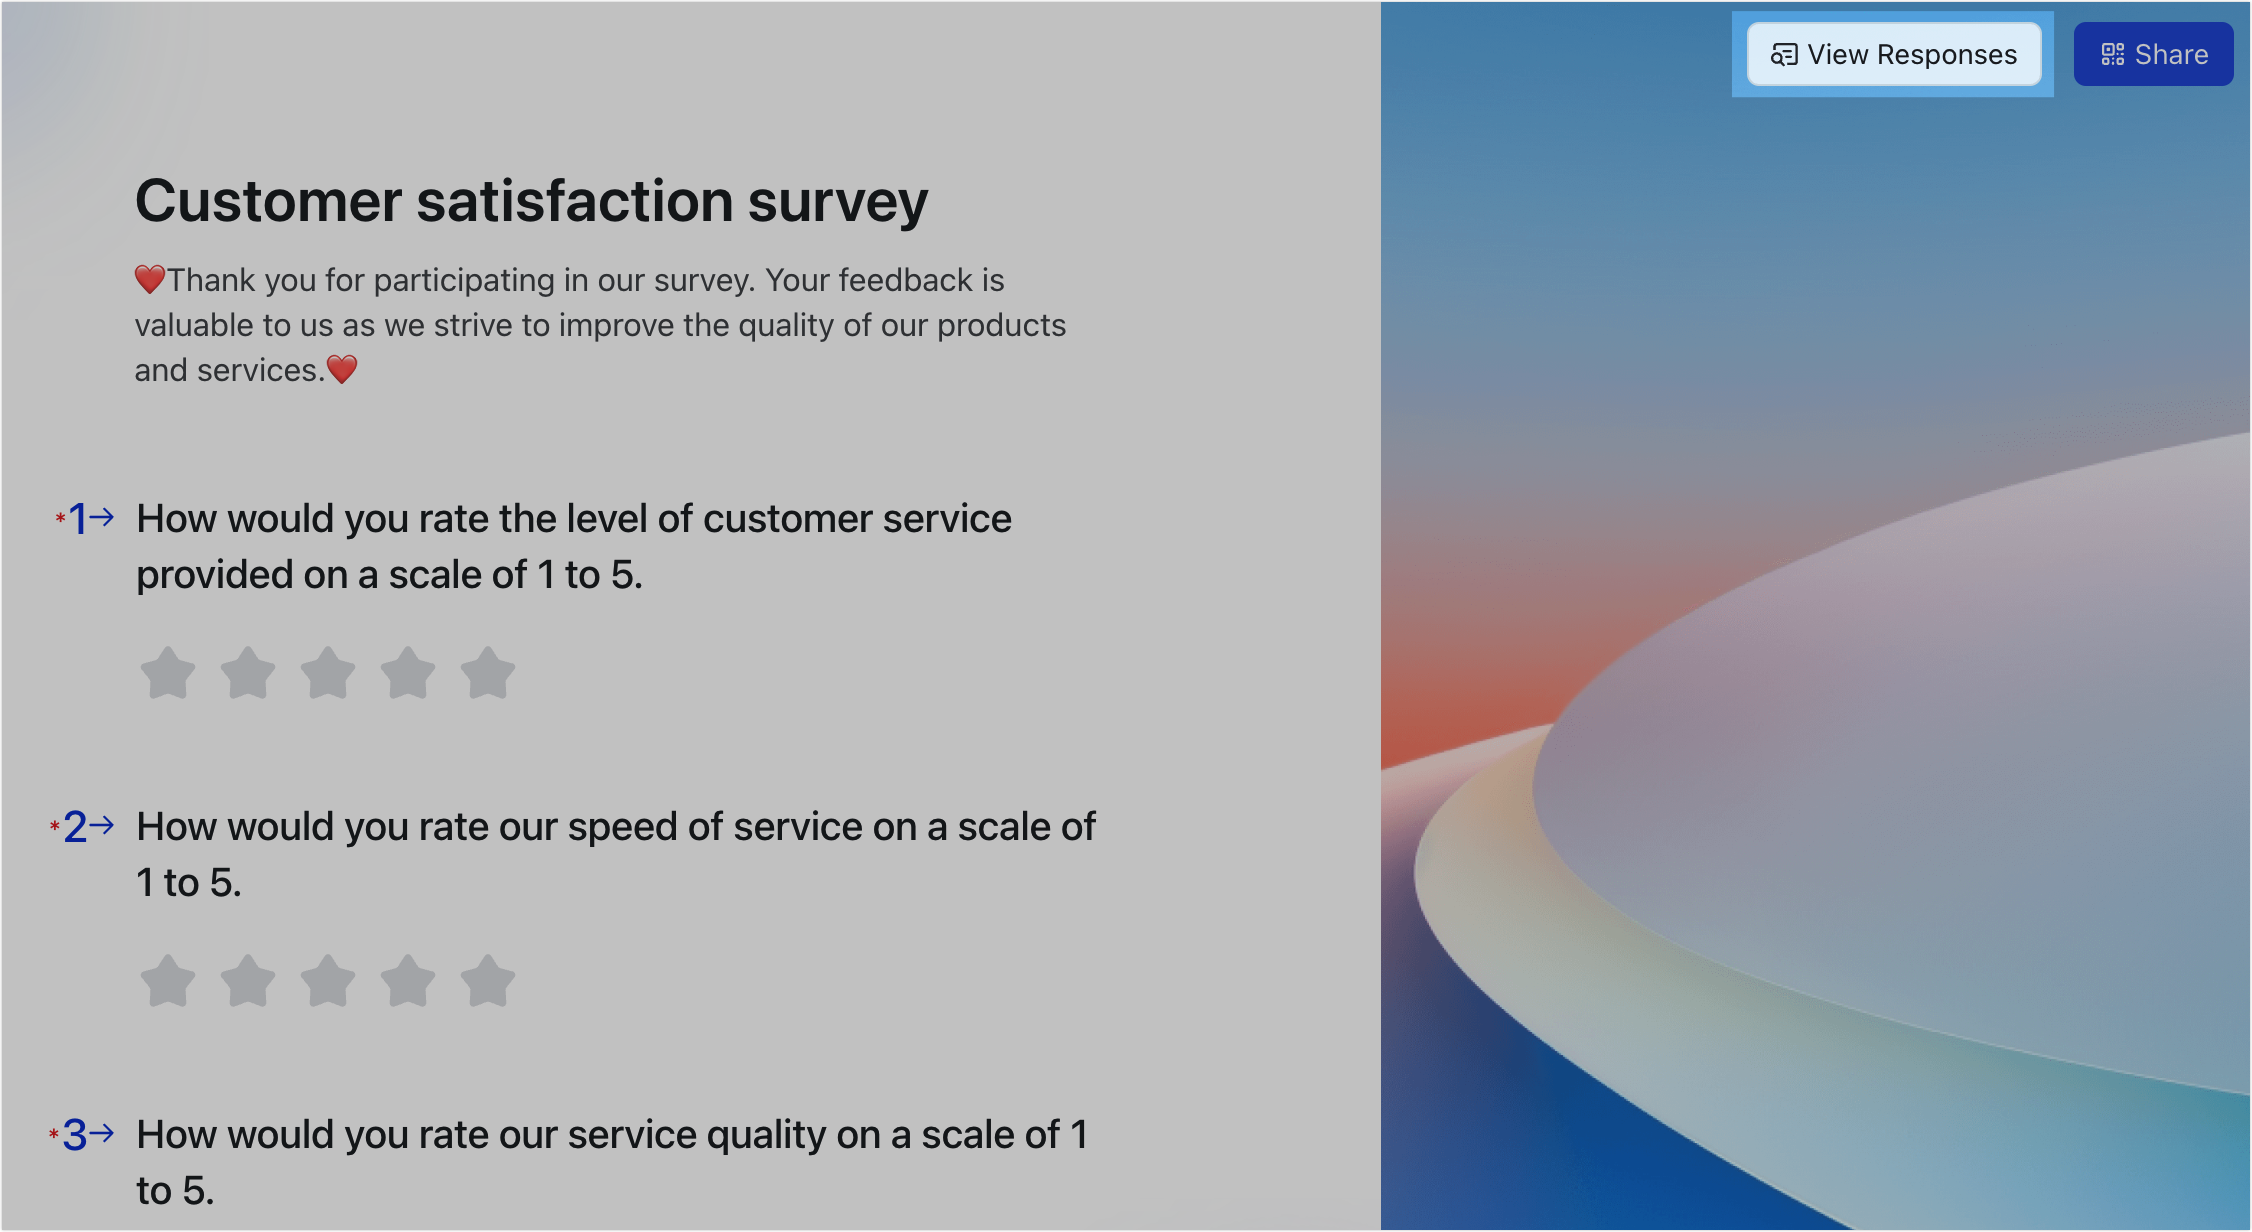
After the respondent submits the form, they can click View Responses to view the content they've filled in and submitted. They can also go back to the form-filling page and click View Responses in the upper-right corner. They will only be able to see their own submissions and not submissions from others.
If the form manager has turned on Allow response editing, then respondents can also edit and modify the submitted content.
250px|700px|reset
250px|700px|reset
View responses as form managers:
In the form editing page, click the Back icon in the upper-left corner to go to the corresponding base, where responses are recorded in a table in grid view. Only users with view permission for the table can see all form responses.
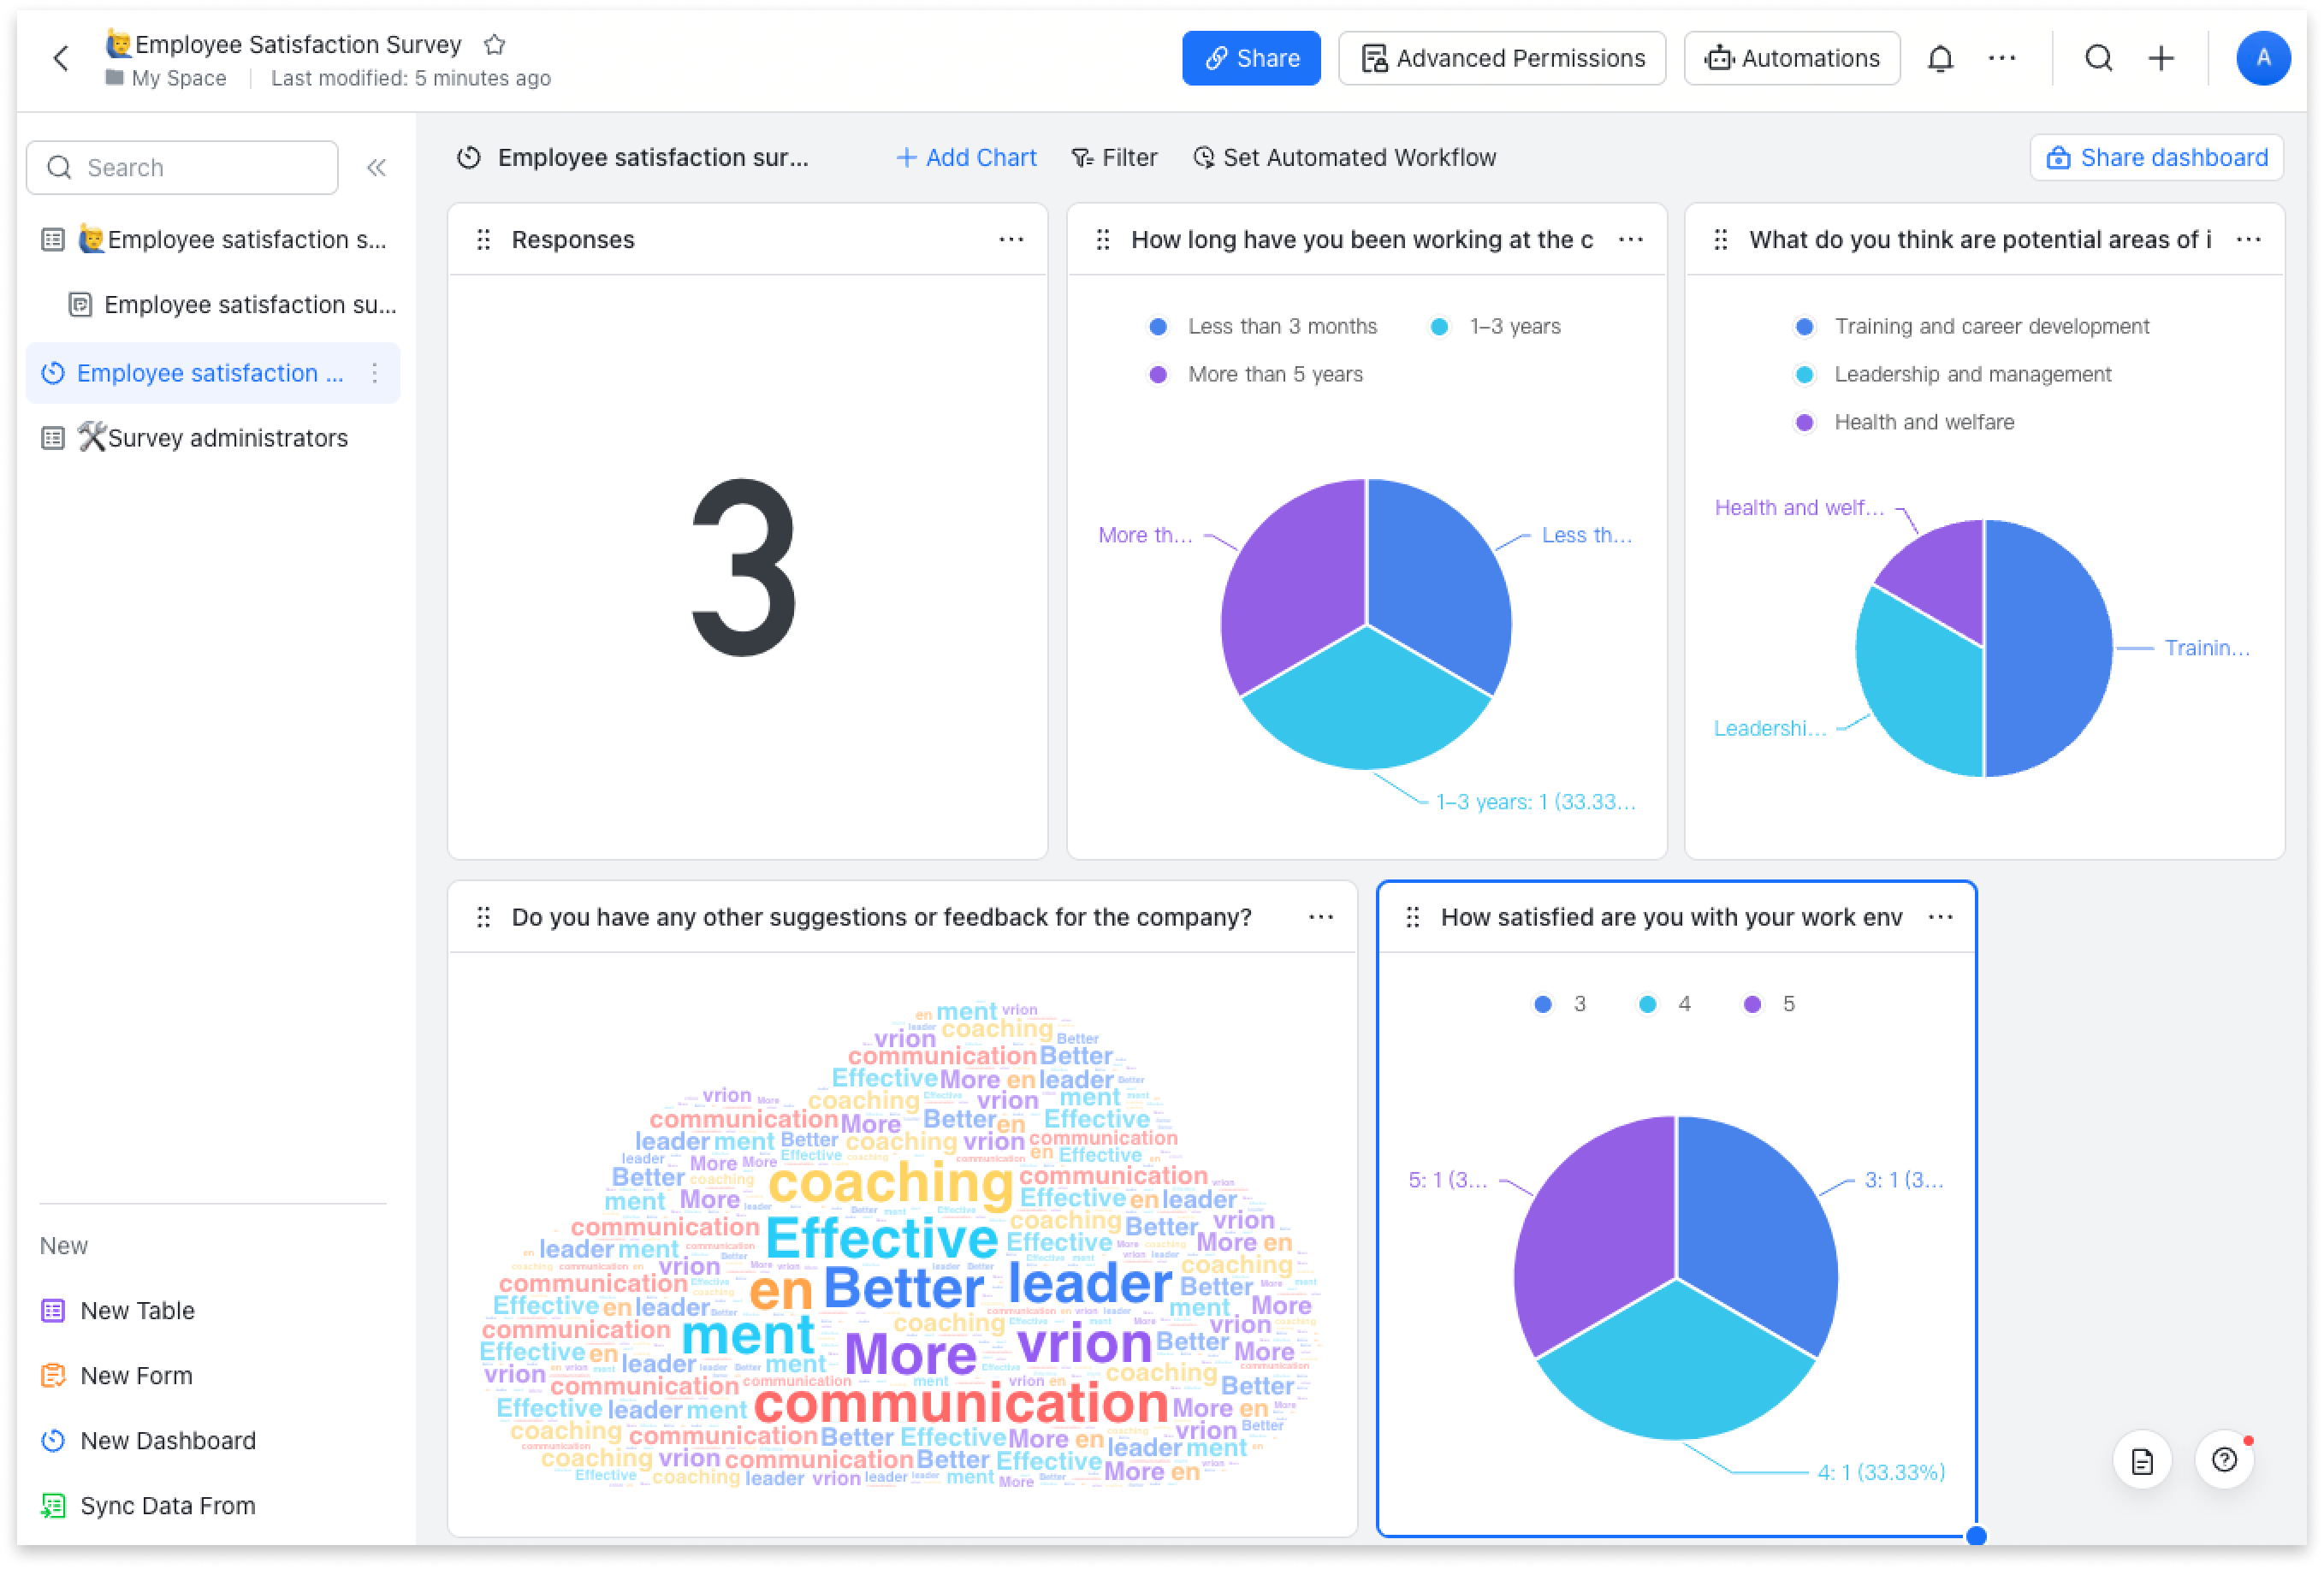
On the form editing page, click Analytics in the upper-right corner to jump to the Base dashboard, where you can view collected responses and analytics.
Note: A dashboard linked to the form, called [Form Name]—Analytics, will be generated the first time you click Analytics.
The dashboard will show the number of responses. Depending on the questions, up to 200 charts can be generated.
With Base, you can easily manage form results:
- Click Share dashboard to share it with others.
- In grid view of a table, you can easily delete invalid or incorrect responses to improve accuracy.
250px|700px|reset
The dashboard will generate different charts based on the question types. You can change the chart types based on your needs.
Manage forms from the form list
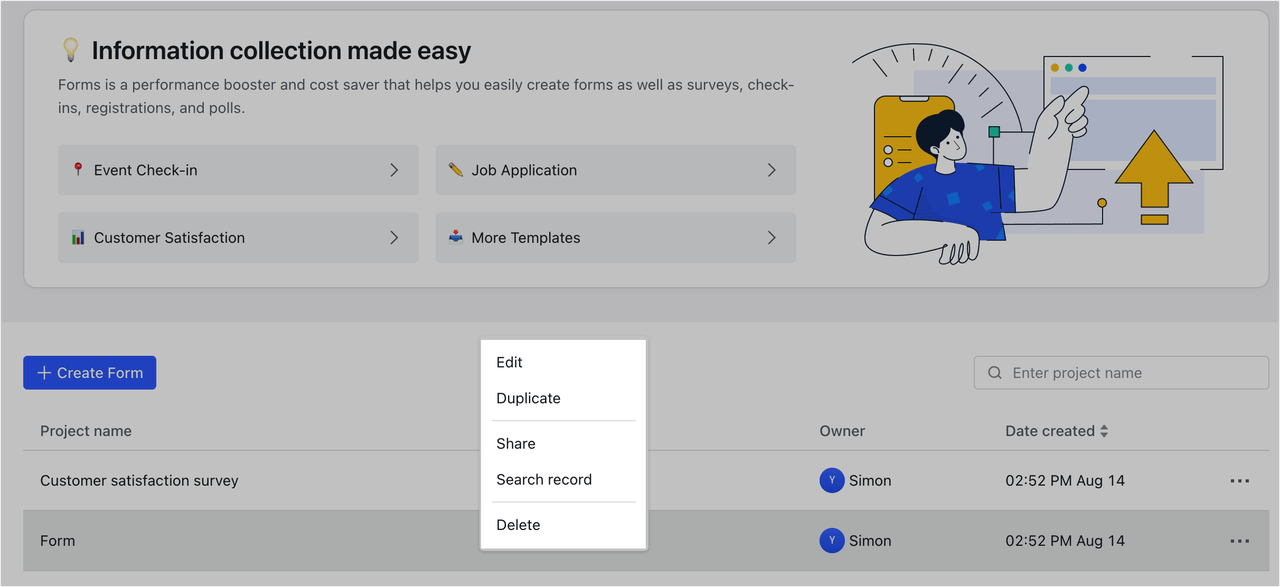
You can view forms on the Lark Forms page.
Right-click a form, and in the pop-up menu, you can choose to edit, duplicate, share, search records, or delete the form.
Click Search record to jump to the form dashboard. If the form does not have a dashboard, you will be taken to the corresponding base in grid view instead.
When you delete a form, the associated base will be deleted as well.
Note: Forms created in a base are also in the Forms format, but they will not appear on the Lark Forms homepage. You can only find them in the base in which it was created.
250px|700px|reset

III. FAQs
