Who can perform these steps: Primary administrators or administrators with Approval management permissions.
Lark Approval helps organizations ditch cumbersome offline approval methods in favor of easy online processes.
I. Product overview
1. Enter Approval Admin
1.1. Go to Approval Admin
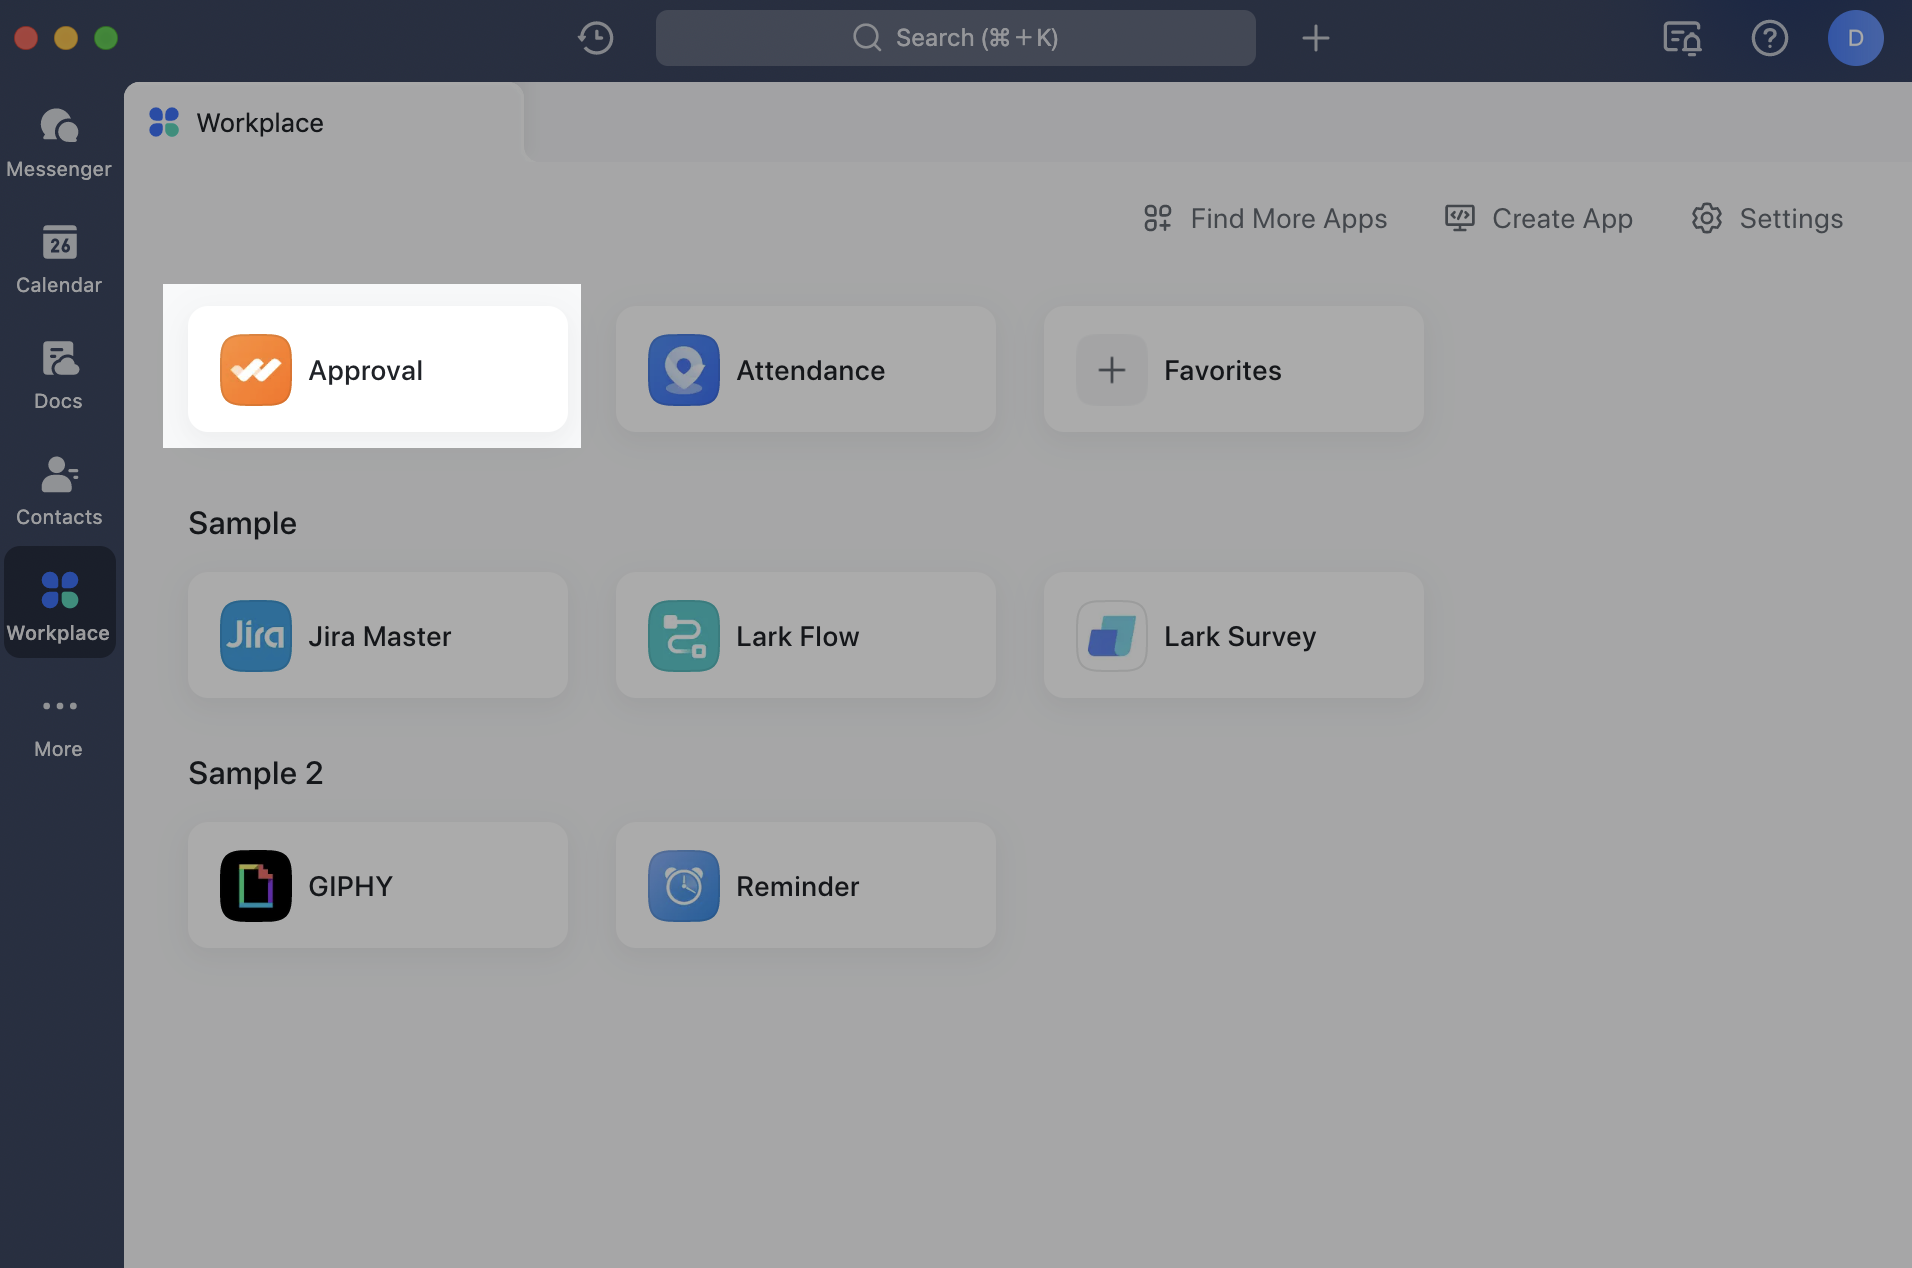
- Click Workplace in the Lark desktop app, and locate the Approval app.
250px|700px|reset
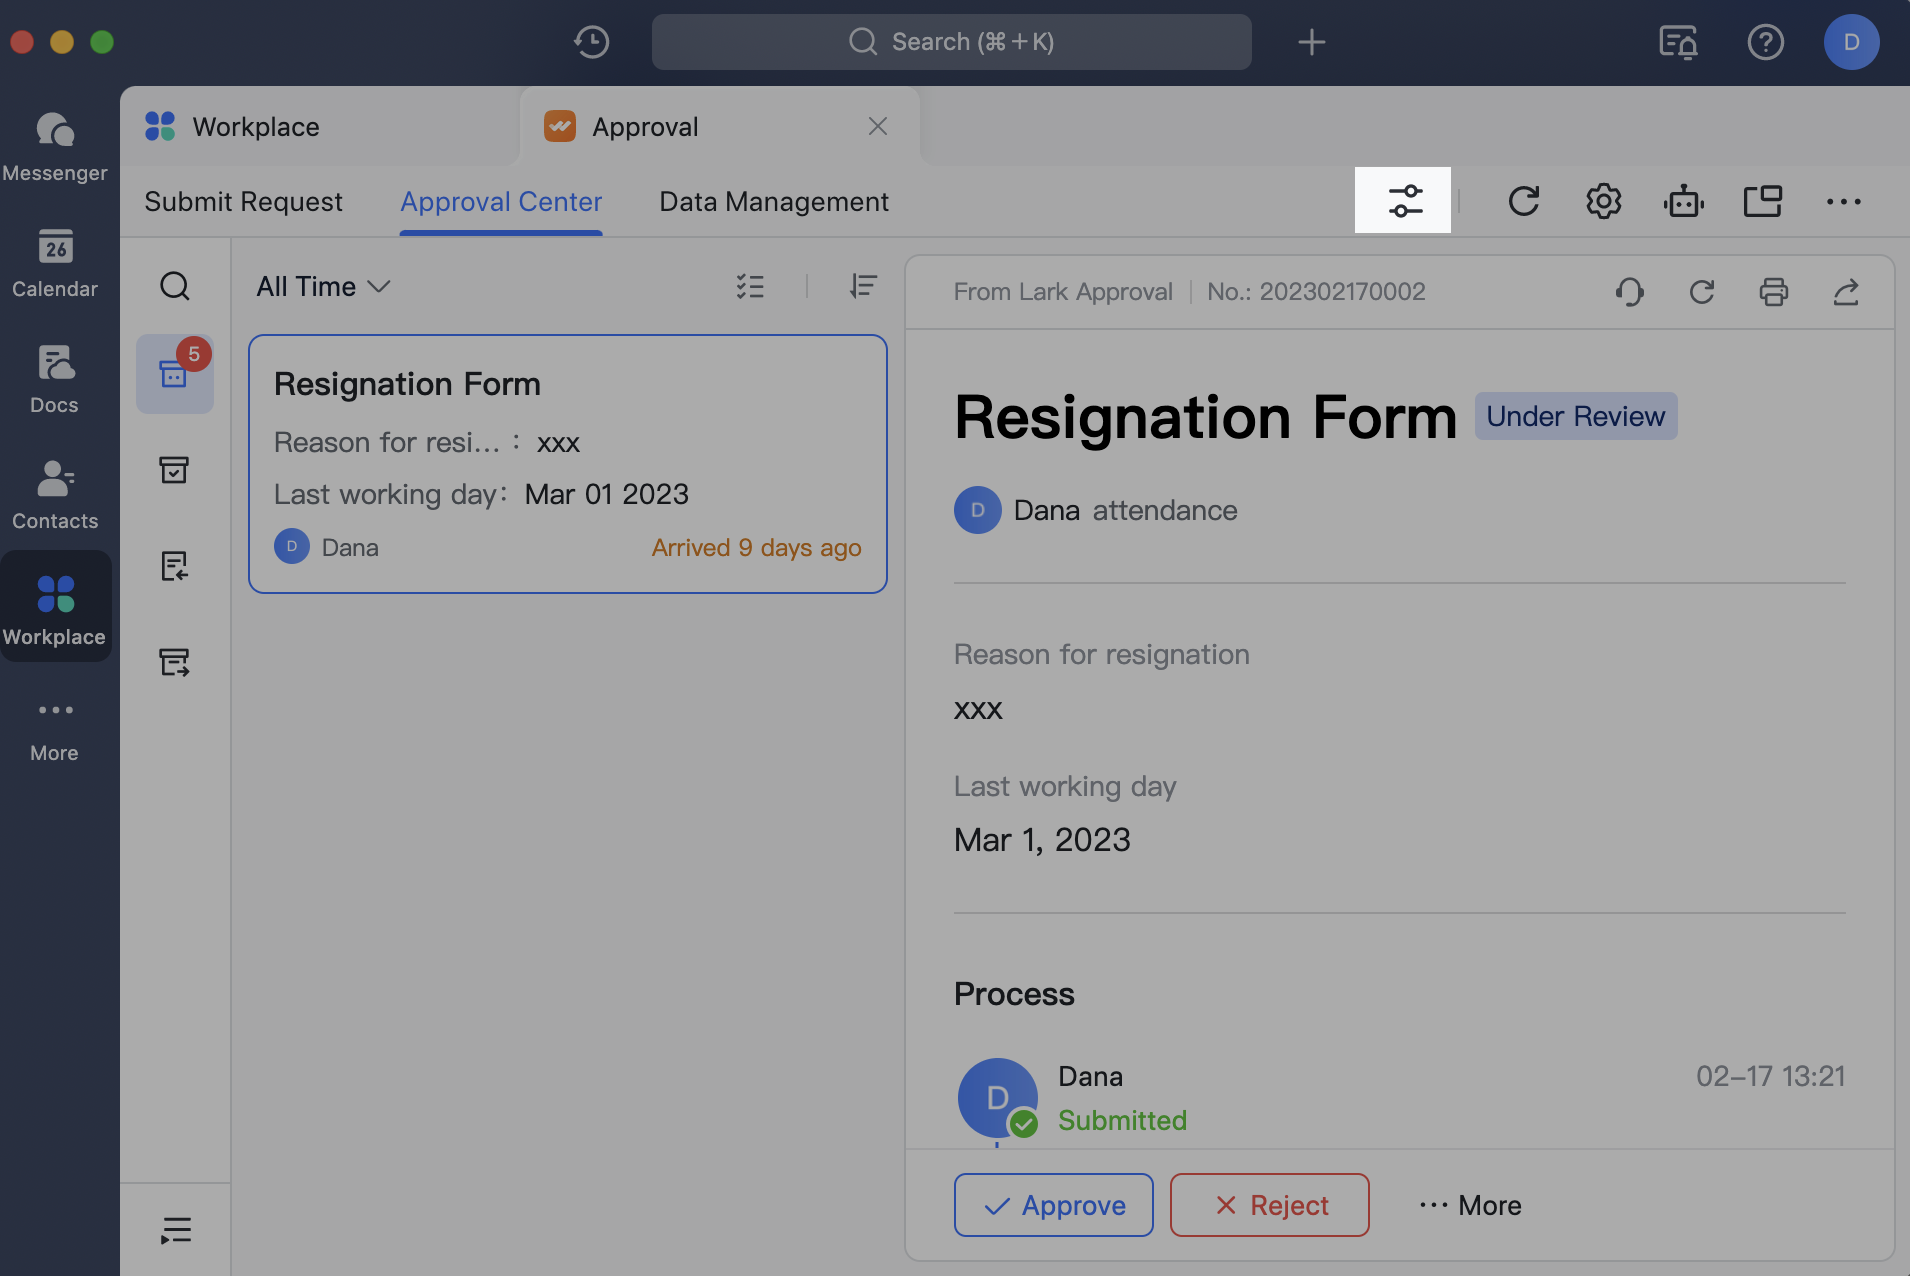
- Click Admin Console in the upper-right corner (this link will only be shown to users with Approval Admin permissions).
250px|700px|reset
1.2. Create approvals
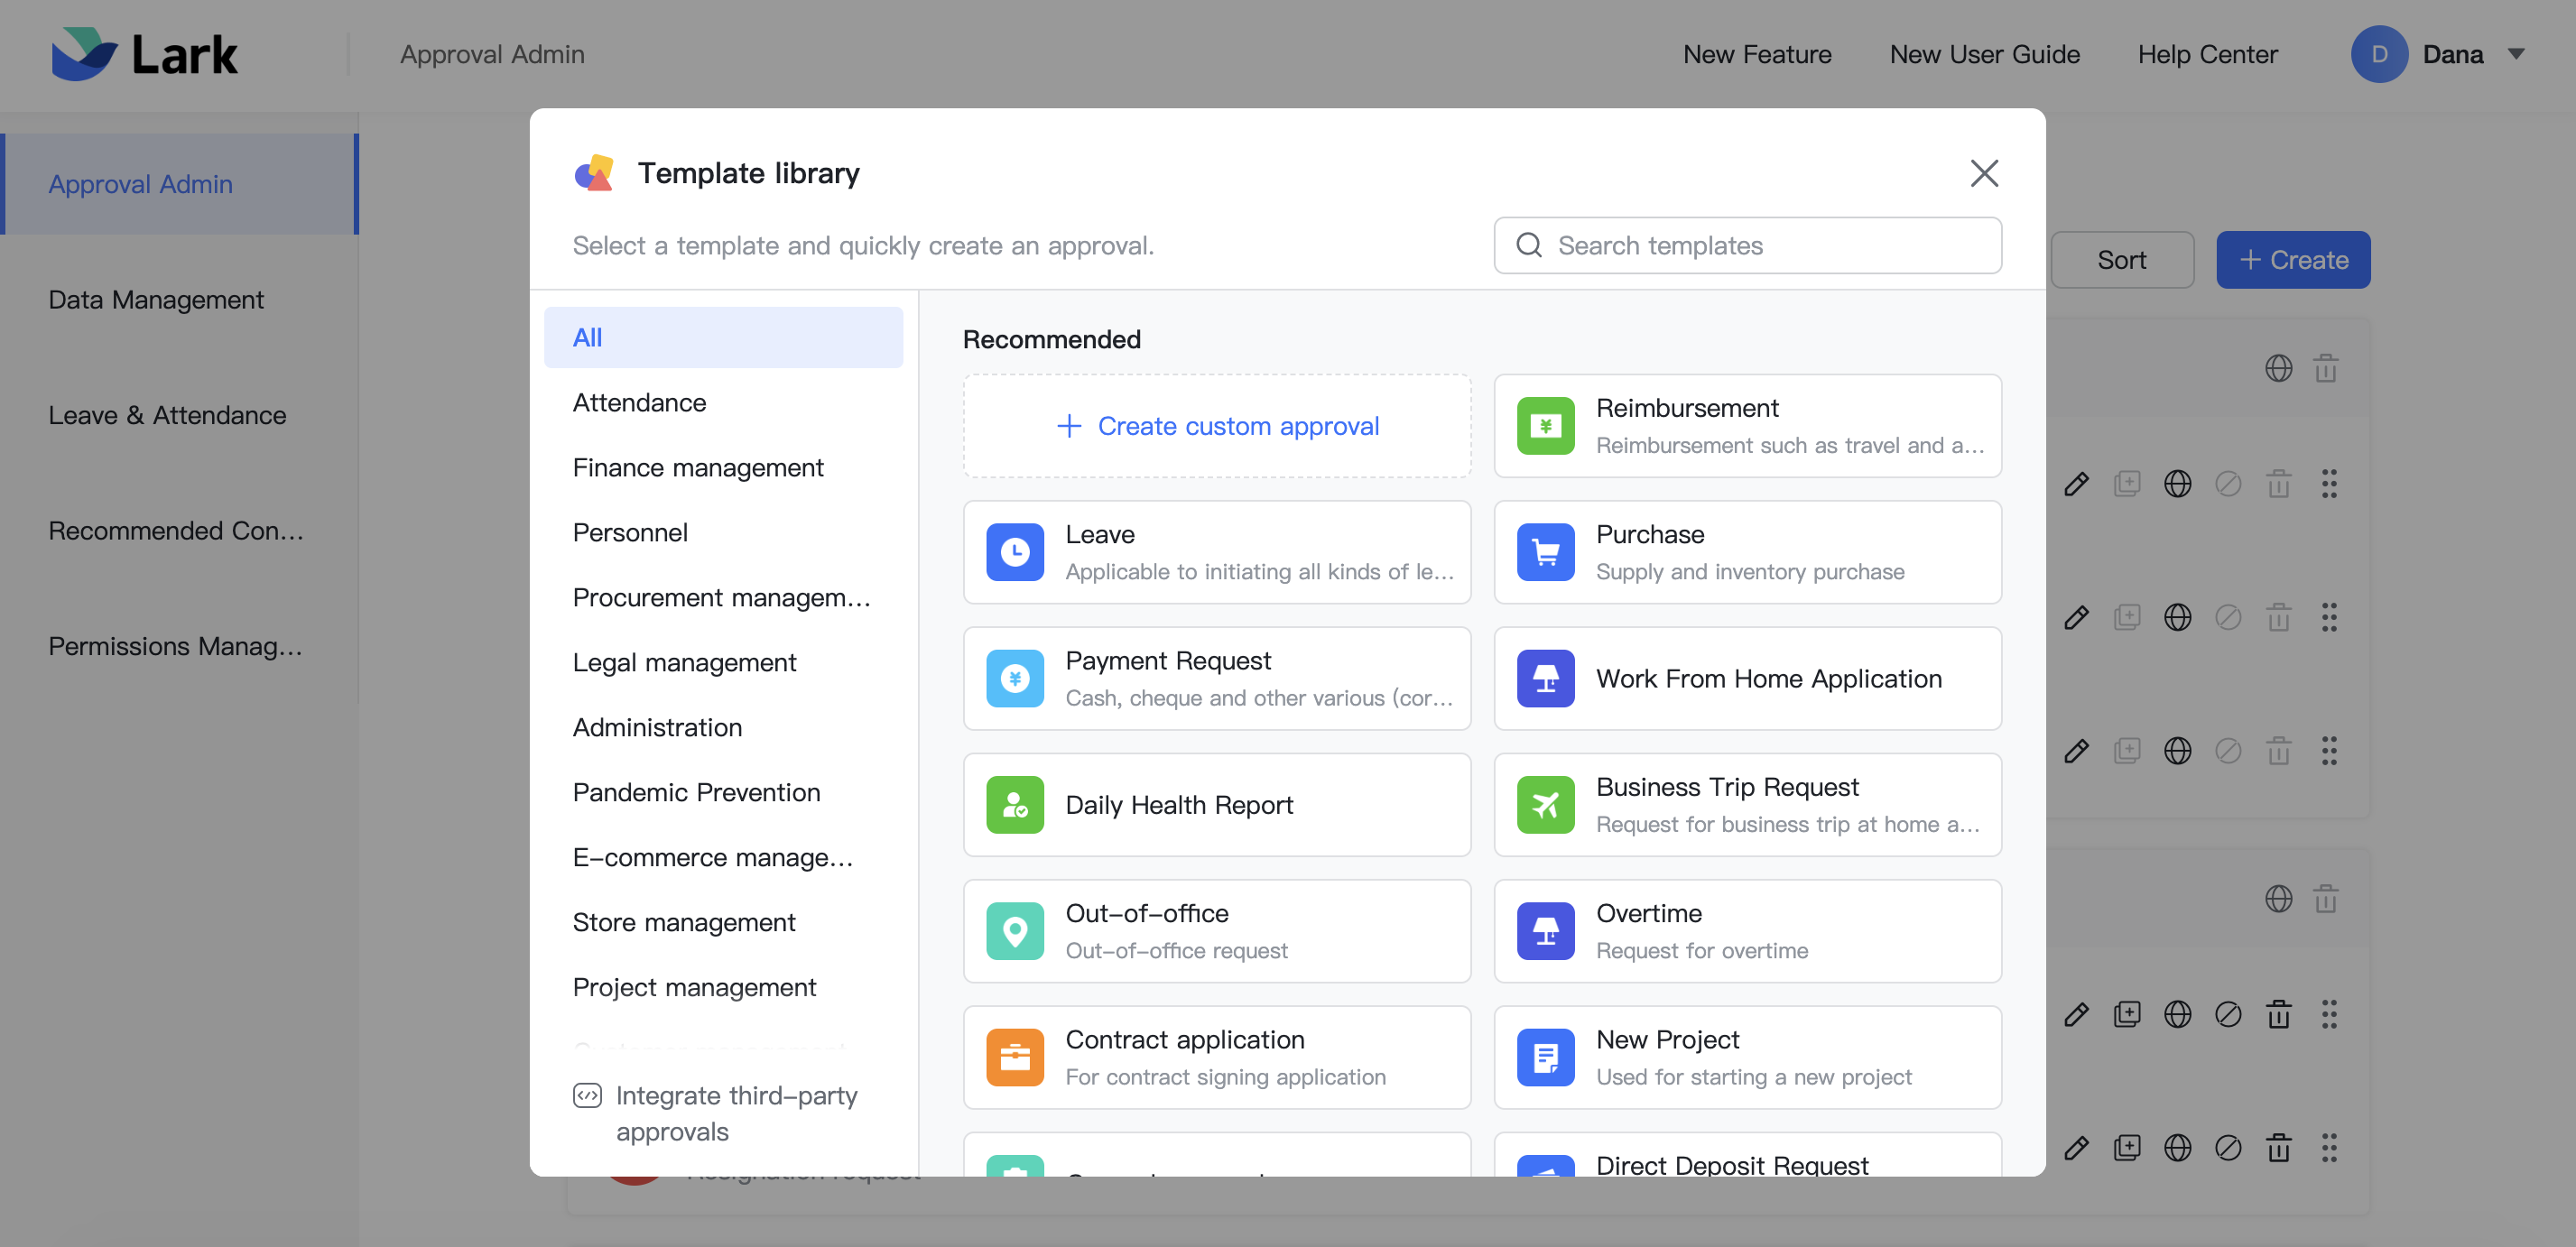
Go to Approval Admin and click Create. You can select a template (there are over 100 templates covering scenarios including attendance, finance, and HR, as well as several specific industries), create a custom approval, or integrate third-party approvals.
250px|700px|reset
- Basic info
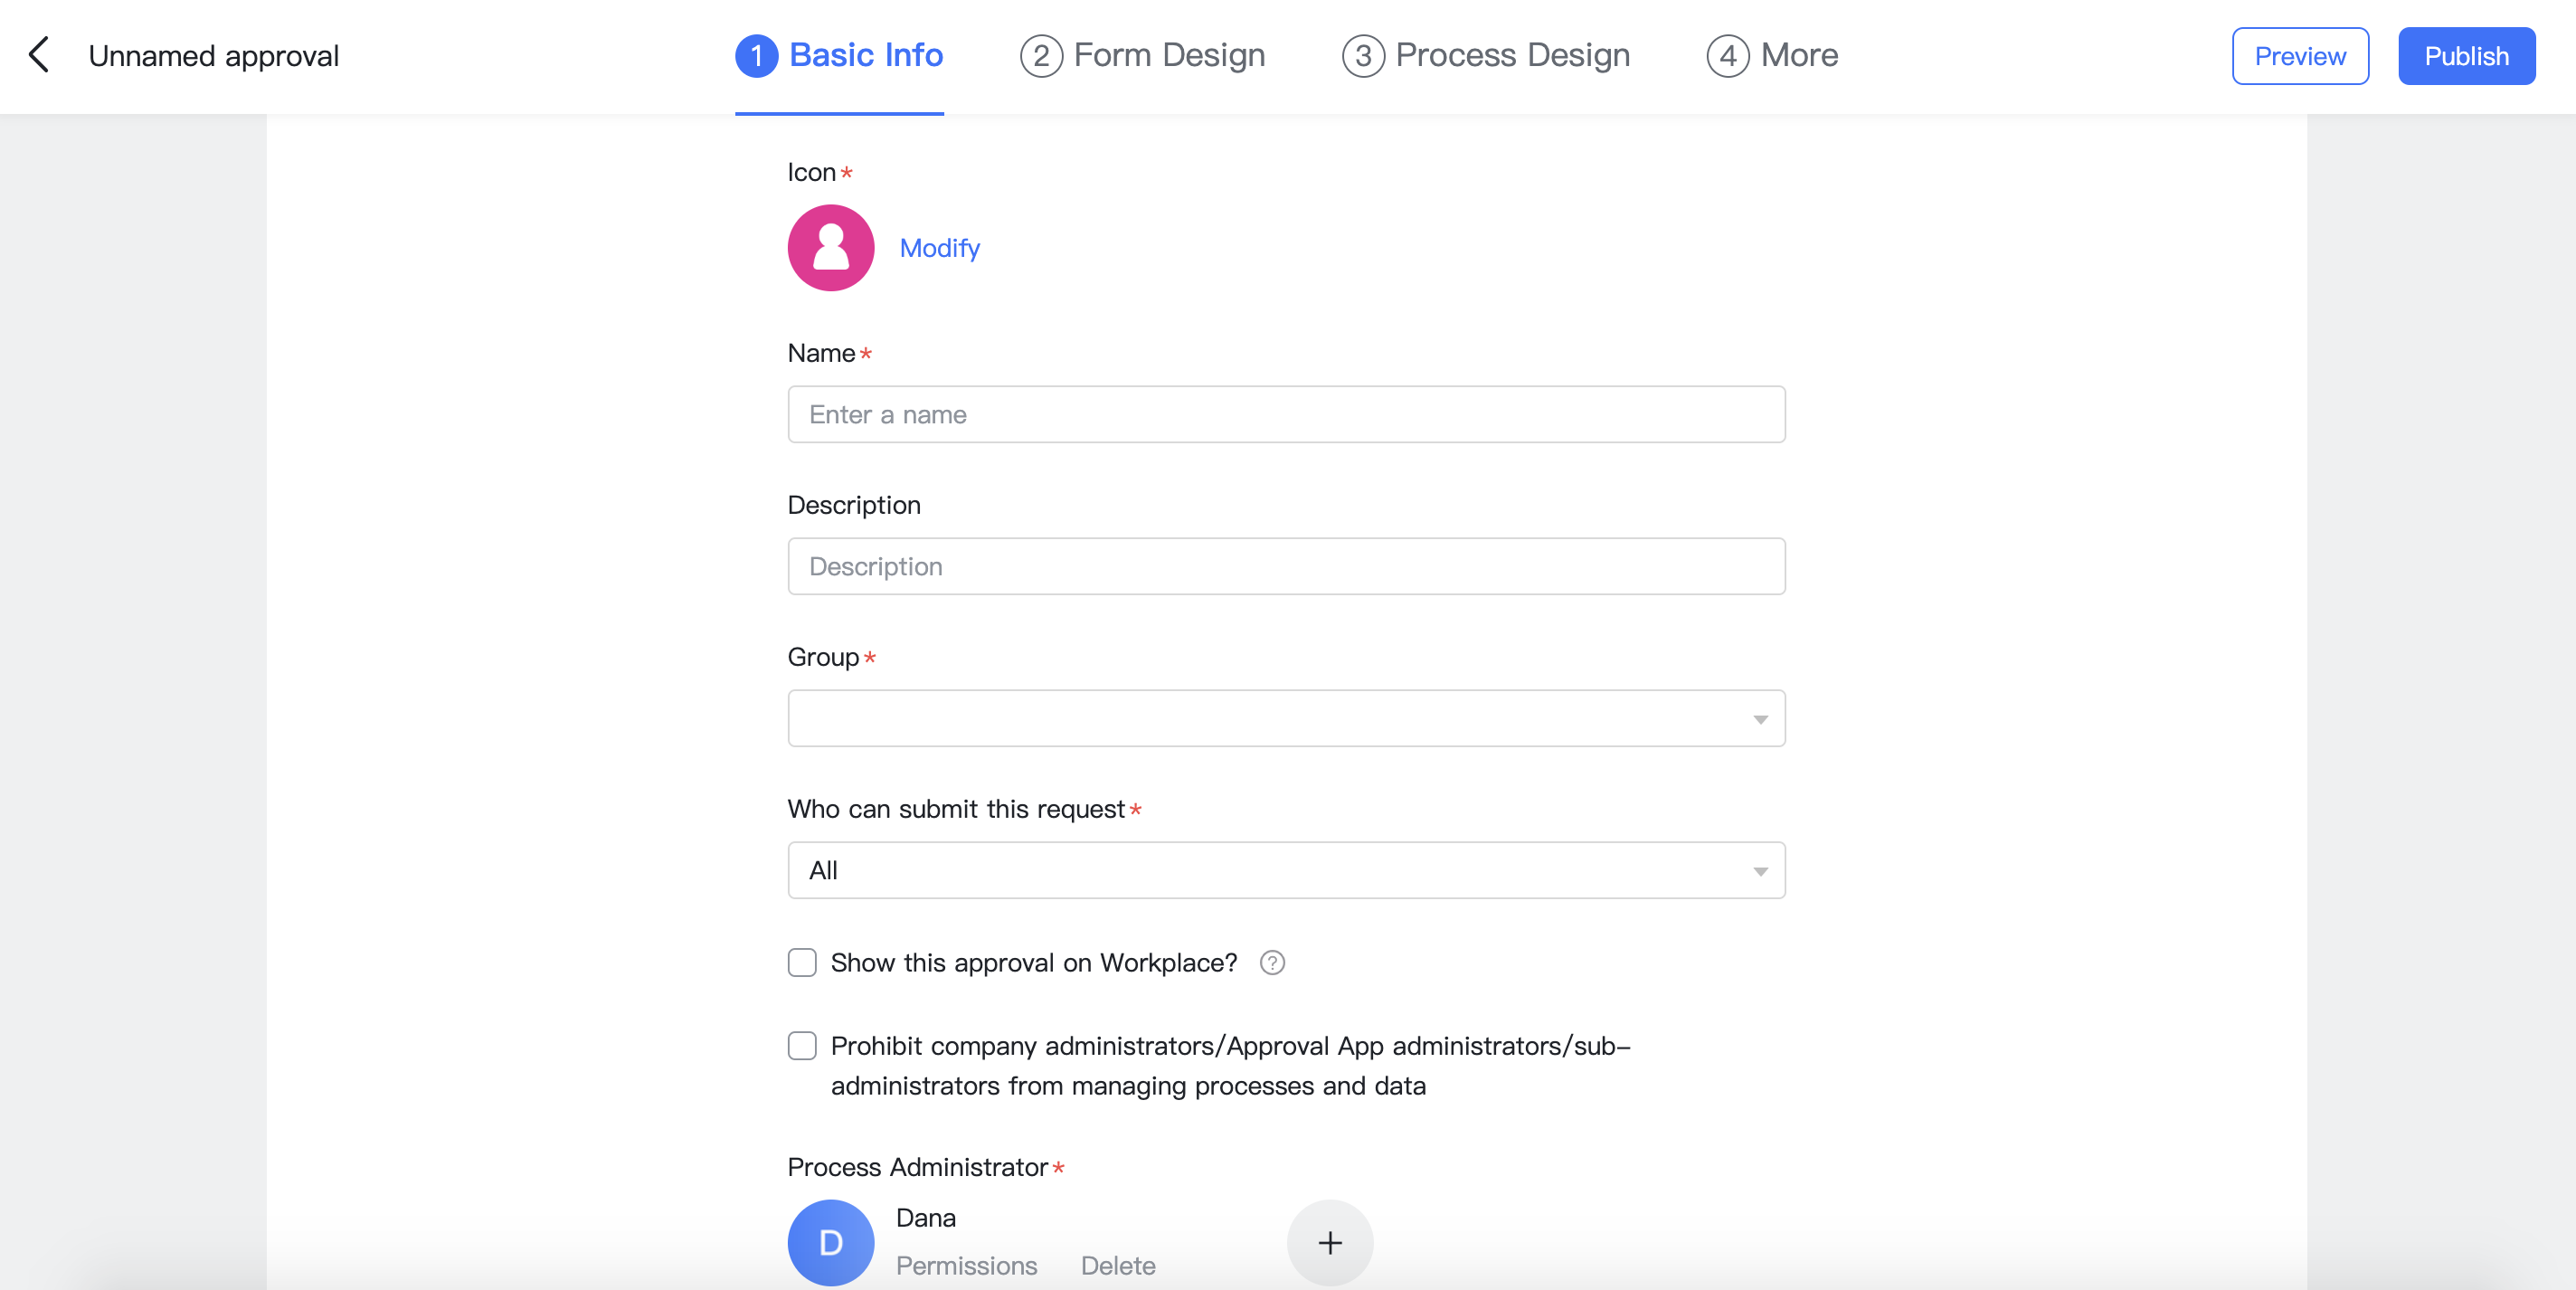
Set the approval's name, description, group, and other basic info.
250px|700px|reset
- Form design
Design approval forms that fit your organization's specific needs to ensure members always submit the required information with their requests.
3.1 Intro to form design
Add widgets
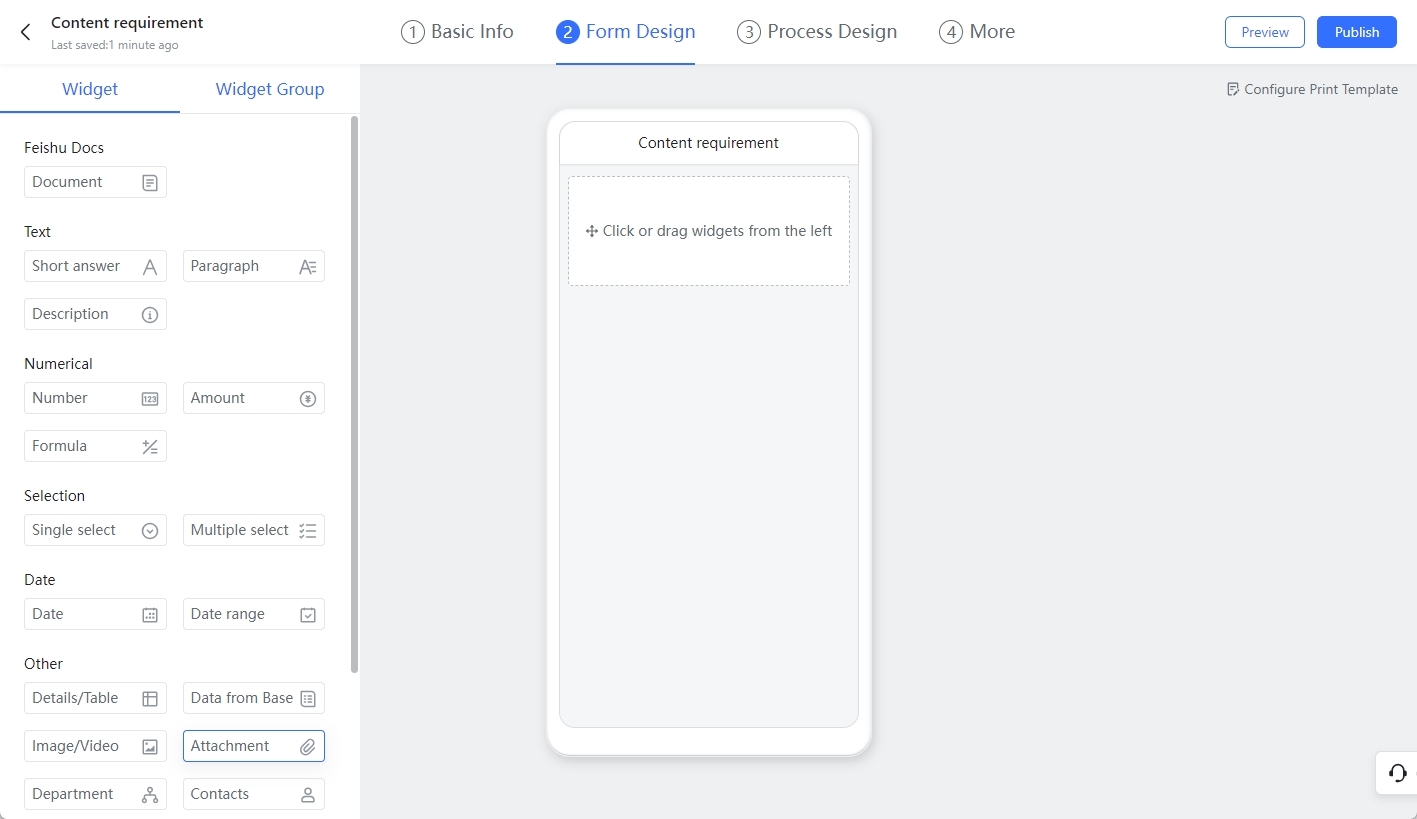
Text, values, options, dates, and many other types of widgets are available on Lark Approval. Click or drag the widget that you need to add to the form, then right-click to modify the widget's settings.
250px|700px|reset
Add a widget group
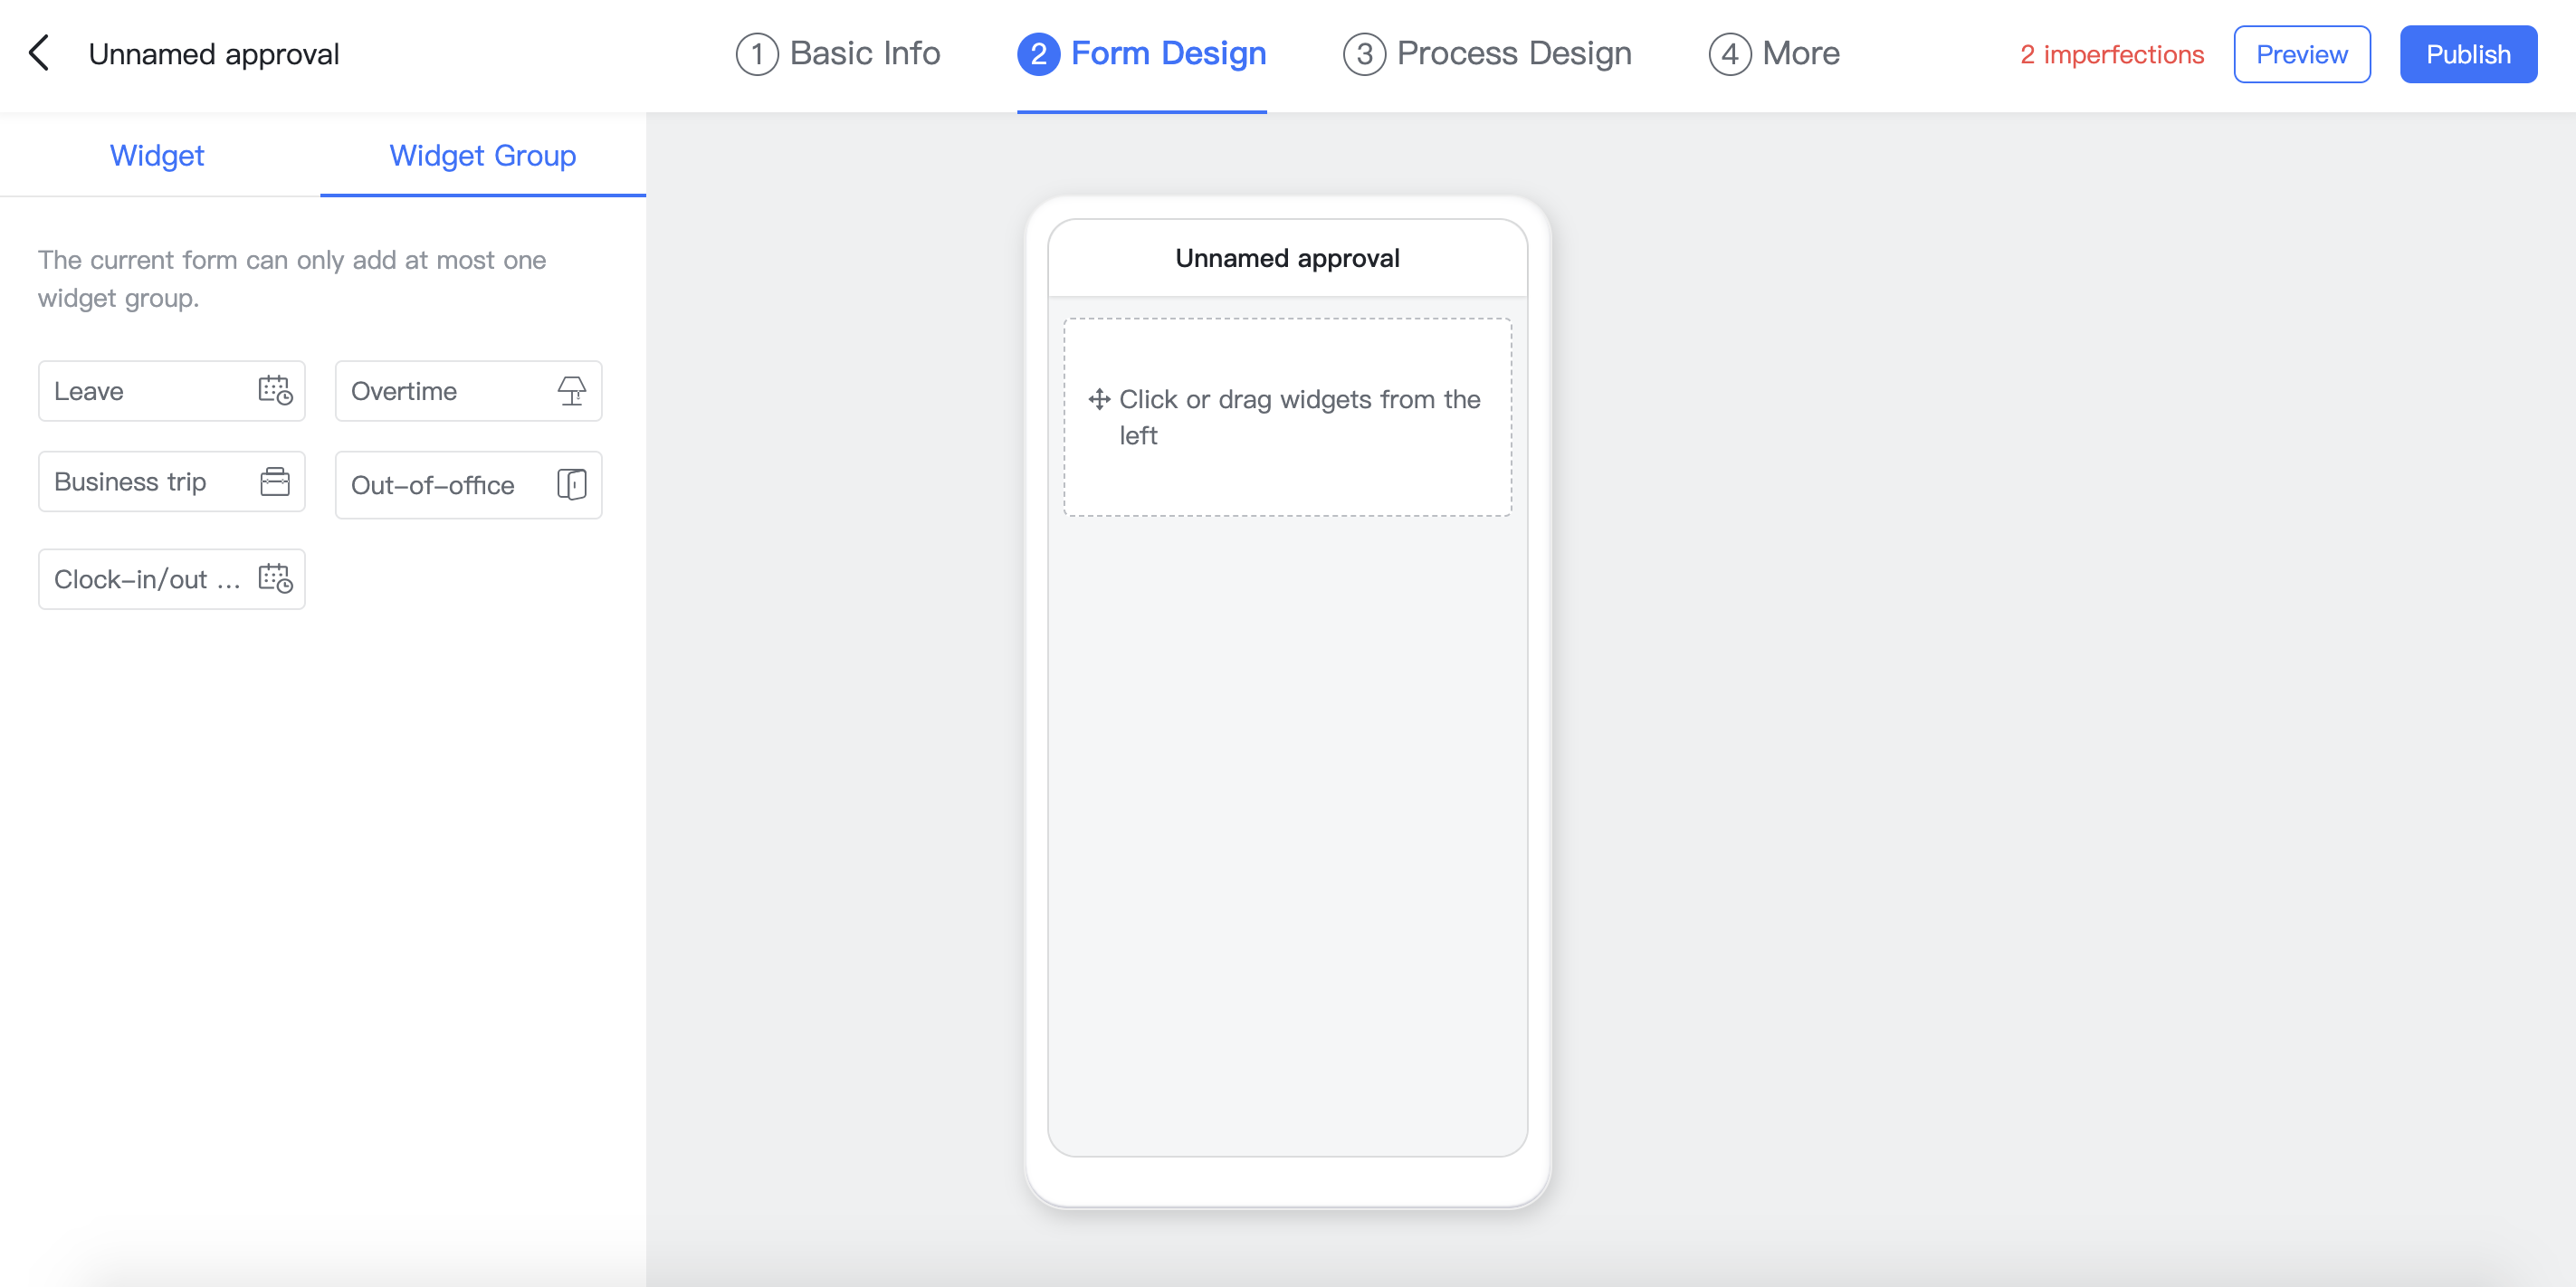
You can also use widget groups, which gather collections of widgets applicable to specific scenarios like overtime and leave requests. These widget groups are linked to Lark Attendance, and any member leave or overtime data submitted through widget groups will be automatically synchronized to Lark Attendance.
Click or drag the widget group you need, then right-click to modify its settings. Only 1 widget group can be added per form.
250px|700px|reset
Basic settings
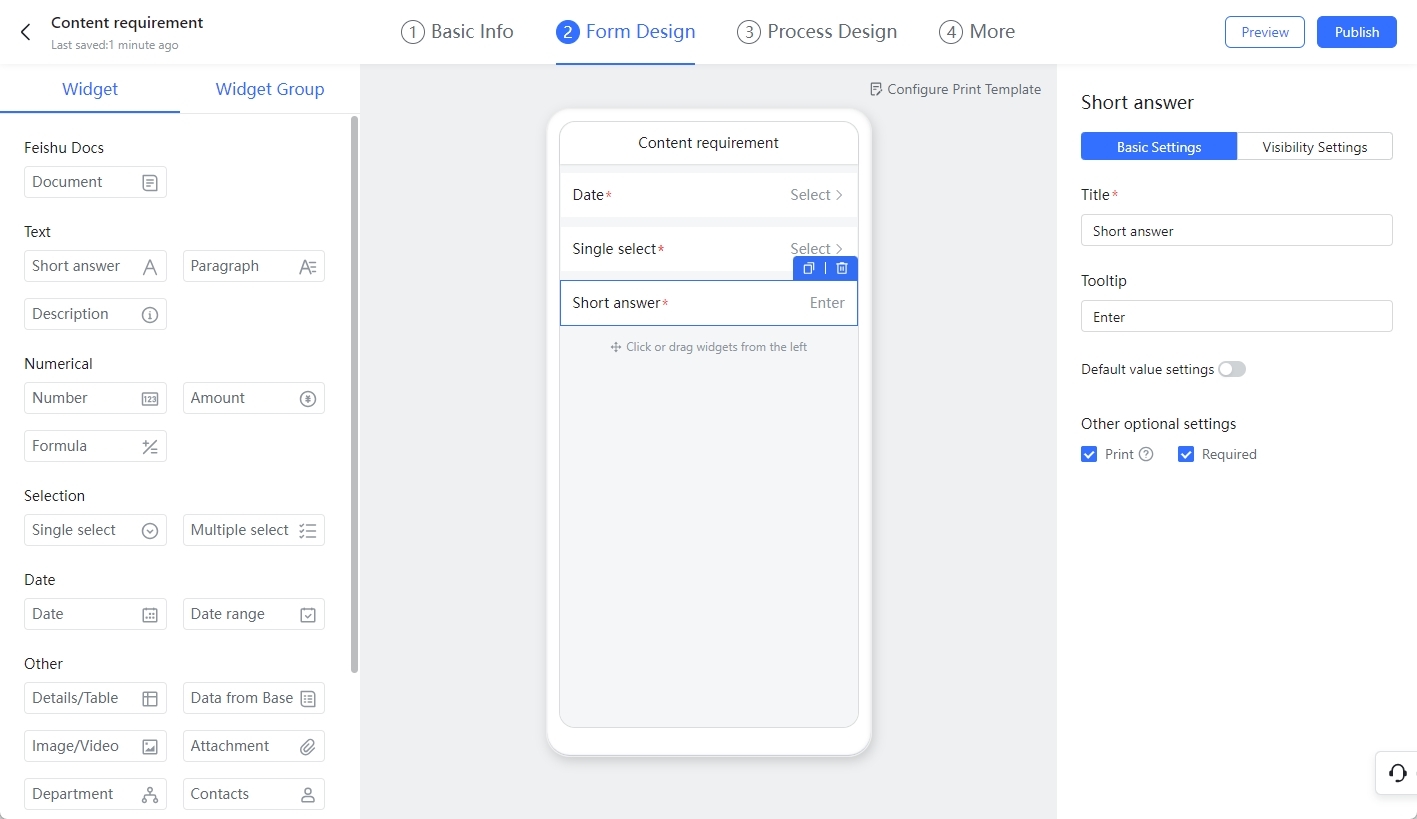
Basic settings generally include: title, tooltip, default value settings (for example, option settings for a single option widget, or type settings for a date widget), and whether or not the widget can be printed or if submitters will be required to fill it in.
Note: See sections 3.2 and 3.3 below for more detailed descriptions
250px|700px|reset
Visibility settings
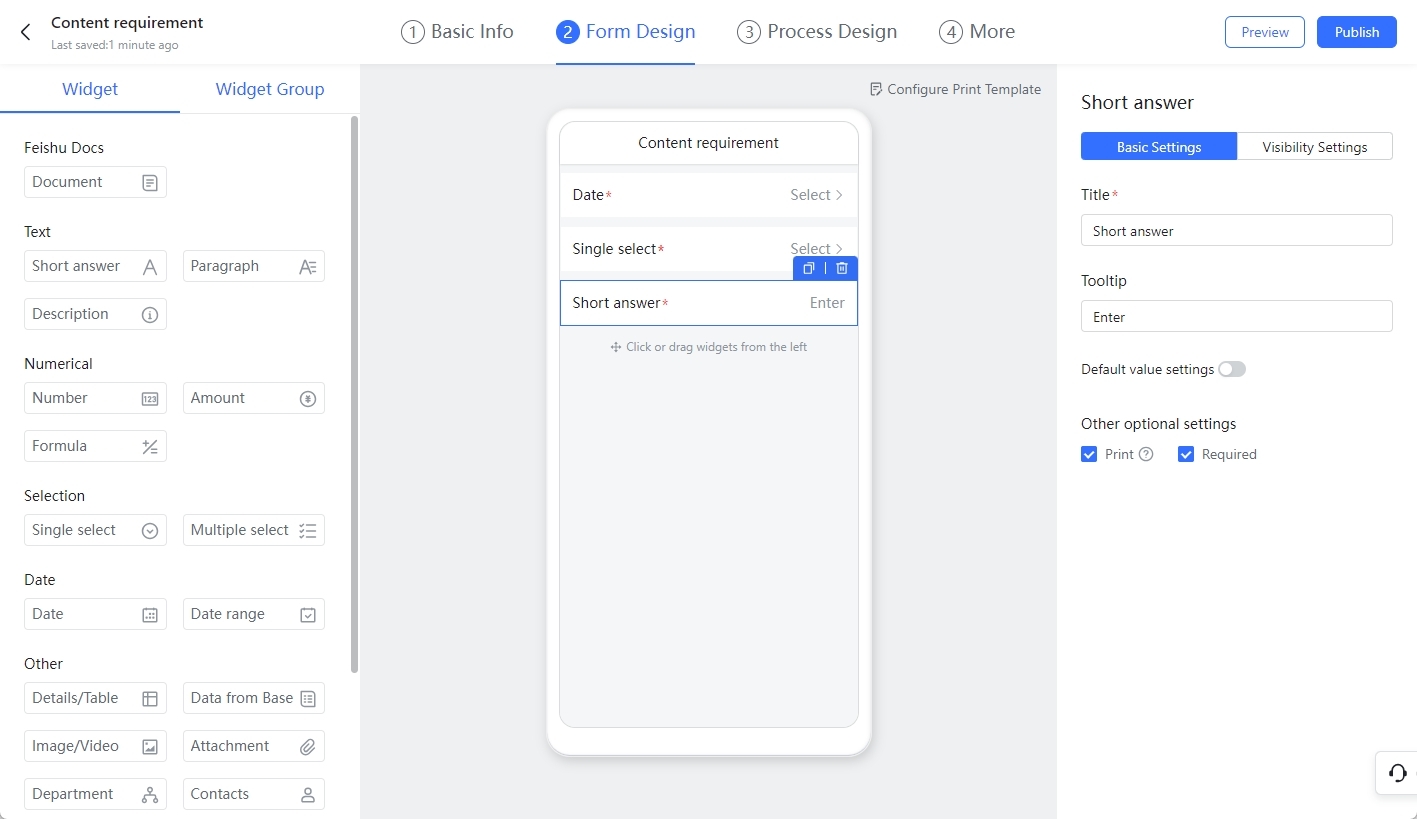
Visibility settings refer to setting conditions that govern whether or not a widget will be displayed.
Click Add condition group and then Add condition to set another widget as a condition. For example, you could decide that the Reason for Reimbursement widgets should only be displayed if the Expense type widget is set to Select travel or transport expenses.
Note:
- The form must contain at least 1 Single select, Multiple select, Number, Amount, Formula, or Date range widget or a Leave, Overtime, or Business trip widget group before display conditions can be set.
- You can add multiple conditions and condition groups. When multiple conditions are added to a single condition group, the relationship between each condition is an "and" relationship, meaning all conditions must be met for the widget to take effect.
When multiple condition groups are added to a single widget, the relationship between each condition group is an "or" relationship, therefore only the conditions of one group need to be met for the widget to take effect.
250px|700px|reset
Smart forms
Display condition of control
The form will intelligently display relevant options based on the information already entered by the member completing the approval form, making the process more efficient.
For example: When completing an office admin procurement application, the Mailing address option will only be displayed when Mailing is the selected collection method. The option will not be displayed if Company picking is selected.
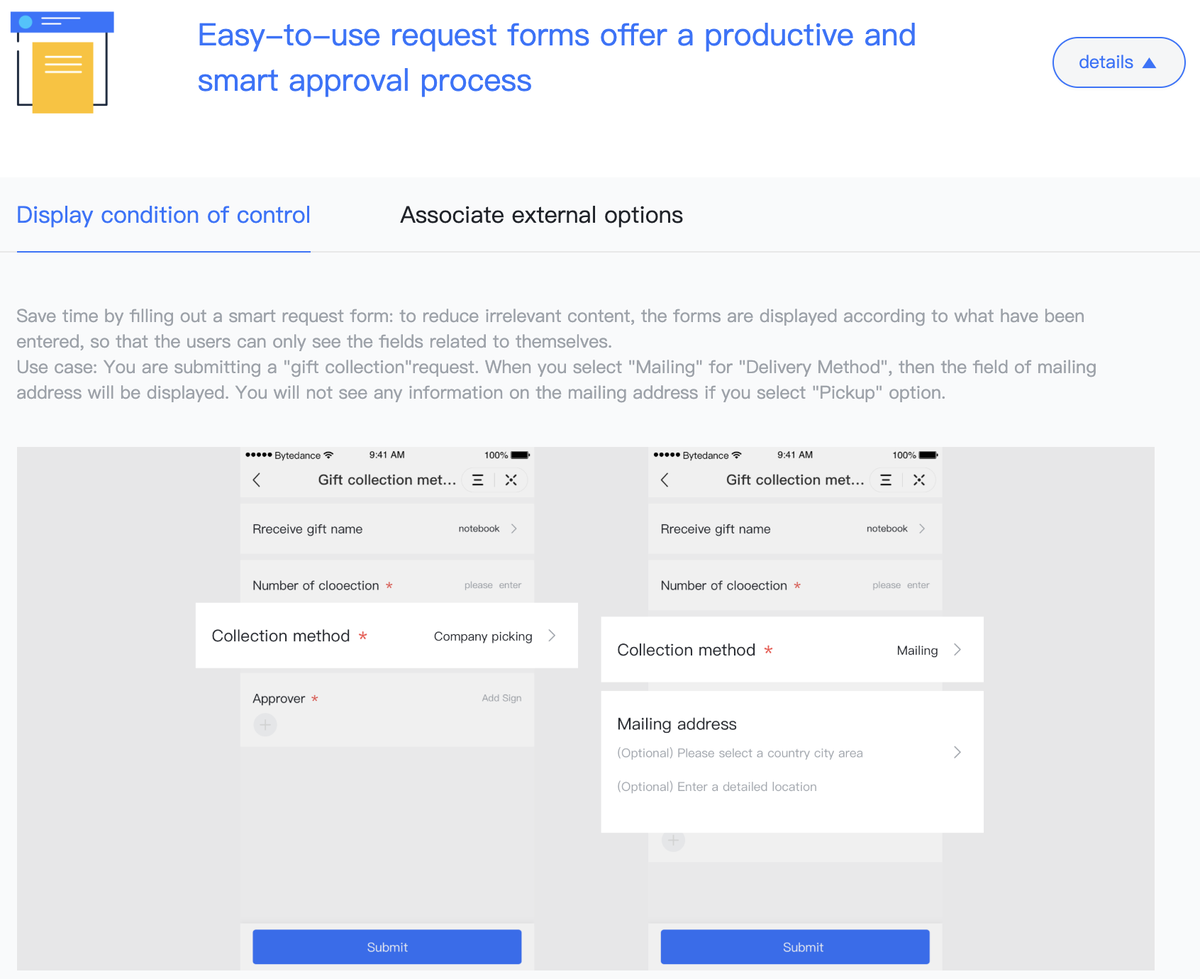
250px|700px|reset
Associate external options
Data from other synchronized company systems (such as data from the HR or Sales Management systems) can be included in forms as an option to eliminate the need for manual user intervention.
For example: You can configure the CRM client list to appear as the options offered when filling out a sales approval request for submission.
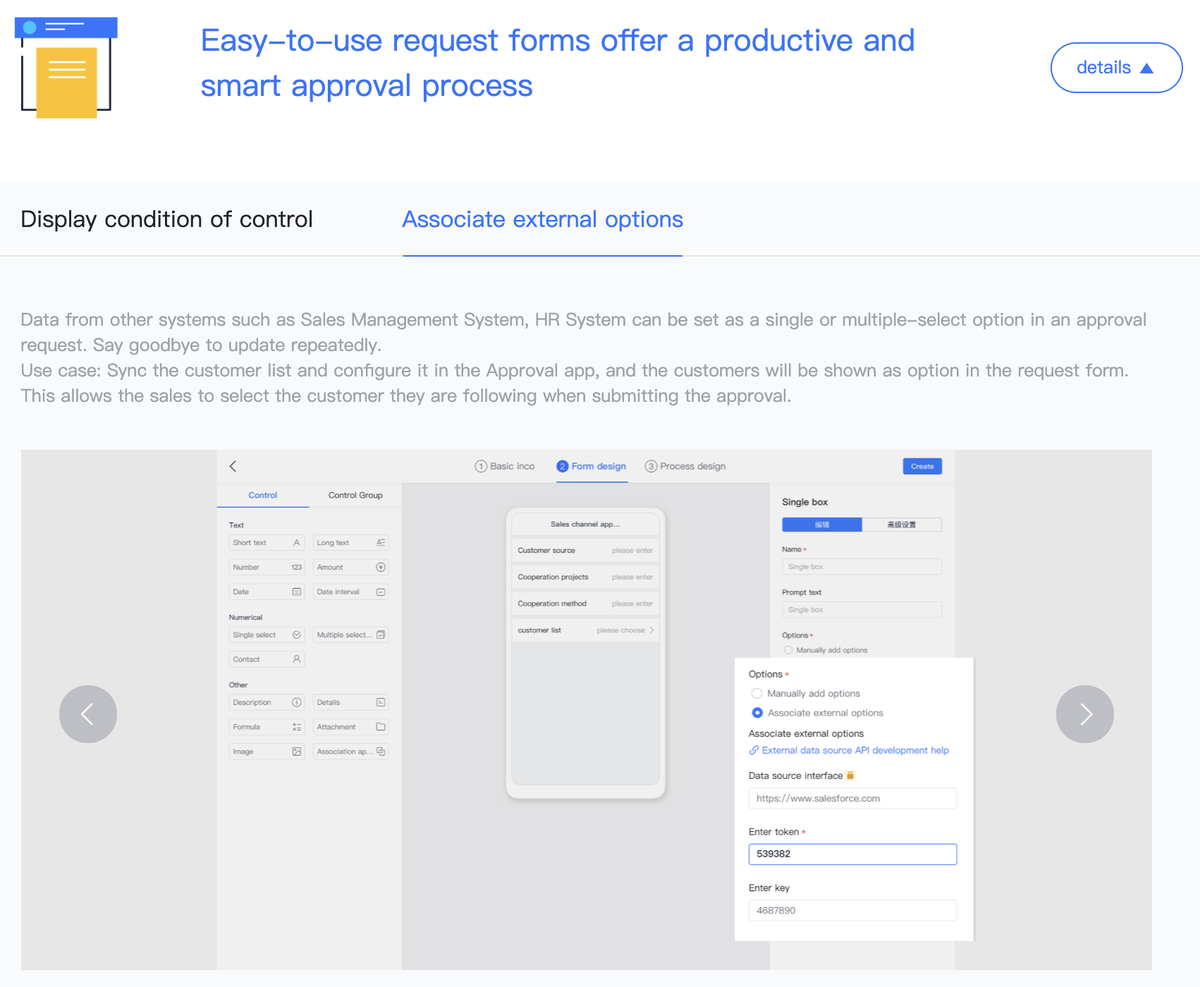
250px|700px|reset
3.2 Form widgets in detail
Short answer
Allows users to enter a single line of text.
Multi-line text
Allows users to enter paragraphs of text.
Description
Enter a descriptive explanation, remarks, or other text.
Number
Enter numbers. Can be restricted to a certain range.
Note: Please use a text widget for ID card or bank card numbers longer than 15 characters.
Amount
Enter amounts in a designated currency. Can be restricted to a range.
Calculation formula
Performs calculations on the numbers and amounts entered in real-time.
Single option
Restricts selection to one of a group of options
Multiple options
Allows the selection of multiple options in a group of options.
Date
Select the date and time. Hours/minutes, AM/PM, and other detailed information can also be displayed.
Date interval
Select start and end times and automatically calculate duration.
Details
Combine multiple widgets within a details table.
Images
Take a photograph or upload an image saved locally.
Supports JPG, JPEG, BMP, PNG, SVG, and other formats. Upload a maximum of 9 images at one time.
Attachment
Upload documents, videos, and other files.
Supports PNG, JPG, JPEG, DOC, DOCX, XLS, XLSX, PPT, PPTX, PDF, TXT, ZIP, RAR, MP4, and MOV file formats. No file can be larger than 50 MB.
Department
Search and select departments from within the organization.
Contact person
Search and select members from within the organization.
Link approval
Link other approvals to the current approval form.
Address
Select and enter address information. Supports auto-positioning.
Phone
Enter a mobile or fixed-line telephone number. Can automatically verify the format entered.
Serial No.
Customize unique approval form number information.
3.3 Form widgets in detail
Leave requests
Automatically link leave requests to Lark Attendance. Once approved, member leave data is automatically synced to the Leave Attendance system.
Overtime
Automatically link Lark Attendance for overtime requests. Once approved, member overtime data is automatically synced to the overtime Attendance system.
Business trip
Automatically link Lark Attendance for business trip requests. Once approved, member business trip data is automatically synced to the Lark Attendance system.
Offsite
Automatically link to Lark Attendance for offsite working requests. Once approved, member offsite data is automatically synced to the Lark Attendance system.
Clock in/out corrections
Automatically link to Lark Attendance for clock in/out correction requests. Once approved, member correction data is automatically synced to the Lark Attendance system.
- Process Design
Set up the flow of steps between when a request is submitted through to its approval and closure.
4.1 Intro to process design framework
The process design area intuitively displays process steps. Click + to add approvers, CC recipients, handlers, and conditional branches. When you click a step, its settings open on the right.
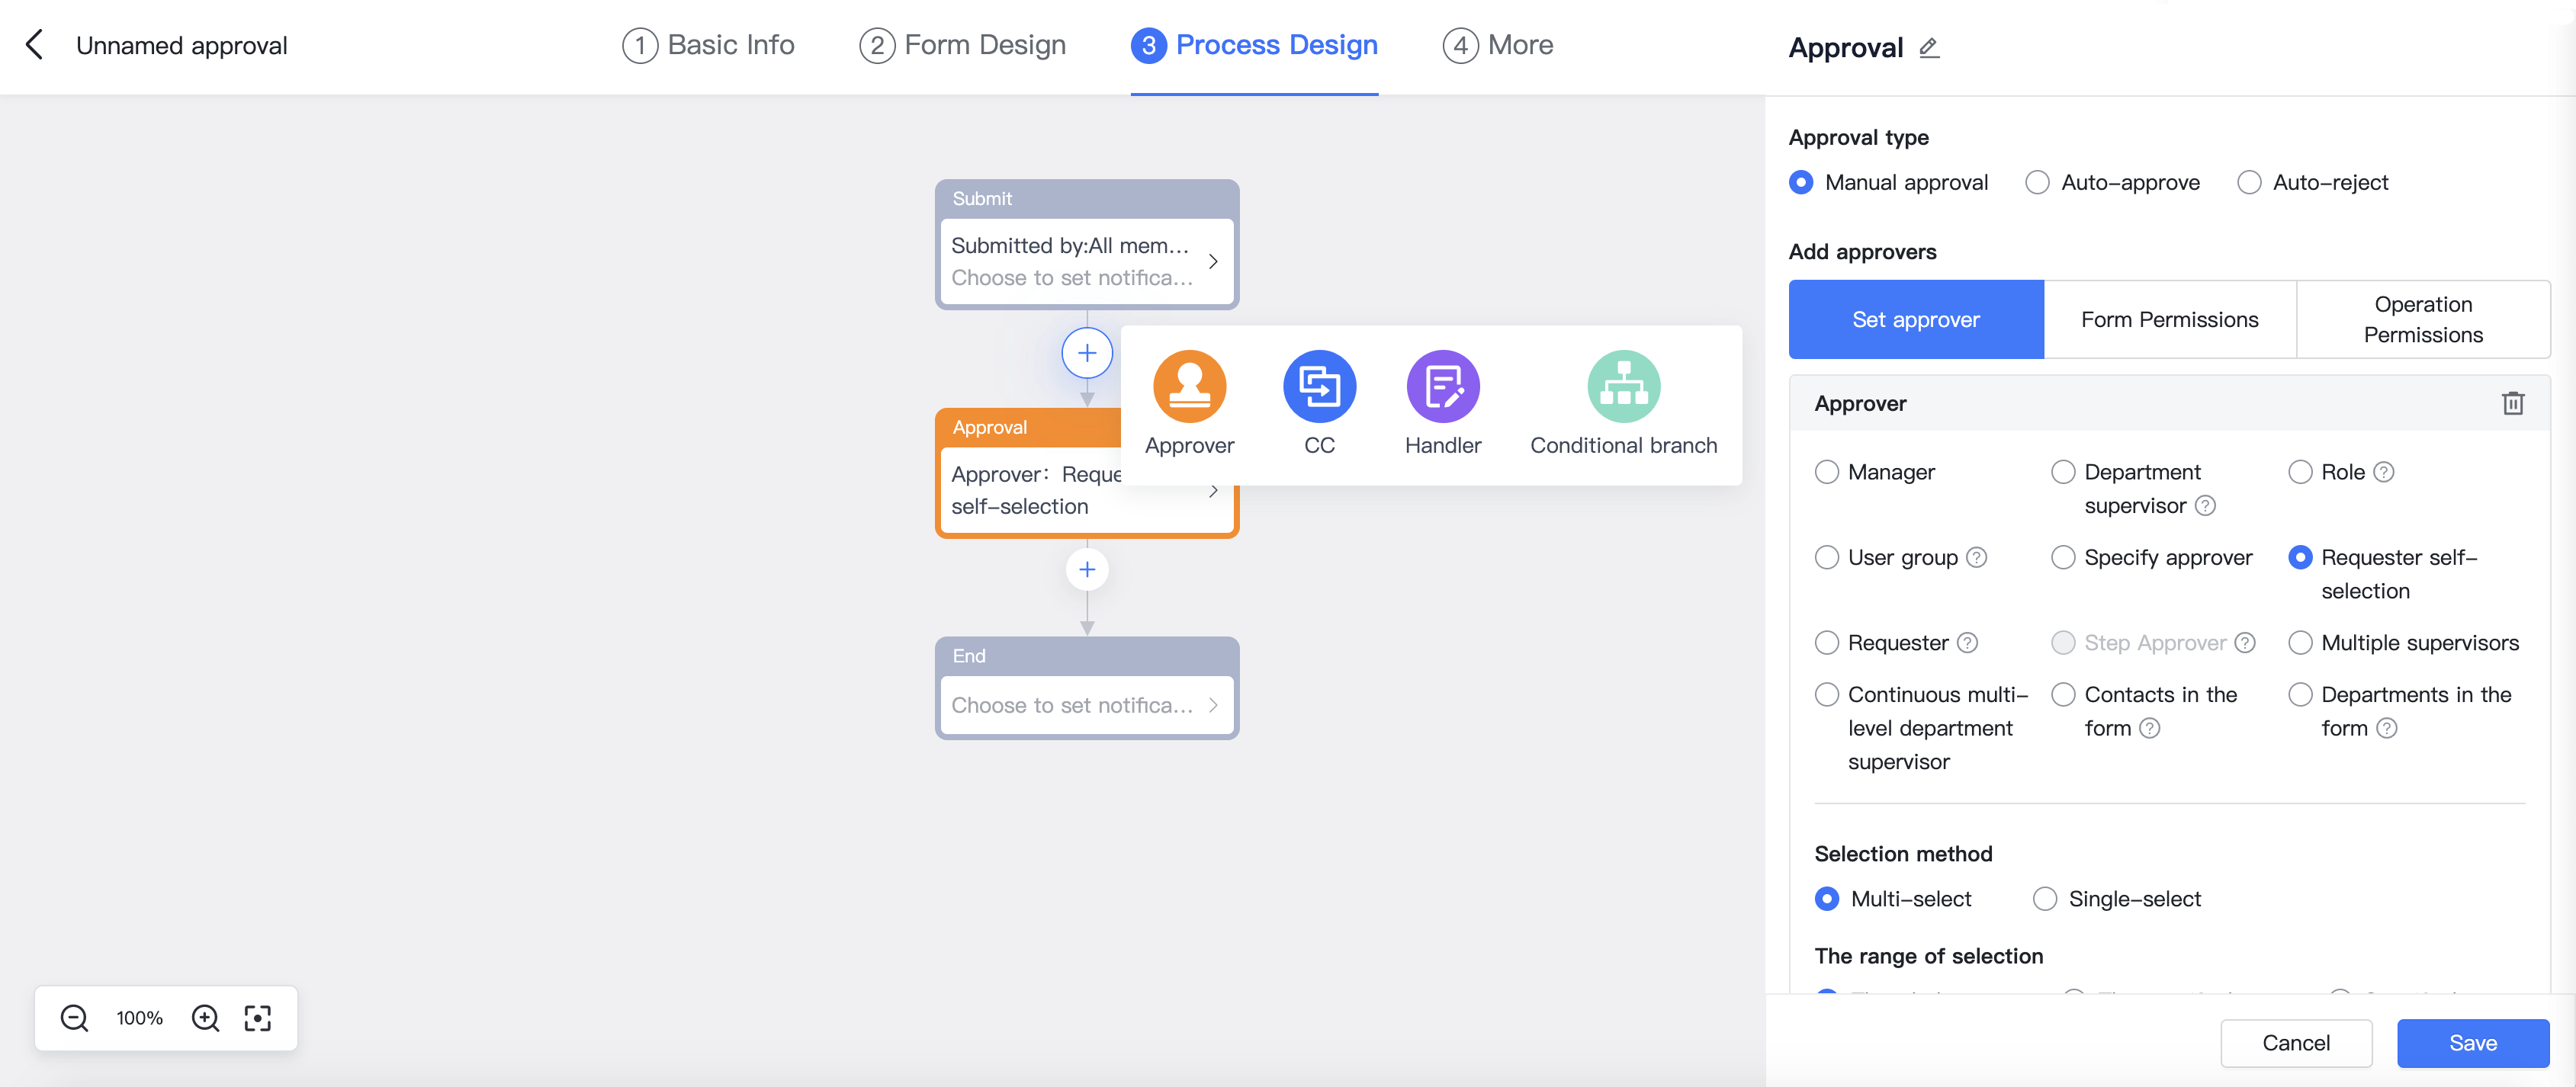
250px|700px|reset
4.2 Submit
Click the submit step to set the CC recipients and enable automatic CC notifications when a request is submitted.
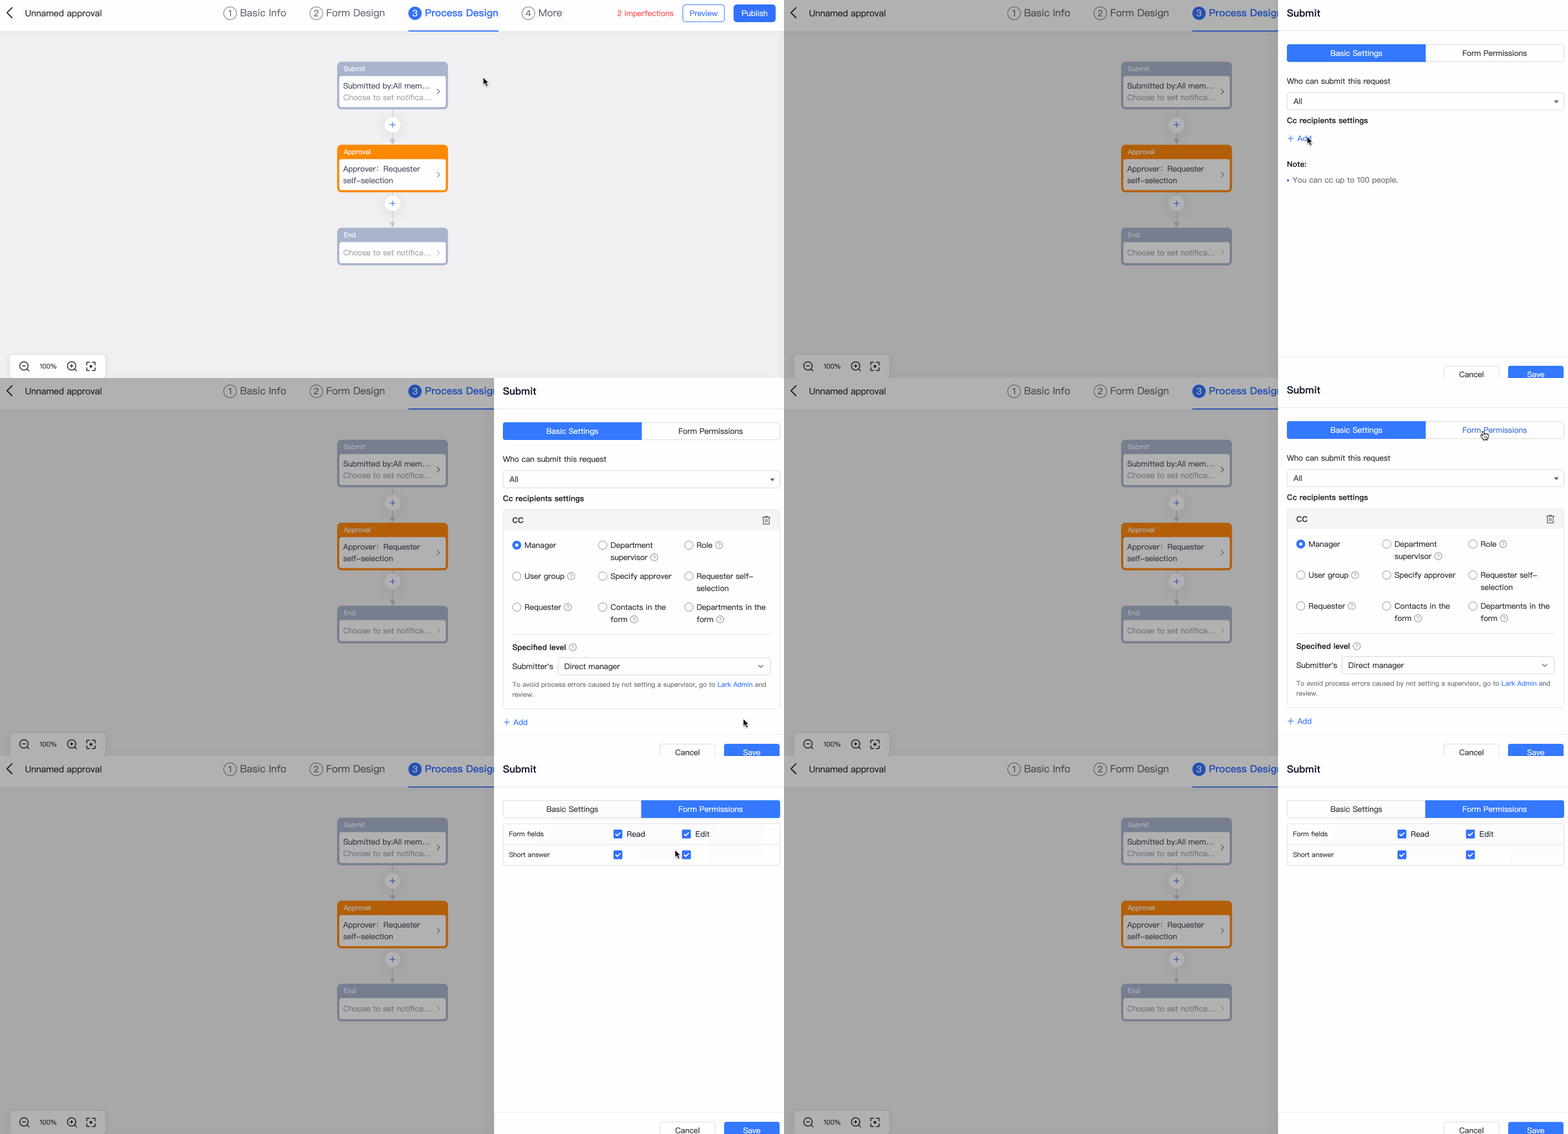
250px|700px|reset
Set CC recipients
Click Add CC recipient to choose how many recipients you want. You can set a maximum of 100 CC recipients.
See 4.4 CC recipient step - Set CC recipients below for CC recipient types
Form permissions
Set whether or not CC recipients have read or edit permissions for each field in the form in this step. These settings are mostly used in scenarios where there is a need to protect private information or where users can supplement information.
4.3 Approval
When you click the approval step, the settings open on the right. You can also click the + icon between the steps to add more approver steps to the process.
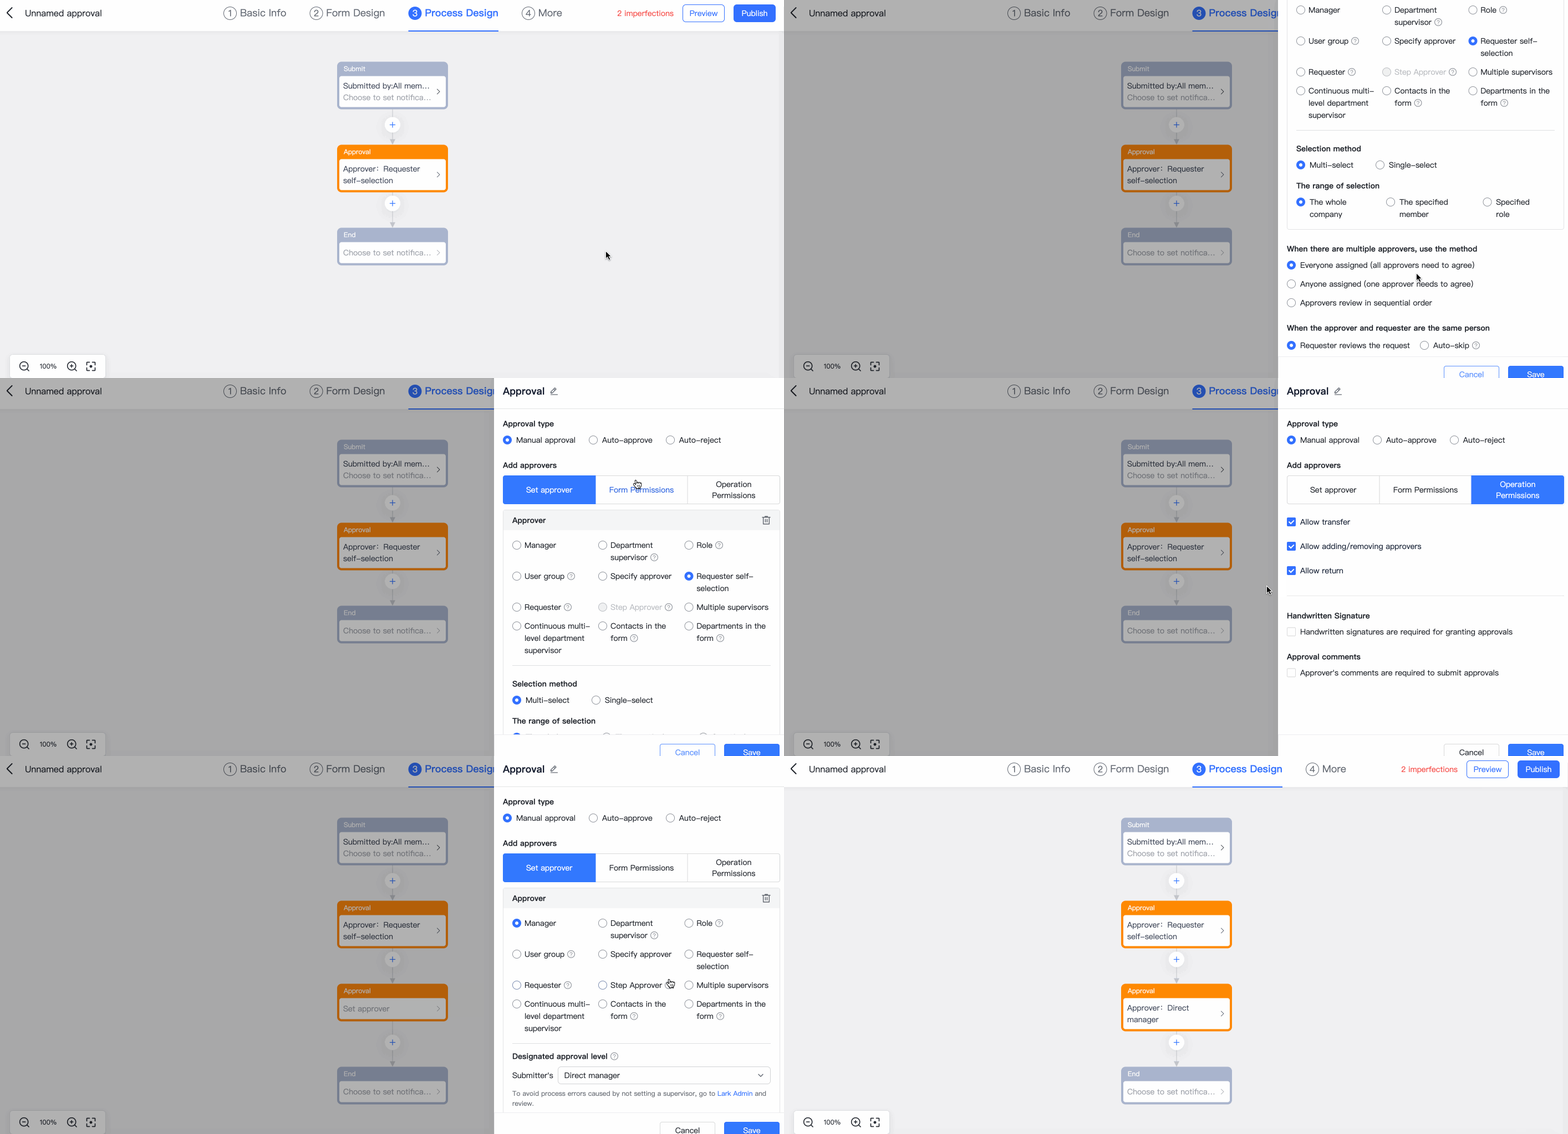
250px|700px|reset
Approval type
Set whether this step is a manual approval or automatically handled by the system.
Set approver
Set the person who will approve the step, and the rules for when there are multiple approvers or when the approver is empty.
Approver type
"When there multiple approvers, use the method"
Set rules for when there are multiple approvers because the approver is a role, user group, specified members, or similar.
"When approver is empty"
Sometimes there will not be a member mapped to the appropriate manager, department supervisor, role, or other type of specified approver category in Lark Admin. If this happens, the "when approver is empty" process will run.
Note: If the approver resigns, the request will automatically transfer to the approver's manager.
When the approver and applicant are the same person
Set transfer rules for when the approver and applicant happen to be the same person.
Note: If the same approver is duplicated in the flow, they will only be able to approve once by default. This can be edited in More settings (to learn more, see 5.2 Approver deduplication).
CC settings
Set CC recipients for the approval step. CC recipients will receive a notification once the step is completed.
Form permissions
Set whether or not approvers have read or edit permissions for each field in the form in this step. This setting is mostly used in scenarios where there is a need to protect private information or where users can supplement information.
Operation permissions
Set which actions an approver is able to take.
4.4 CC step
Click the + icon between the steps to add a CC recipient step to the flow. After adding the step, click the step to set the CC rules on the right.
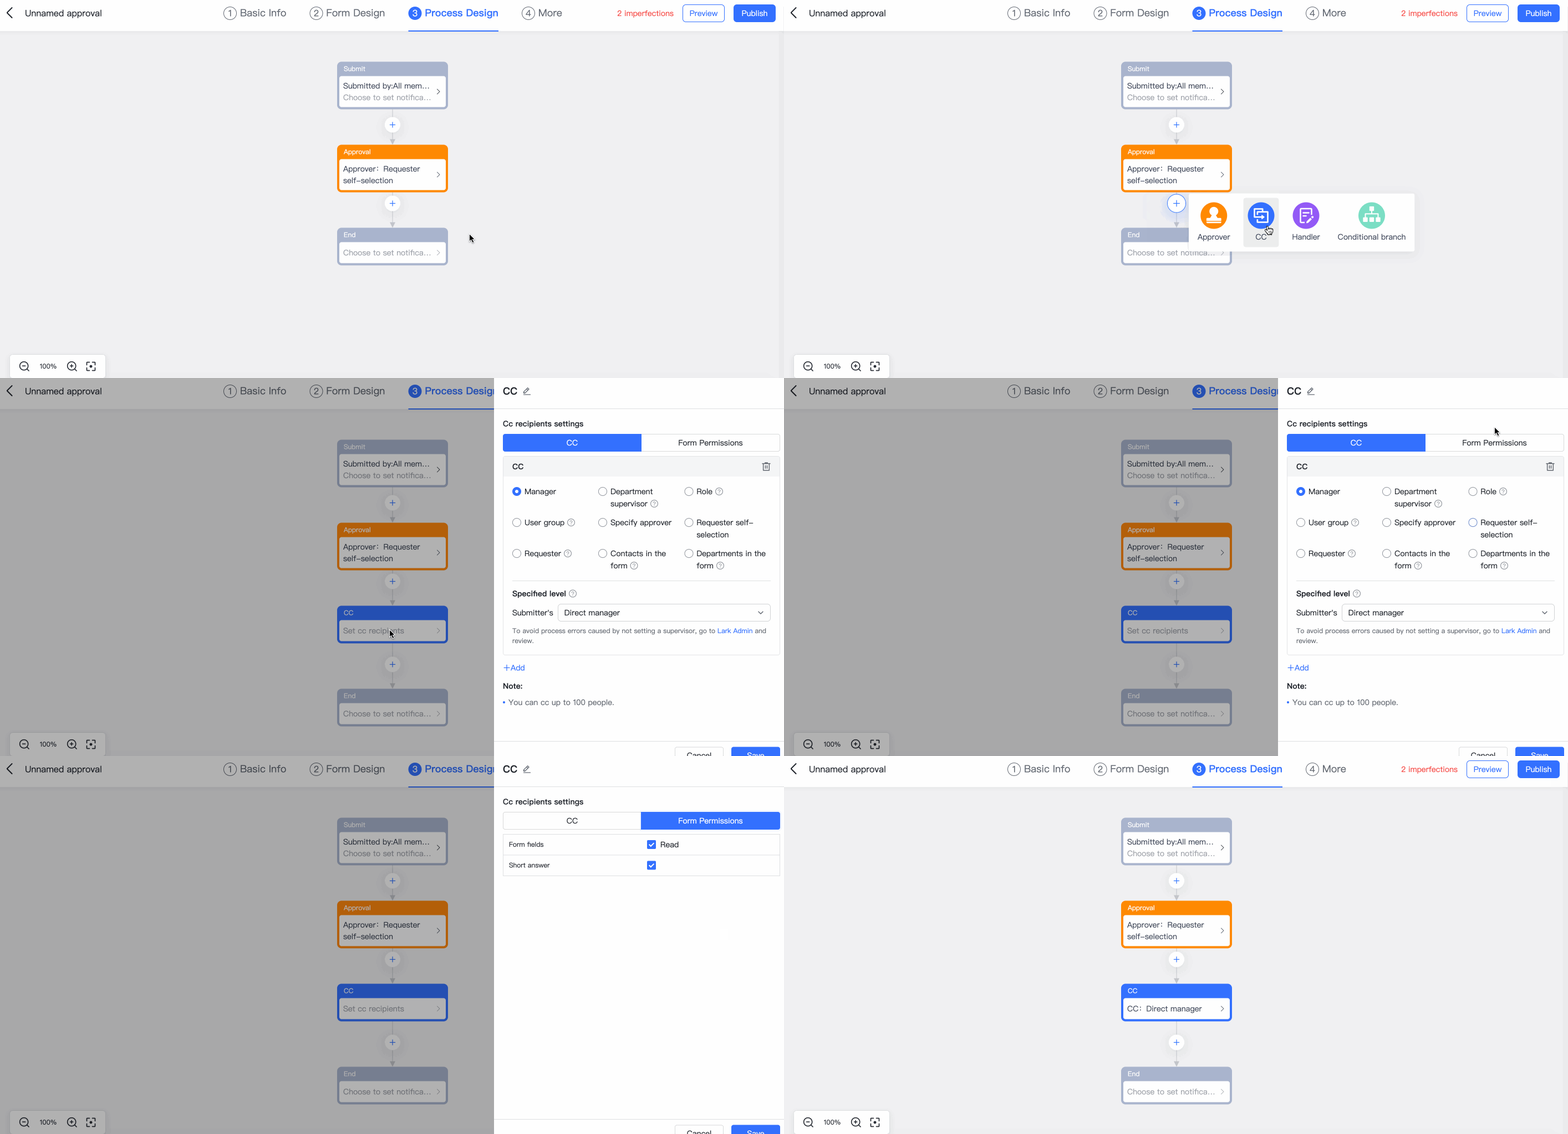
250px|700px|reset
Set CC recipients
Set the CC recipients for this step by clicking Add CC recipients. You can set a maximum of 100 CC recipients.
Form permissions
Set whether or not CC recipients have read permissions for each field in the form in this step. This setting is mostly used in scenarios where there is a need to protect private information.
4.5 Handler step
When a step in the flow does not require approval, but instead requires an administrative action, you can set up a handler step. Handler steps are suitable for scenarios such as transferring payments or processing seals.
Click the + icon between the steps to add a Handler step to the flow. After adding the step, click the step to set the handler rules on the right.
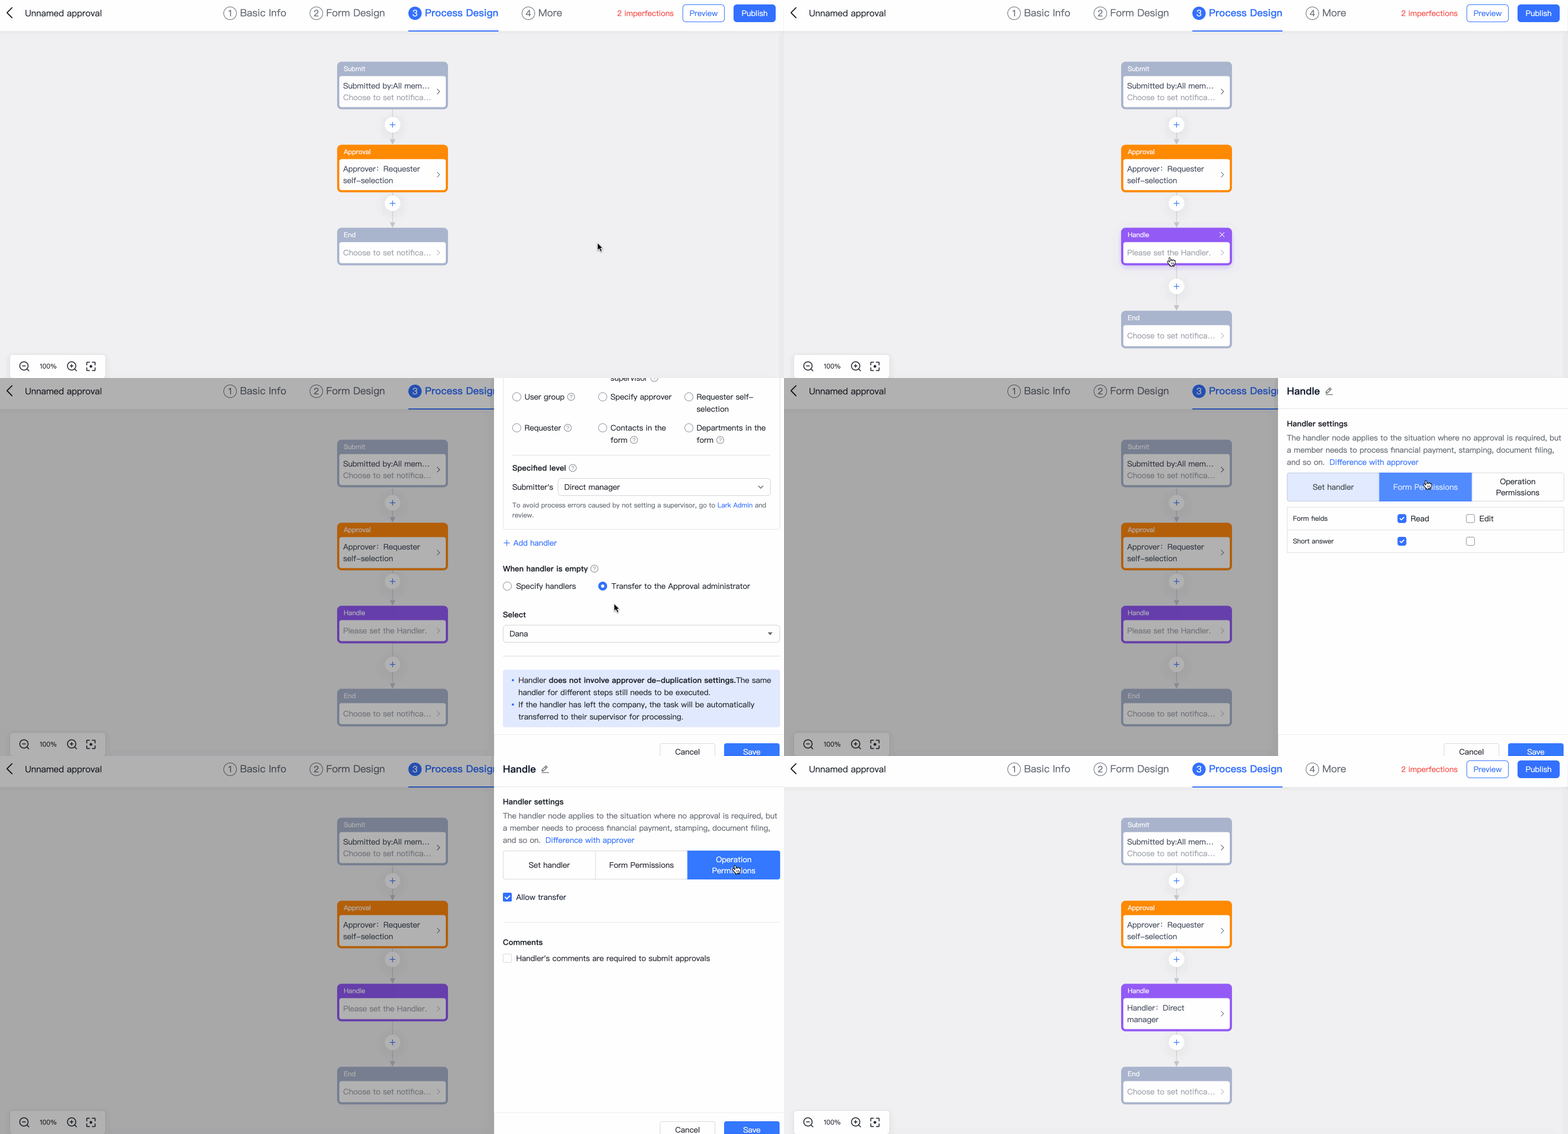
250px|700px|reset
Handler settings
Set the person who will handle the step, and the process rules for when there are multiple handlers or when the handler is empty.
Handler type
"When there are multiple handlers, use the method"
Set the handling rules for when there are multiple handlers because the handler is a role, user group, specified member, or similar.
When handler is empty
Sometimes there will not be a member mapped to the appropriate manager, department supervisor, role, or other type of specified handler category in the Lark Admin Console. If this happens, the "when handler is empty" process will run.
Note:
- If the handler resigns, the request will automatically transfer to the handler's manager.
- Handlers are not included in the deduplication process. Regardless of whether or not you have set up approver deduplication rules, if there is the same handler for multiple steps, they will need to process each step.
Form permissions
Set whether or not handlers have read or edit permissions for each field in the form in this step. This setting is mostly used in scenarios where there is a need to protect private information or where users can supplement information.
Operation permissions
Set which actions a handler is able to take in the flow for this step.
4.6. Conditional branches
Conditional branches allow the flow to proceed in different manners when various conditions are met. For example, if a requested period of leave's duration is shorter than 2 days, the flow will proceed along Branch A and the request only needs to be approved by the team manager; however, if the duration is longer than 2 days, the flow will proceed along Branch B and the request needs to be approved by the team manager and department HR.
Click the + symbol between steps to add a conditional branch, then click the conditional branch step to set rules for the condition. You can click Add condition in the flow to add further branches.
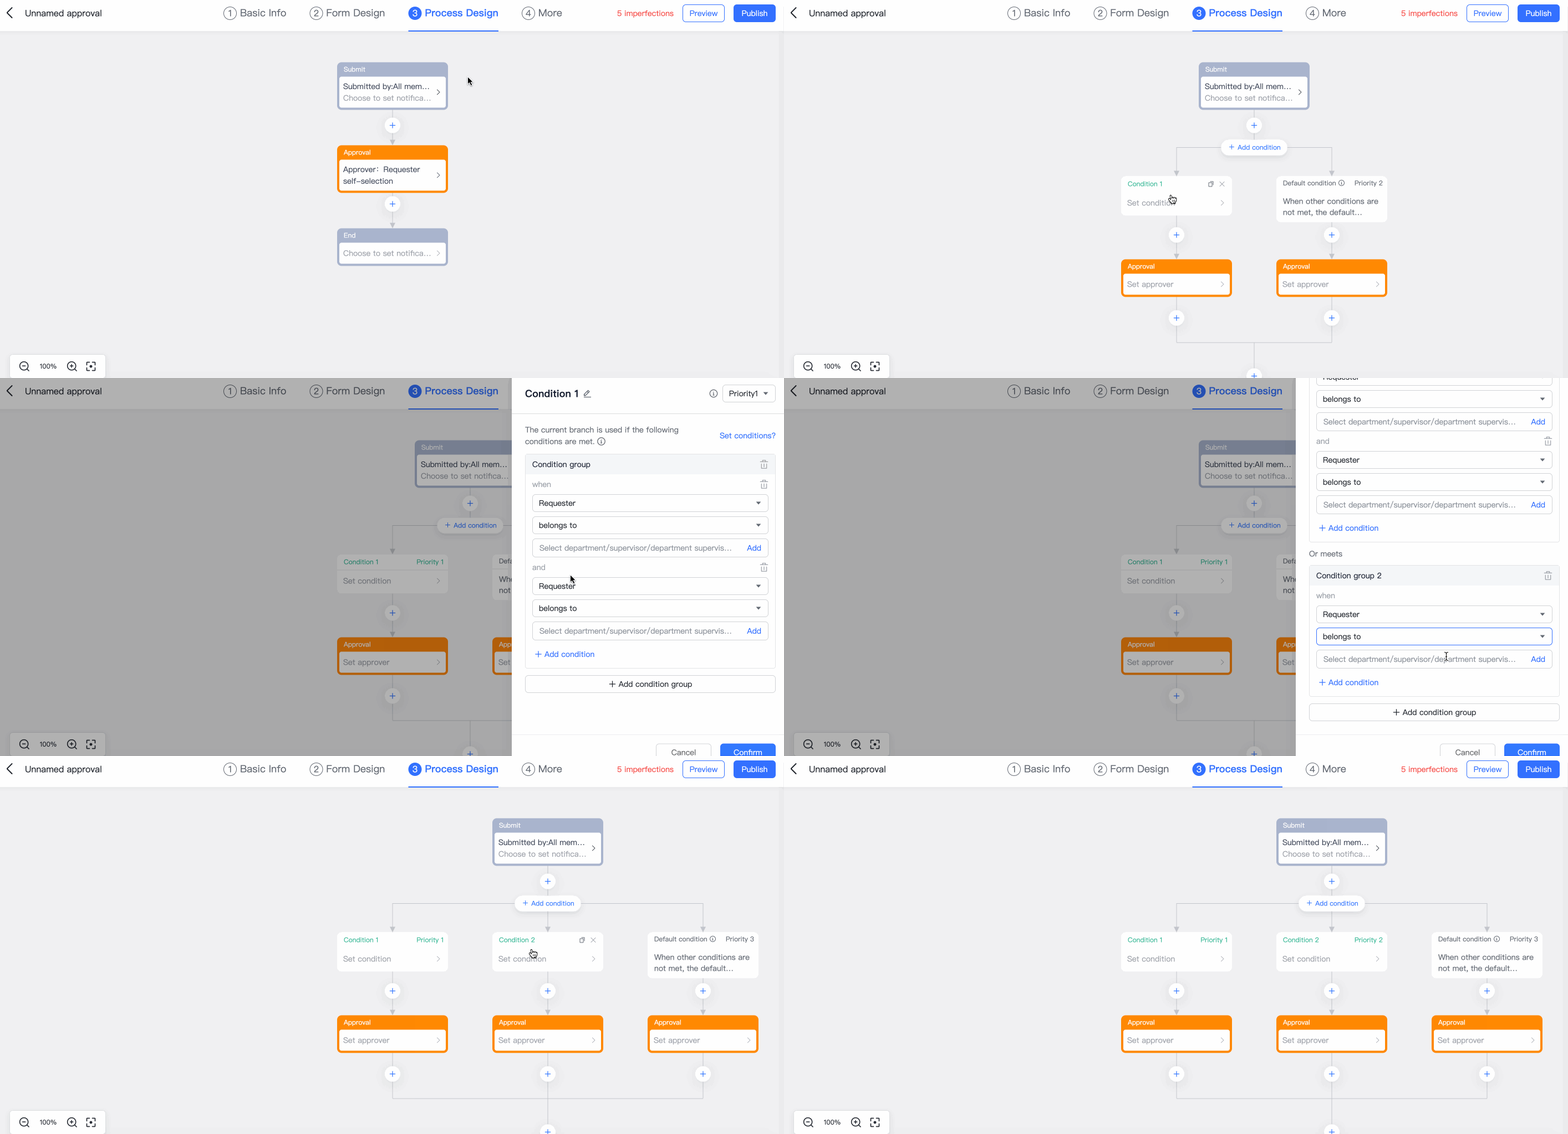
250px|700px|reset
Condition settings
Set the condition rules in the condition settings frame on the right. Click Add Condition to add multiple conditions to the same condition group with an "and" relationship. This means that all conditions must be satisfied simultaneously in order for that condition group to take effect.
Condition group settings
Click Add condition group to add another condition group The relationship between different condition groups is "or." This means that only one of the condition groups needs to be satisfied.
4.7 End step
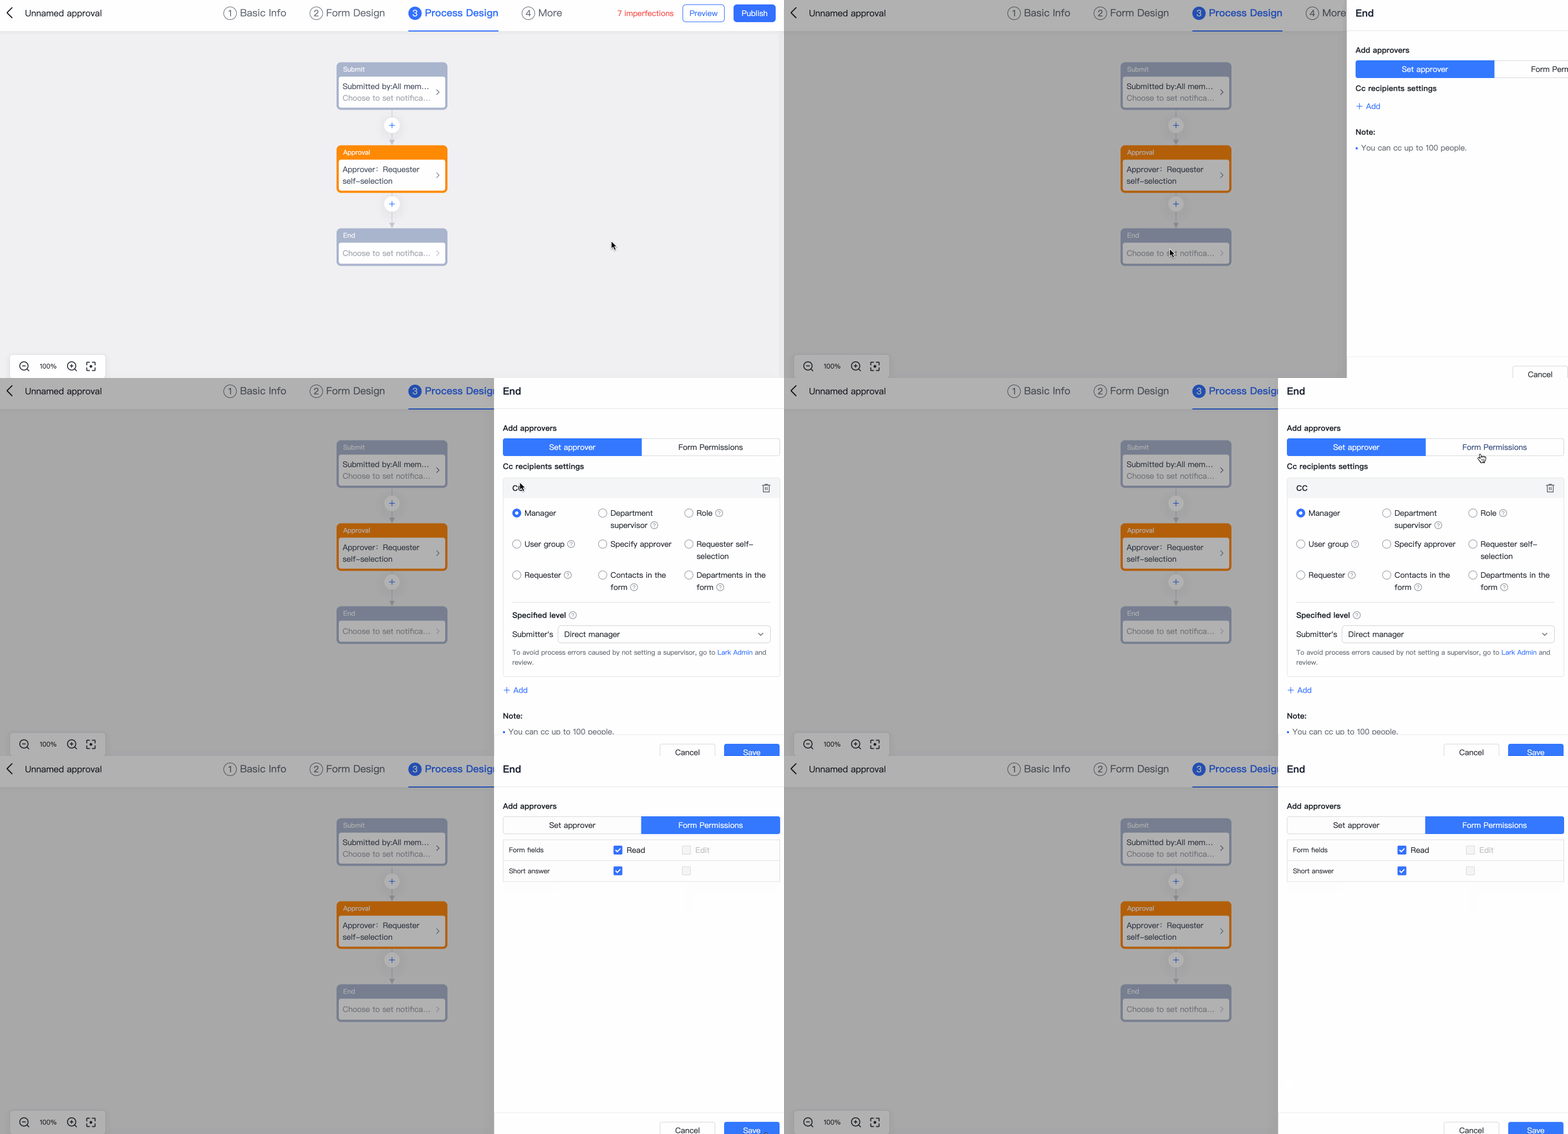
Click the end step to set the end step's CC recipients and enable automatic CC notifications when a request is closed.
250px|700px|reset
Set CC recipients
Click Add CC recipient. You can set a maximum of 100 CC recipients.
See 4.4 CC recipient step - Set CC recipients above for CC recipient types
Form permissions
Set whether or not CC recipients have read or edit permissions for each field in the form in this step. This setting is mostly used in scenarios where there is a need to protect private information or where users can supplement information.
- More
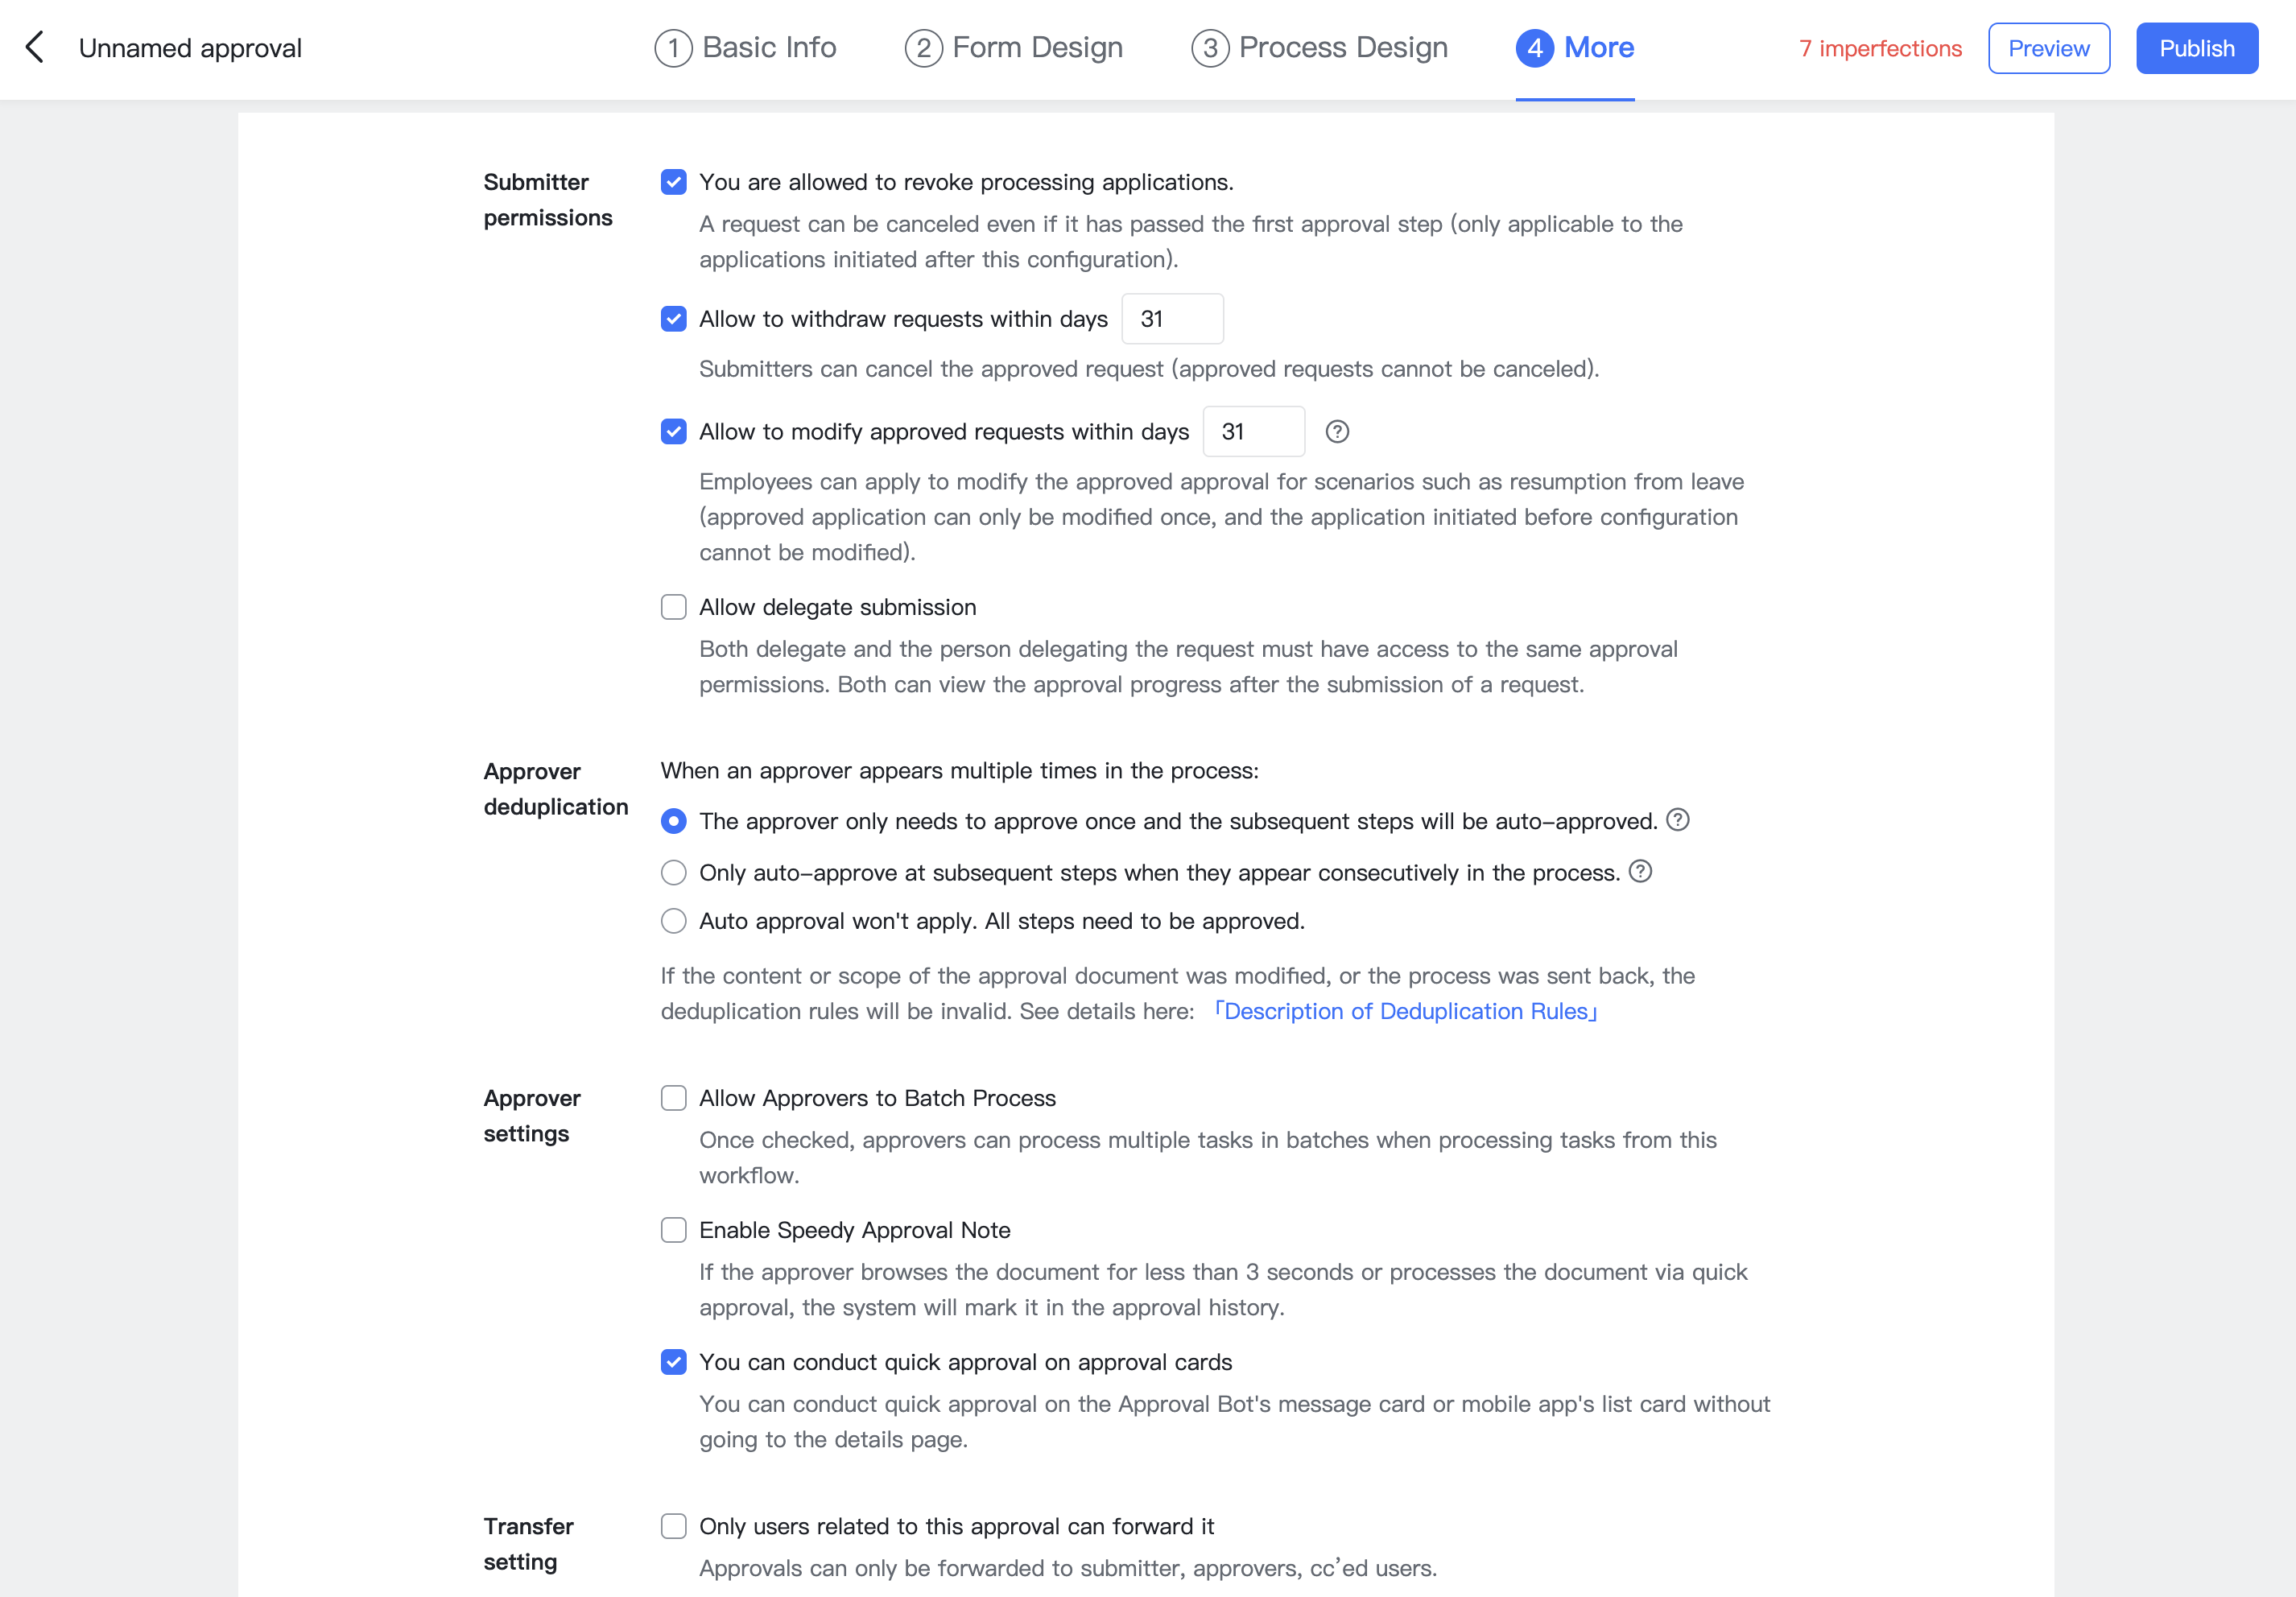
Set submitter permissions, approver deduplication, transfer settings, and more.
250px|700px|reset
5.1 Submitter permissions
Set whether or not submitters are allowed to withdraw or edit their requests, and more.
5.2. Approver deduplication
Set whether or not an approver that appears repeatedly in the same process needs to manually approve the request more than once.
Note:
- Deduplication rules will not apply if there are changes in the approval form's content or review scope or if the approval flow is sent back mid-flow. Learn more about approver deduplication
- Handlers are not involved in the deduplication process. Regardless of whether or not you have set up approver deduplication rules, if there is the same handler for multiple steps, then they will need to process each step.
5.3. Approver settings
Set up the rules that are relevant to approvers, such as batch approvals, instant approvals, and speedy approvals.
Note: Handler steps do not support batch operations, instant tips, or speedy approval.
5.4 Transfer settings
Set whether or not to restrict the transfer scope of the request. This is used in scenarios involving confidential information.
II. More management actions
- Data management
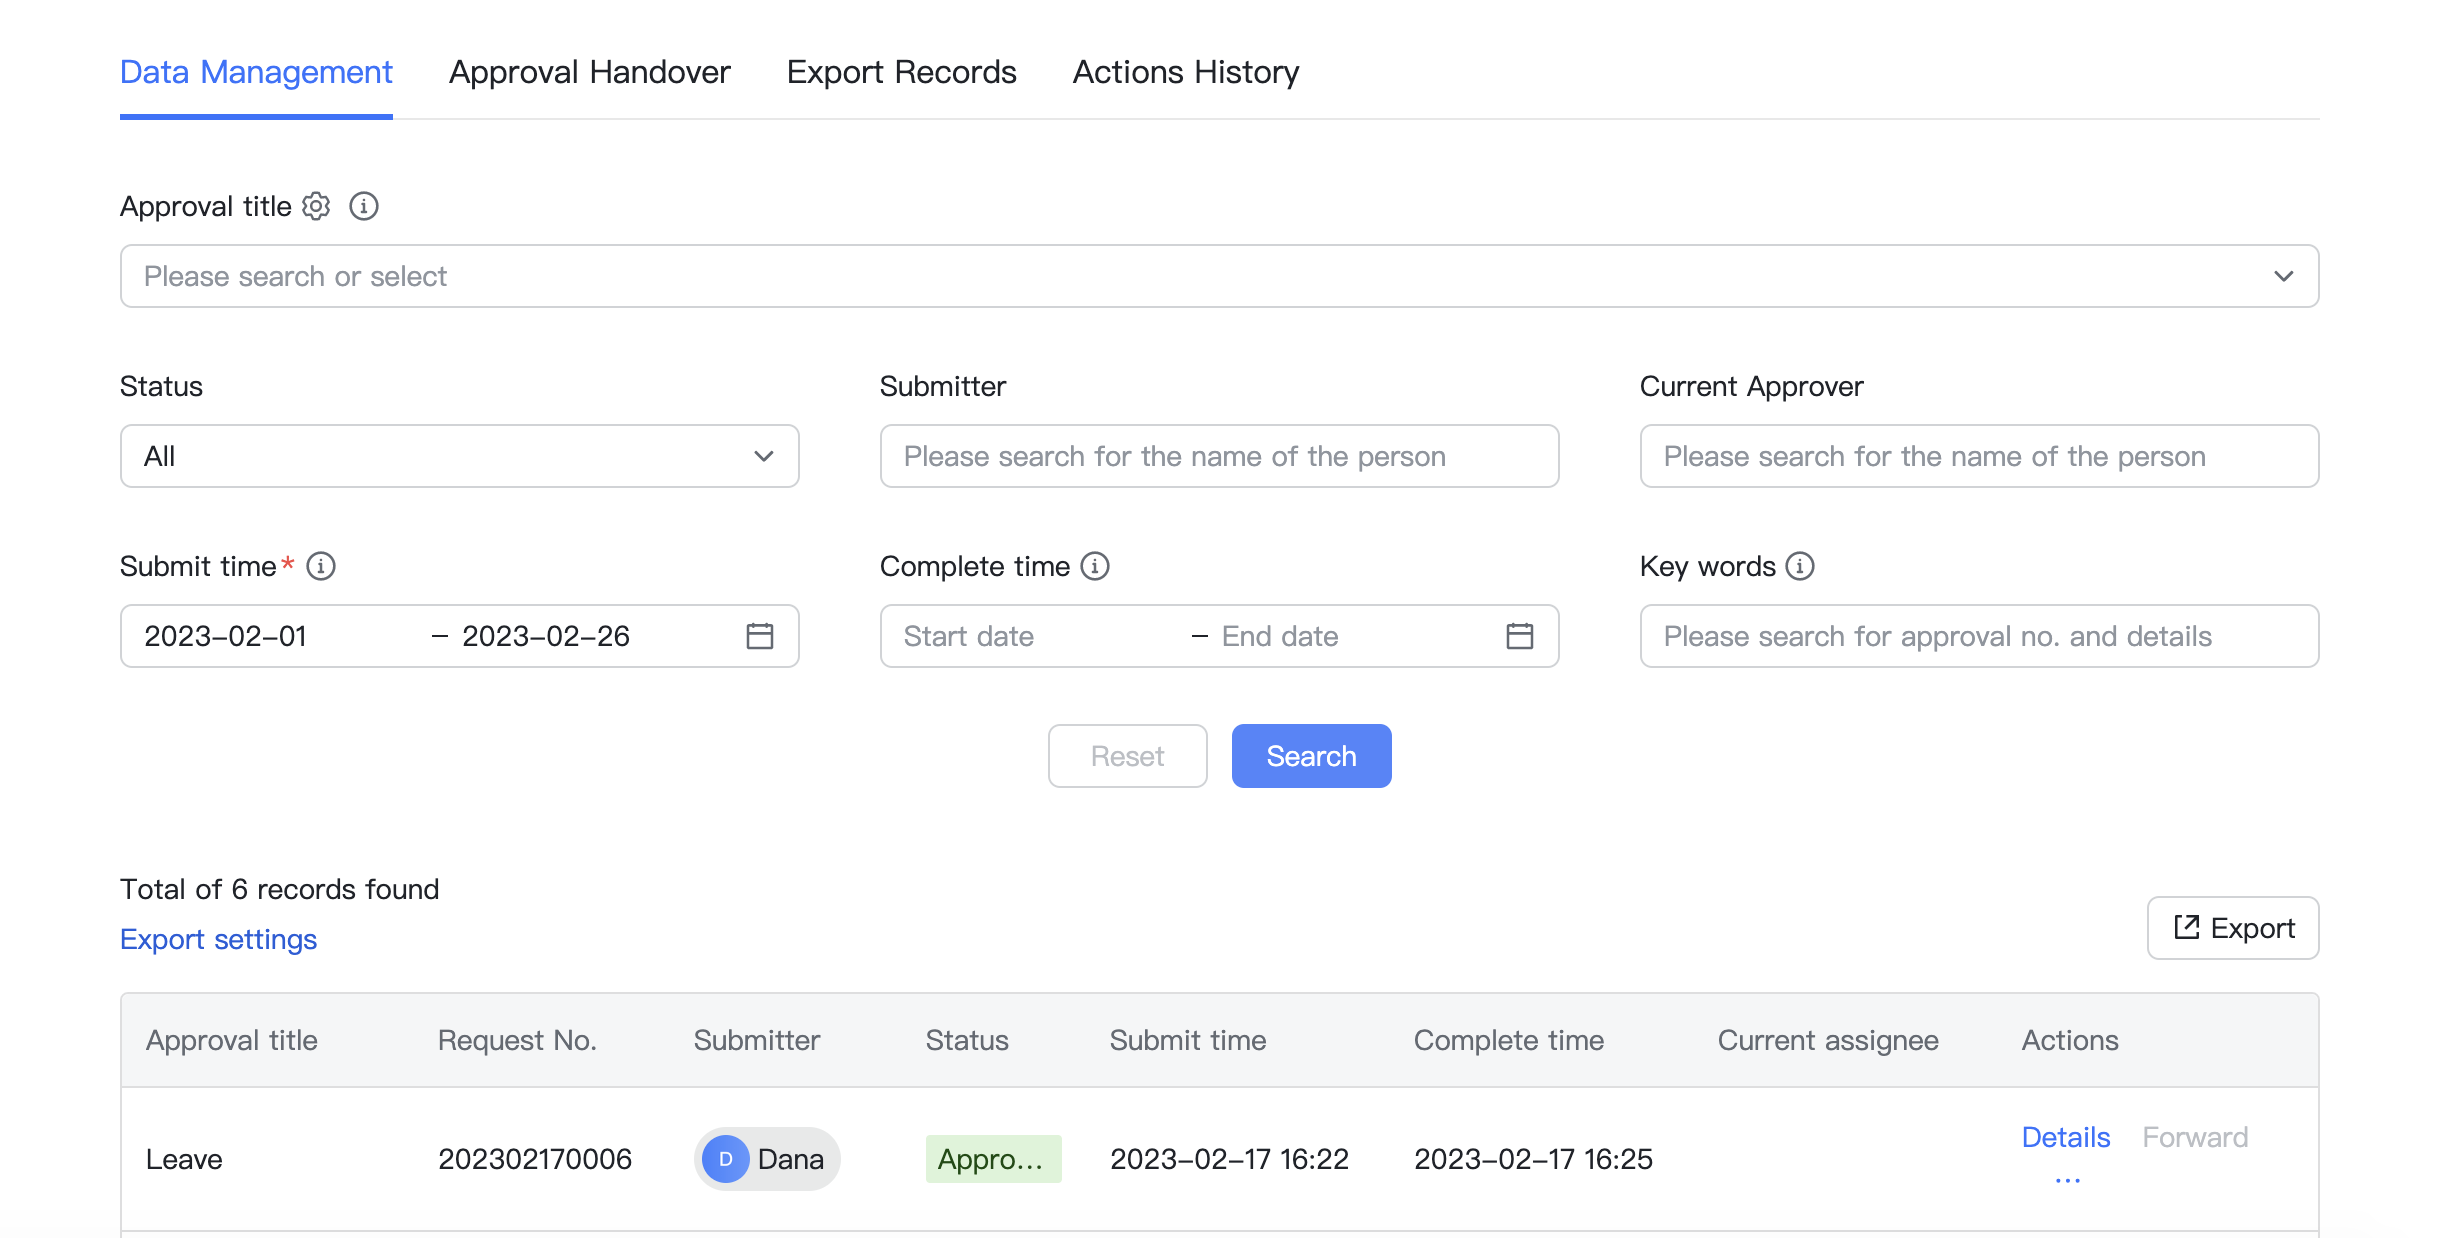
You can query, export, and forward approval history on the Approval Admin > Data Management page.
1.1 Data management
Enter filter conditions and click Search to query approval history. You can review record details and forward, delete, and export data.
Note:
- Currently only forms created in Lark Approval can be queried and there is no support for third-party forms.
- Submit time is a required filter condition and the current month is pre-selected by default but can be edited as needed; the maximum period of time which can be queried in the submit time or complete time fields is one year, so you will need to run multiple queries if you need to find information that covers a longer period.
- Keyword and approver queries cannot run at the same time.
250px|700px|reset
1.2 Approval handover
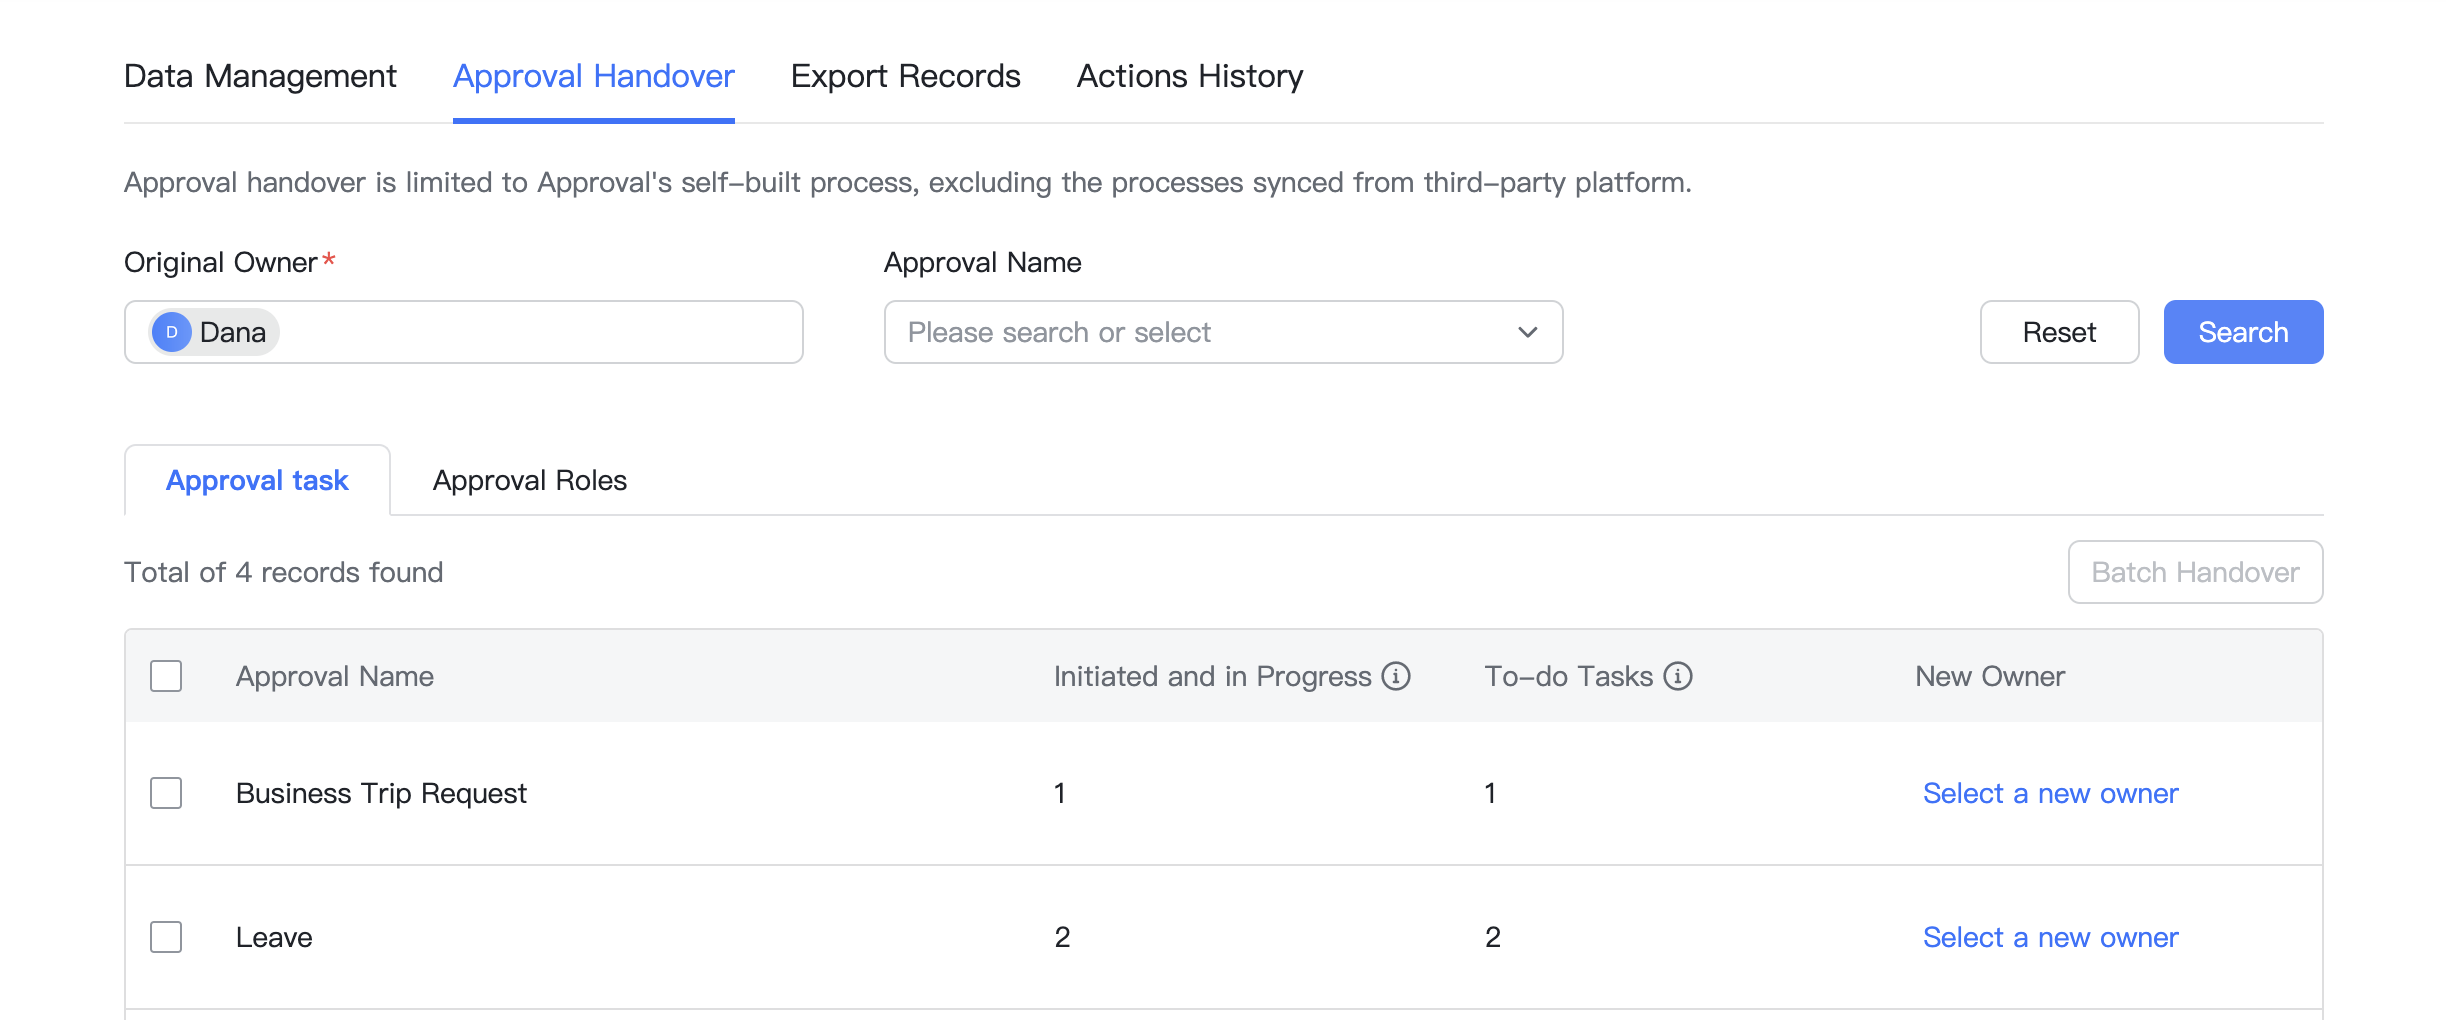
Enter filter conditions and click Search to query approval history for handovers. Approval tasks and approval roles can be handed over separately.
Approval task: Hand over approval tasks to another person. Click Select a new owner and enter the name of the new owner of the task and the reason for the handover.
Approval Roles: Hand over roles such as administrator, approver, or CC recipient roles to another person. Click Go to go to the corresponding edit page.
Note:
- Currently only forms created in Lark Approval can be handed over and there is no support for third-party forms.
- The new owner is a required filter condition.
250px|700px|reset
1.3 Export records
All export operations performed through the Data Management page will be recorded under Export Records. You can also download the data.

250px|700px|reset
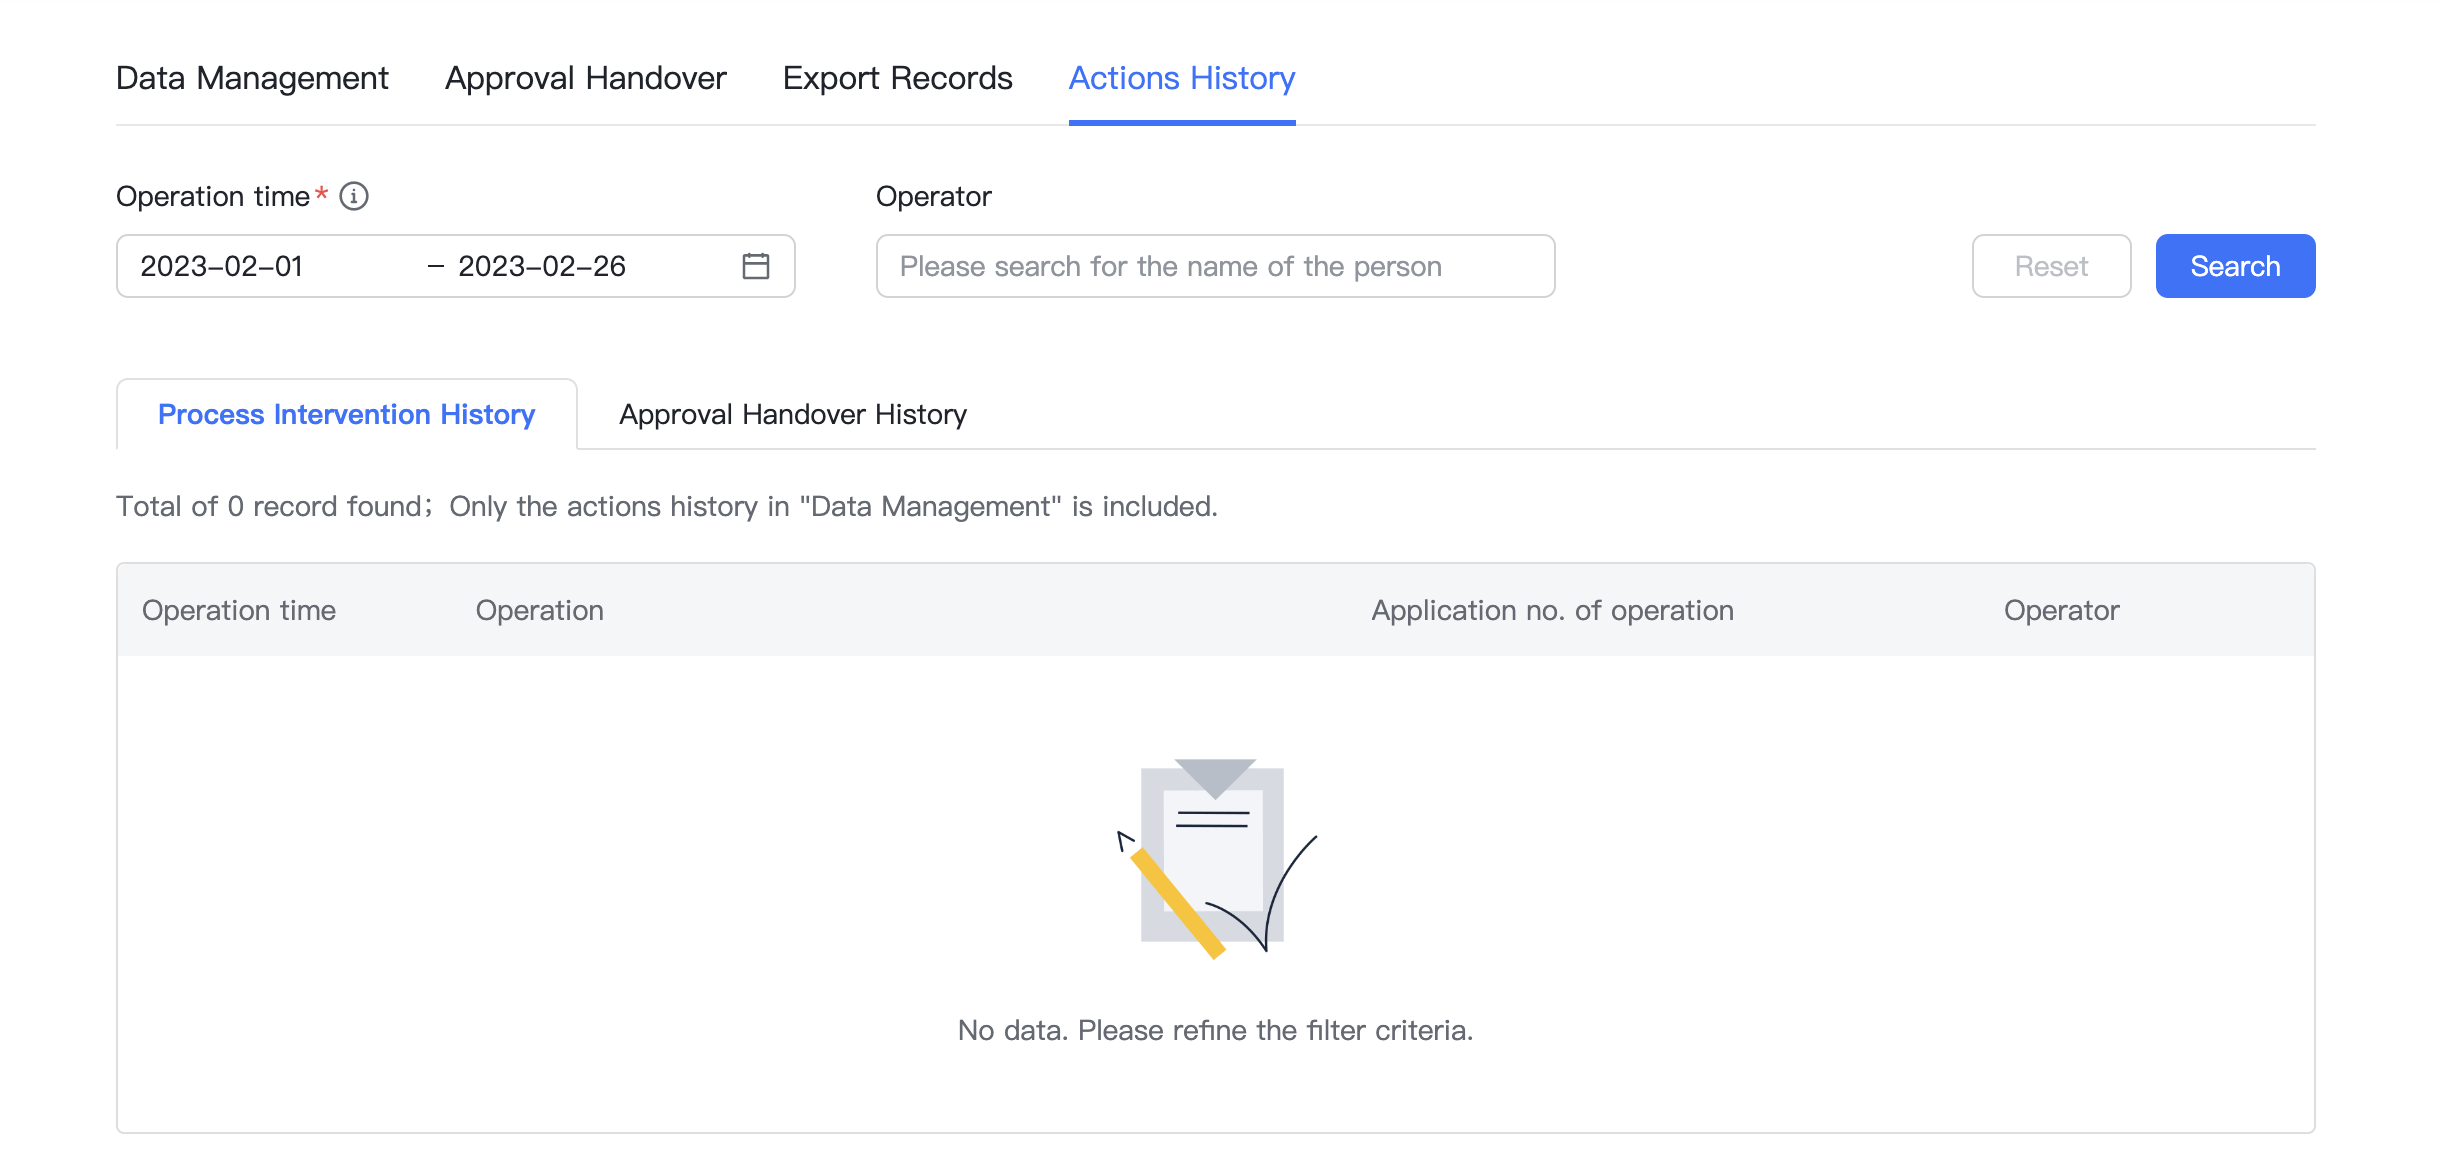
1.4 Actions history
Enter filter conditions and click Search to query the activity log for data management and approval handovers.
Process Intervention History: The activity log of all handovers, deletions, and other actions taken on the Data Management page.
Approval Handover History: The history of all task and role handovers performed on the Approval Handover page.
250px|700px|reset
- Recommended configuration
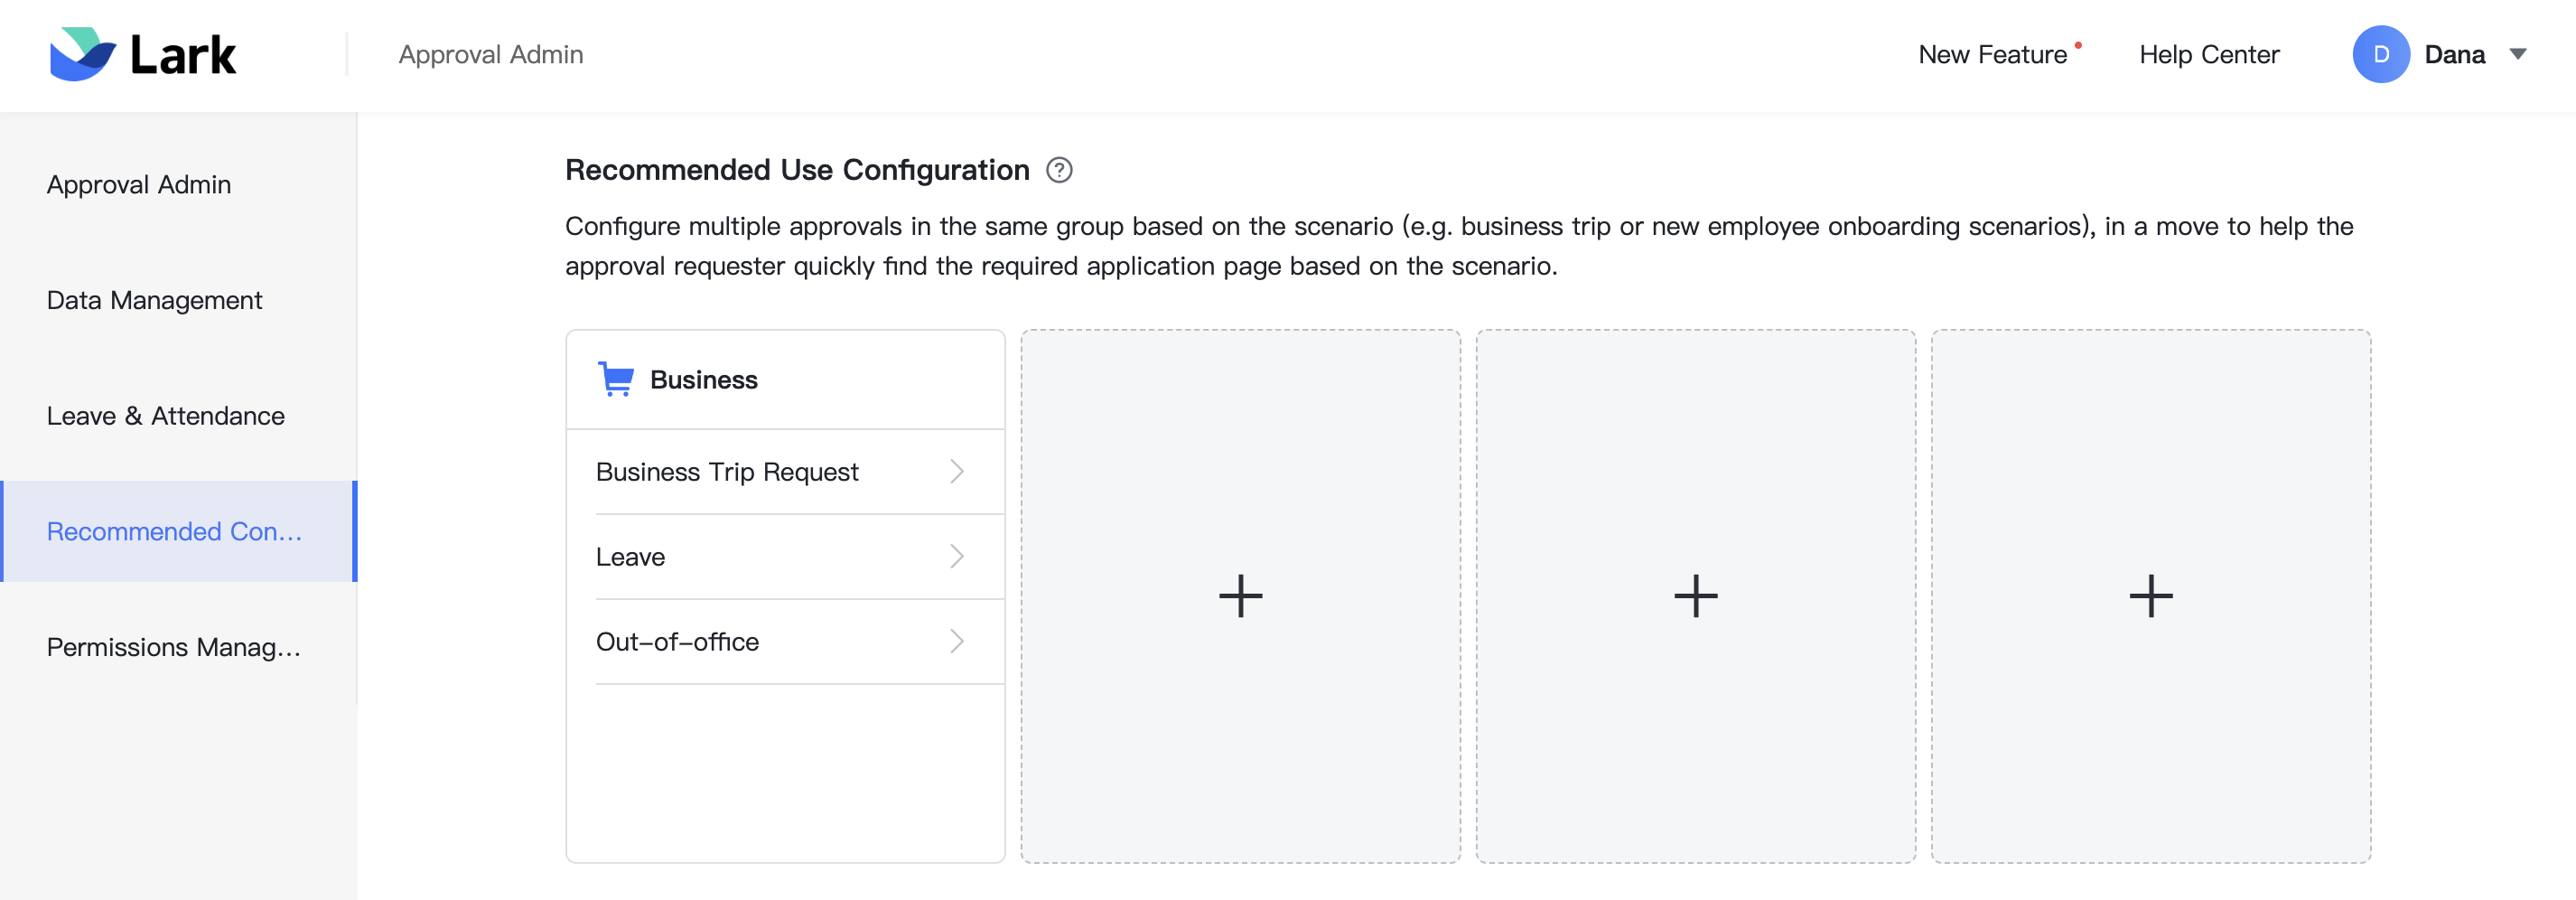
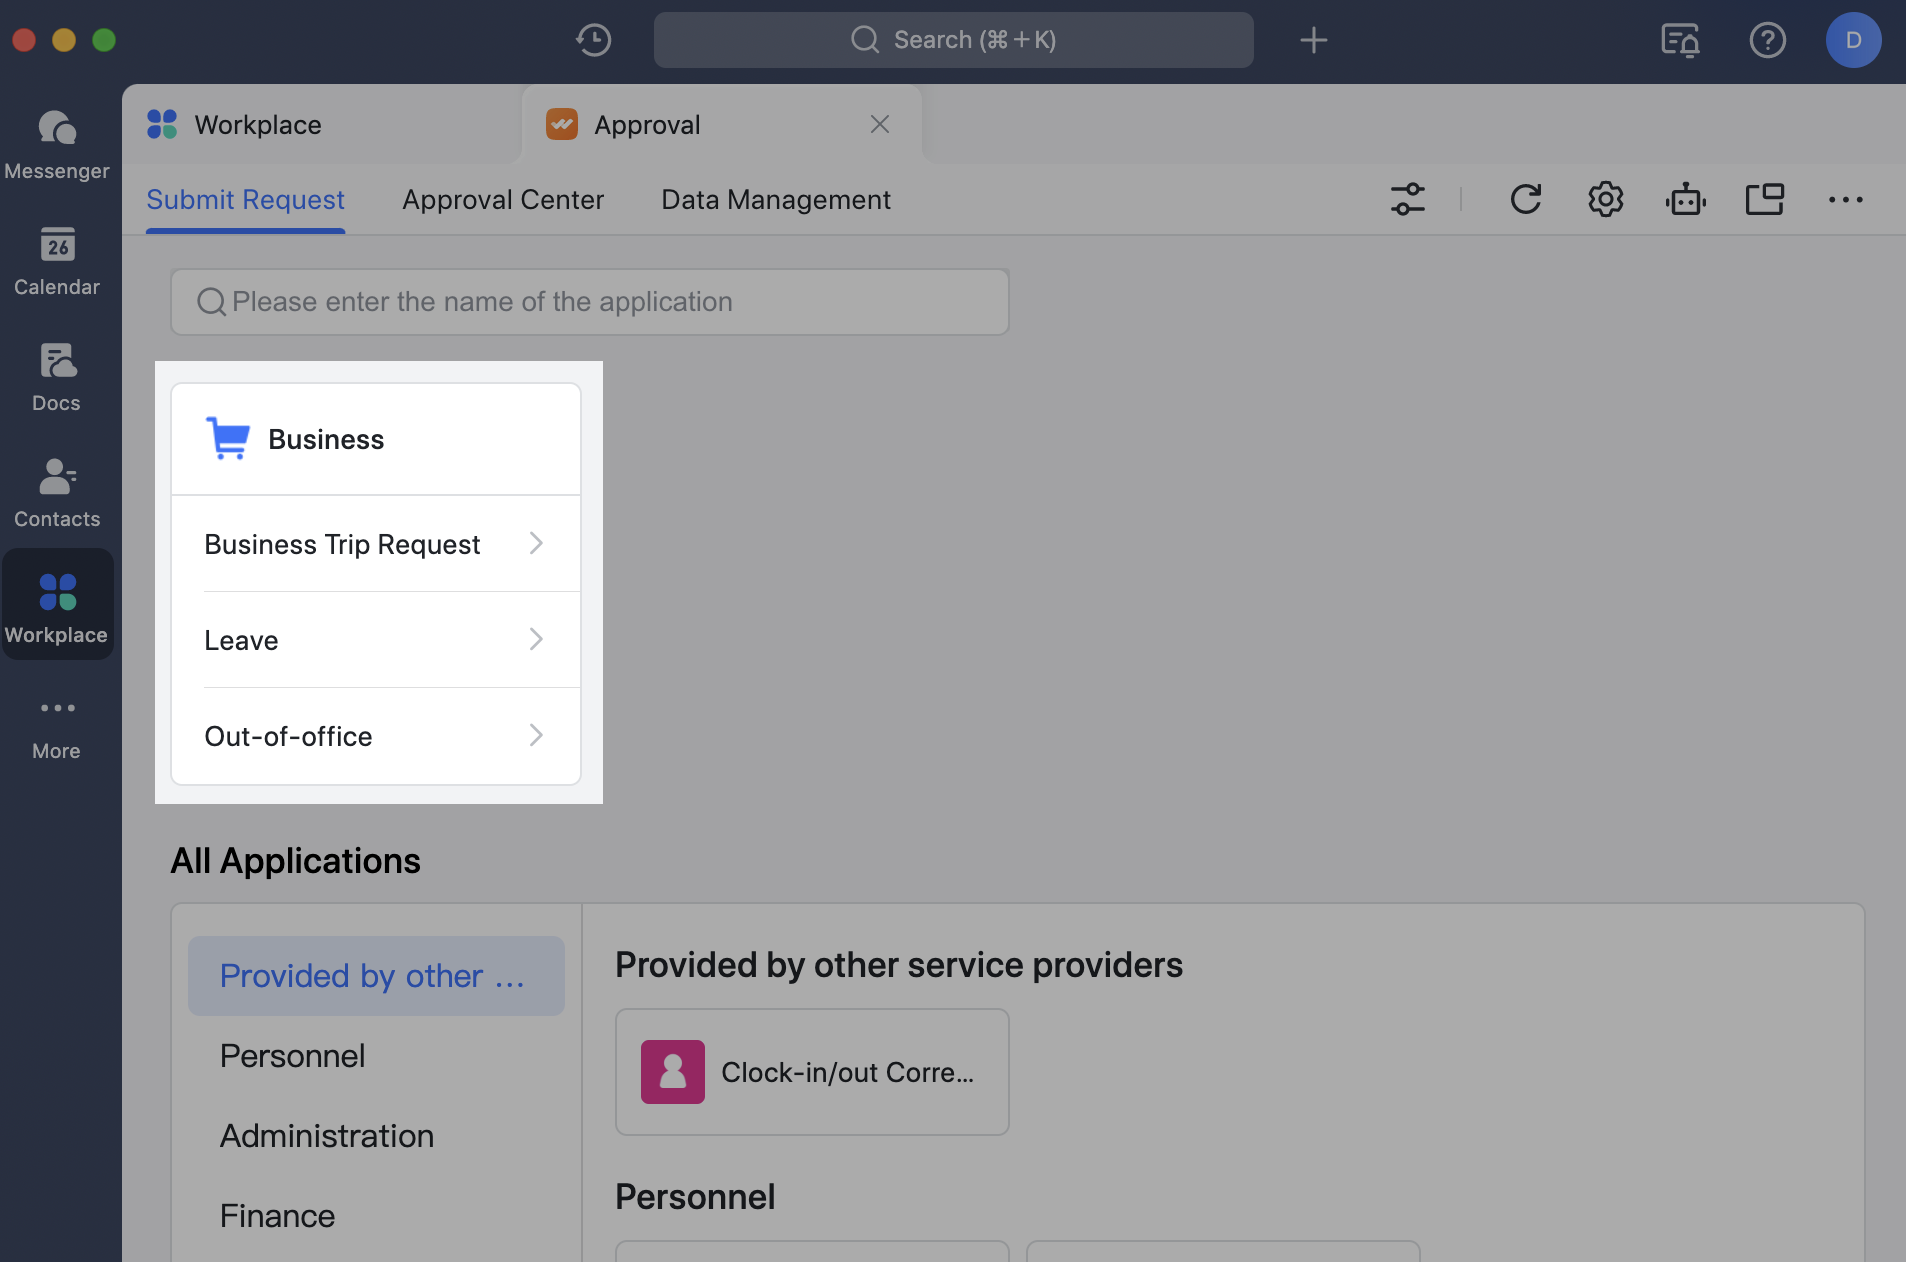
On the Approval Admin > Recommended Configuration page, click + to configure multiple approvals in the same group based on scenarios (for example: business trip scenario, new hire scenario). Submitters will then be able to quickly find the request portal at the top of the Submit page in the Approval app.
250px|700px|reset
250px|700px|reset
- Permission settings
There are three admin roles in the Approval app: organization administrator, Approval app administrator, and Approval sub-administrator.
- Organization Administrator/Approval App Administrator
You can set the primary administrator and administrator with Approval app administrator permissions in Lark Admin Console > Administrator Permissions. The approval permission scope is the same for these two kinds of administrators, and both have full administrator permissions for Approval.
To add, edit, or delete either of these two administrators, you will need to go to Lark Admin Console > Administrator Permissions.
- Approval Sub-administrator
Add sub-administrators in Approval Admin > Permission settings. These administrators will only be able to take action onn approvals within their permission scopes.
Organization administrators and Approval app administrators can add, edit, and delete sub-administrators in Approval Admin > Permission settings.
III. Open capability
You can push the approval tasks of external systems (organizations' self-developed systems or systems procured from third parties) to the Lark Approval app.
Approval tasks can reach users in real time cross-platform (PCs, mobile phones, tablets), and can be opened using Lark Approval's embedded forms. Lark Approval is an all-in-one approval experience that allows users to uniformly view and process all approvals, while also integrating features such as dialog box message pushes, one-click chat forwarding, daily to-do notifications, and efficient Kanban dashboards.
- API self-service access
Organization development teams and third-party technology partners can use the open capability of Lark Approval to link the Approval center to a third-party OA system and enable Lark's one-stop Approval functionality.
- In-app approval workflow integration
There's no need to build a stand-alone in-app approval workflow for third-party apps provided by Lark app ISPs which have approval workflows (for example: the in-app approval workflows for leave or corrections in the Attendance app). In these cases, you can simply call the Approval API, reducing development costs and improving the user experience.
IV. FAQs
V. Version updates
